The Deephaven Server Installation Guide
This document details the steps to installing Deephaven v1. 20200121.
Overview
Installation from a base system starts with designating server roles (described in Planning the Installation), installing prerequisites, installing the Deephaven binaries, and configuring Deephaven services on each node based on the decided roles.
Deephaven uses etcd to persist and distribute configuration data across servers. In test installations, a single node can run all Deephaven services and the sole etcd instance; this provides no resilience or high availability, but it makes for a simple installation for test/dev/evaluation use. Production installations should have a quorum of at least three nodes running etcd. This provides fault detection and fault tolerance in case one node should fail.
System Requirements
Deephaven requires a Linux variant OS for the server nodes. Clients, and some remote services, like data loggers, can run on a variety of operating systems, including OSX and Windows, but the server installations need to be Linux, such as:
- CentOS or RHEL 7 or later
- OpenSUSE Tumbleweed
At least one server should have high speed storage locally attached for data import and streaming data. All query servers should have shared storage, such as NFS, for shared access to historical data.
Deephaven can be installed on a Linux server or virtual machine.
Minimum Hardware Requirements
|
Processor: |
x86_64 (64-bit) |
|
RAM: |
128 GB minimum, 512 GB preferred |
|
Intraday Data |
Mount: /db/Intraday Size: Sized for several days of the data set. Type: Low-latency direct attached; SSD is usually ideal. Needed on server(s) running the Data Import Server (DIS) process or batch import processes. |
|
Historical Data |
Mount: /db/Systems Size: Depends on the size of the historical data set. Type: Network attached storage shareable between query servers (i.e., NFS). |
|
Binary Log Data |
Mount: /var/log/deephaven/binlogs Size: Sufficient to store at least a day's streamed data. Type: Low-latency direct attached; SSD is usually ideal. Needed on server(s) running logger and tailer processes. Deephaven services also generate binary logs for internal monitoring. |
|
Process Log Files |
Mount: /var/log/deephaven other than binlogs Size: Sufficient for a minimum of a week's log files. Type: Locally attached disk. Needed on all Deephaven servers. |
|
Operating System: |
CentOS/RHEL version 7.x or greater OpenSUSE Tumbleweed |
Regarding System RAM
Deephaven connections — either from users/applications interactively executing queries, or from persistent queries managed by the Deephaven Controller process — allocate heap space to worker processes spawned on the server(s). The amount of heap allocated to a worker is configurable, and more complex queries that manipulate more and larger columns of data will need more heap.
A reasonable starting point in determining the RAM needed for a query server is to allow 8GB per concurrent user and per persistent query. For example, 160GB of RAM should be able to comfortably serve 10 users running 10 persistent queries.
Prerequisites
Each Deephaven system (server or client) must have a Java JDK installed. For this release, Java 8 is the only supported release. Oracle's JDK can be used, as well as the OpenJDK, and third party OpenJDK distributions, such as Azul Zulu. Java versions should be consistent across servers and clients to ensure that cryptographic ciphers and certificate signing authorities can be correctly negotiated and validated when making secure connections between processes.
Each server node that will be part of the etcd cluster must have etcd installed prior to initial configuration of the Deephaven services.
Planning the Installation
Although Deephaven can run with all its component services on a single server, this type of "single-node" deployment is normally only used for test or development purposes.
Production installs will typically have three or more servers, as shown below. The primary reasons for this number of servers are to allow specialized configuration and to provide fault tolerance of system configuration management. The system will have designated server roles, such as query servers or merge servers. (See Scaling to Multiple Servers to learn more.)
Within a Deephaven deployment, the following services are used:
- Query Server - one or more instances per deployment. This is the main service that processes user queries, and query server instances will often run on dedicated query servers in larger deployments.
- Merge Server - usually one instance per deployment. This service is responsible for writing historical data tables.
- Data Import Server (DIS) - one or more instances per deployment. This service writes data to intraday tables based on streams sent to it by the tailers.
- Controller - usually one instance per deployment. The controller manages scheduled persistent queries.
- Client Update Service (CUS) - usually one instance per deployment. The client update service facilitates installation and updating of client components on Windows, OSX, and Linux clients.
- Local Table Data Service (LTDS) - usually one instance per DIS. This service provides query servers with access to previous days' intraday data. Current day intraday data is sourced from the DIS process that wrote the data.
- Table Data Cache Proxy (TDCP) - optional, but, when used, usually one instance per query server. This process caches and consolidates client data requests.
- Log Aggregation Service (LAS) - one per Deephaven server. This process allows other Deephaven processes to write log files.
- Configuration Service - At least one instance per deployment; additional instances can be deployed for high availability. This process allows other Deephaven processes to access common configuration data. Because the Configuration Service is a dependency for most other Deephaven services, it is strongly recommended to deploy multiple instances in production installations.
- Authentication Server - usually one or two per Deephaven installation. This process authenticates login requests from Deephaven client processes. The Authentication Server can be configured to use a variety of back-end account stores for its credential authorities.
- DB ACL Write Server - usually one per Deephaven installation. Provides write access to the database used for storage of Deephaven accounts and permissions data.
- Web API Service - usually one per Deephaven installation. Provides HTTP(S) presence and port handling for Deephaven Web API and Web IDE clients.
- Tailer - at least one per Deephaven server. Additional tailers may run on external servers. This process watches for new binary log files - usually used to transmit streaming data - and feeds new data from them to the Data Import Server.
The Remote Table Appender unifies the user and system data stream by putting user data into the Log Aggregator Service-Tailer-Data Import Service pipeline. This increases stability, persistence, and repeatability.
Besides these core Deephaven services, Deephaven also makes use of third-party services:
- m/monit - one instance per Deephaven server. A process monitoring service normally used to start and manage Deephaven services.
- etcd - etcd servers can be dedicated to just running etcd, or can be servers that also run other Deephaven services; however, a Deephaven installation must have its own etcd cluster and cannot share one, or the servers of one, that is used for other purposes. Single node installations are possible, but odd numbers of multiple nodes are recommended to allow fault tolerance and high availability. A distributed property store that is used as the back-end data store for the Configuration Service.
- Mysql or MariaDB - usually one instance per Deephaven deployment. Can be external to the Deephaven deployment. A relational database used as the back-end to the Authentication Service to store Deephaven user, group, and permissions information.
- envoy - optional. Usually one instance per Deephaven installation. May be external to the Deephaven installation. Provides reverse proxy handling between external Web API clients and the Web API Service, allowing a single external port to map to multiple internal Web API ports.
When planning a new installation, it is important to plan the number of servers, and which servers should run which of the Deephaven services. Scale of load (number of concurrent users and the sizes of their queries), the volume of incoming data, and fault tolerance needs, are all considerations for this planning.
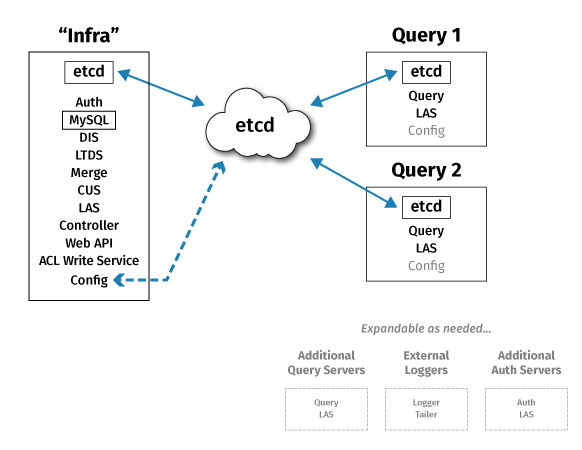
A typical small production deployment might look like this:
"Infra" node:
- Etcd
- DIS
- LTDS
- LAS
Merge Server
- CUS
- Web API Service
- MariaDB
- Authentication Server
- DB ACL Write Server
- Controller
- Tailer
- M/Monit
"Query" server 1
- Etcd
- Query Server
- LAS
- Tailer
- M/Monit
"Query" server 2
- Etcd
- Query Server
- LAS
- Tailer
- M/Monit
This provides fault tolerance for etcd-maintained configuration data, and scale-out of query processing across two query servers, but no fault tolerance for other Deephaven processes. The "Infra" server should have fast locally attached storage for intraday data being written by the DIS, and all servers should have shared (e.g. NFS) storage for access to historical data (written by the merge server or merge processes and read by the query servers).
Certificate Requirements
For production environments, Deephaven requires a certificate containing an Extended Key Usage with TLS Web Server Authentication and TLS Web Client Authentication, and a Subject Alternative Name containing the Fully Qualified Domain Name of the host of your Web API Service (it is common to use a wildcard certificate for ease of reuse, but note that your wildcard cert is only valid for one level of subdomain; *.my.company suffices for test.my.company, but NOT for my.test.my.company). This certificate should be obtained either from an internal corporate certificate authority that is already trusted for use in the organization, or from an external provider, such as Digicert or Verisign. The certificate and key files must be named (or renamed to) tls.crt and tls.key and must be PEM format without passwords.
For test, demo, and lab installations, the installation process can create self-signed certificates, and configure some services to work in an insecure fashion. This, however, will also require approval of exceptions when accessing Deephaven Web services, and may require configuration of the Envoy reverse proxy for any significant amount of Web console use (details below). In general, properly issued and signed certificates are strongly recommended for most installations.
Installation Process
1. Install a Java 8 JDK on all nodes:
- e.g., (on CentOS, to install the latest Java 8 OpenJDK):
sudo yum install java-1.8.0-openjdk-devel
2. Install the MySQL connector on the auth server node(s):
sudo yum install mysql-connector-java
3. Install other prerequisites:
- MySQL or MariaDB (auth server node) sudo yum install mariadb-server
- Lighttpd (CUS node) sudo yum install lighttpd
- M/Monit (all nodes)
sudo yum install monitsudo systemctl enable monitsudo systemctl start monit
4. On each node that will form part of the etcd cluster, install etcd:
- e.g. (on CentOS):
sudo yum install etcd
5. Copy the Deephaven RPM to each node and install the binaries. This will create directory structures under /db, /usr/illumon, /etc/sysconfig/illumon.confs, /etc/sysconfig/illumon.d, and /etc/sysconfig/deephaven.
sudo yum localinstall ./illumon-db-1.20200121.xxx-1-1.rpm
6. If using an externally issued certificate, copy the tls.crt and tls.key file to /etc/deephaven/cus-tls/. tls.crt should contain the complete certificate chain, and contain Extended Key Usage per “Certificate Requirements” section above. Permissions for these files should be 400 with owner and group of irisadmin.
7. On any node, perform the initial configuration of etcd and its keys:
- If config_generator is run on an etcd node, the packaged config will be automatically unpackaged for (applied to) this node.
sudo /usr/illumon/latest/install/etcd/config_generator.sh --servers <IP address of first etcd server> <IP address of second etcd server> <IP address of third etcd server> --max-procs 1 --self-signed
8. Copy the iris_etcd_client_config.tgz to the other servers that will be running etcd and to any Deephaven servers that will be running the Configuration Server.
9. On the other etcd servers, unpackage the etcd server configuration: sudo /usr/illumon/latest/install/config_packager.sh etcd unpackage-server <ordinal of the etcd server> The ordinal is the position number of the etcd server's IP address as it was passed in step 7, with the first server being ordinal 1.
10. On any Deephaven servers that are running the Configuration Server but are not running etcd, unpackage the client configuration: sudo /usr/illumon/latest/install/config_packager.sh etcd unpackage-client
11. Enable the etcd service on all etcd nodes: sudo /usr/illumon/latest/install/etcd/enable_dh_etcd_systemd.sh
- Note that this command must be run on all servers within ten minutes. If more time is needed, pass the
--sequentialflag. This will cause the scripts to return immediately, rather than wait for all peer machines to run the script. In this case, cluster status should be checked withsudo DH_ETCD_DIR=/etc/sysconfig/illumon.d/etcd/client/root /usr/illumon/latest/bin/etcdctl.sh endpoint status -w table, and the installation can continue once all nodes are showing present.
12. On any one of the etcd nodes, to initialize the etcd cluster: sudo /usr/illumon/latest/install/etcd/admin_init.sh
13. Run iris_keygen.sh. This will create keys, interprocess certificates, keystores, and truststores, and configure Deephaven services to use them. This step is run on just one of the configuration server nodes. The keys, certificates, and passwords generated here will be copied to the other nodes in later steps.
- If a web certificate was provided in step 6:
sudo /usr/illumon/latest/install/iris_keygen.sh --config-server <FQDN of Configuration Server host> - Otherwise, for self-signed certificate installations:
sudo /usr/illumon/latest/install/iris_keygen.sh --config-server <FQDN of Configuration Server host> --web-server <FQDN of Web API Server host>
14. Use sudo cp to copy the mysql connector jar (mysql-connector-java-5.1.44.jar or mysql-connector-java.jar) to /etc/sysconfig/illumon.d/java_lib on all nodes. Installing the connector would have placed the jar initially in /usr/share/java/mysql-connector-java.jar on the server where yum was run in step 2.
15. Configure the Deephaven Configuration Server settings on on the same node where iris_keygen was run in step 13: sudo /usr/illumon/latest/install/dh_config_server_init.sh --server <CONFIG_SERVER_FQDN>
16. Configure installation properties: sudo /usr/illumon/latest/install/set_iris_endpoints_prop.sh with arguments to indicate which services are hosted on which servers. This is run on the Configuration Service node.
sudo /usr/illumon/latest/install/set_iris_endpoints_prop.sh \
 --config-server <server1.mycompany.com> \
 --auth-servers <server1.mycompany.com> \
 --merge-servers <server1.mycompany.com> \
 --query-servers <server2.mycompany.com> <server3.mycompany.com> \
 --dbacl-writer-server <server1.mycompany.com> \
 --dbacl-provider-server <server1.mycompany.com> \
 --pqc-server <server1.mycompany.com> \
 --global-rqd-server <server1.mycompany.com> \
 --dbmerge-rqd-server <server1.mycompany.com> \
 --console-rqd-server <server2.mycompany.com> \
 --schema-editor-server <server1.mycompany.com:30002>
17. Configure the ACL database on the Authentication Server node. If running mariadb, use sudo /usr/illumon/latest/install/dbacl_init.sh. If running MySQL, manually execute init.sql and iris-users.sql from /etc/sysconfig/deephaven/<version number>/sql/
18. (Optional, but recommended) Configure the Client Update Service (use --environment centos for CentOS or RHEL):
- If a certificate was provided in step 6:
sudo /usr/illumon/latest/install/cus_init.sh --environment centos --cus-address <FQDN of Client Update Service> --secure - Otherwise, for self-signed certificate installations:
sudo /usr/illumon/latest/install/cus_init.sh --environment centos --cus-address <FQDN of Client Update Service> --insecure
19. Configure data routing on the DIS/Merge Server: sudo /usr/illumon/latest/install/set_routing_service_hosts.sh <FQDN of Data Import Server host> <FQDN of Remote Table Appender host>. In many cases, these two entries will be the same server, which is hosting intraday data processing and user table data.
20. On the Configuration Server, load configuration into etcd: sudo /usr/illumon/latest/install/etcd/config_import.sh
21. On the node where iris_keygen was run in step 13, package the configuration data that will be needed by other nodes, copy it to all other nodes, and install it there.
- On the
iris_keygennode:sudo /usr/illumon/latest/install/config_packager.sh auth package - On the other nodes, after having copied the resultant
iris_auth.tgzfile:sudo /usr/illumon/latest/install/config_packager.sh auth unpackage
22. Configure monit services for the nodes:
For a “classic three node setup”:
- infra:
sudo -E /usr/illumon/latest/install/monit_init.sh --role classic-infrasudo -E /usr/illumon/latest/install/monit_init.sh --role classic-dissudo -E /usr/illumon/latest/install/monit_init.sh --role classic-batch
- query servers:
sudo -E /usr/illumon/latest/install/monit_init.sh --role classic-query
On each node, reload:
monit with sudo monit reload.
Using Envoy for Self-Signed Certificate Installations
If an installation is run using certificates that are not trusted by Web clients, connections to the Deephaven Web IDE will fail. The initial failure will be on accessing the Web login page, but, after accepting a security exception for the certificate of this page, the login process itself will hang. Inspection of the Web log details or Web developer console will show that the browser failed to make a secure connection to the wss:// web socket. Since different web sockets are used for most every connection, many exceptions would have to be accepted when logging in to the Web console this way.
An alternative is to install and configure the Envoy reverse proxy (see: Using Envoy as a Front Proxy). This allows browser users to accept the exception for the connection to Envoy, and, since Envoy is handling the back-end mapping of user sessions to web sockets, no additional exceptions are needed.
Verify the Installation
- On each node, run
sudo monit summary. This should show a list of services, with OK status. If monit was run soon after installation or a restart, some services may show Initializing, but after about two minutes they should all show OK. - From a client system attempt to create a new instance connection to the new installation. (See Installation Guide.)
- Launch a Query Config panel and verify the three initial persistent queries (ImportHelper, etc.) are running:

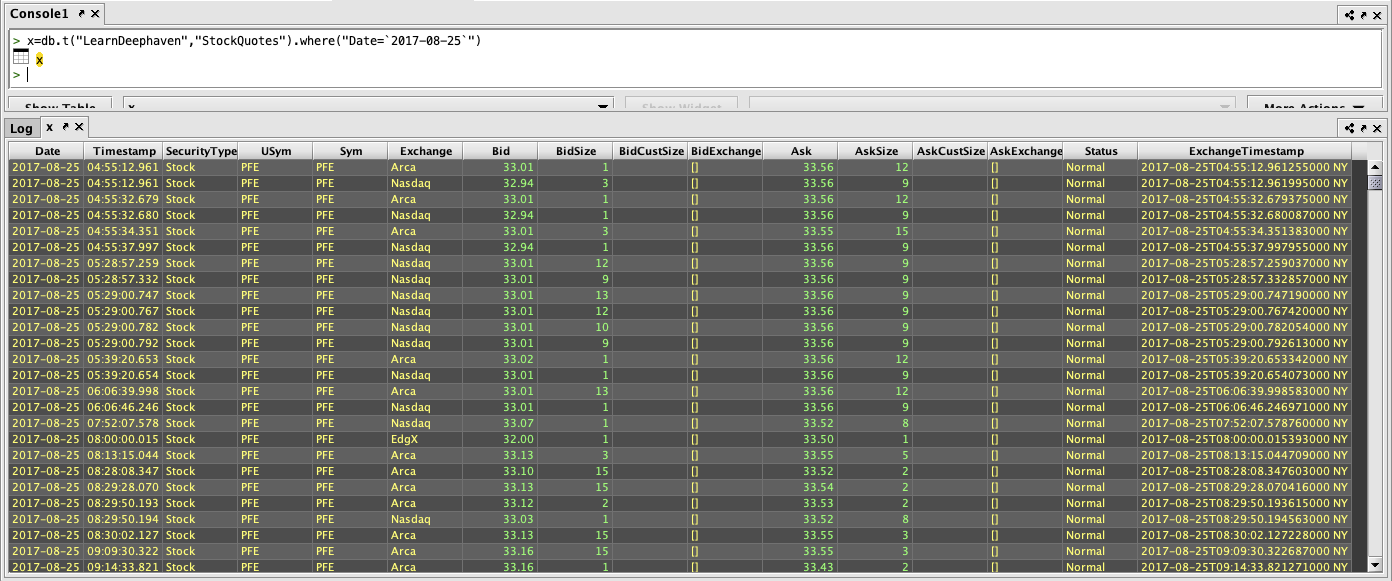
- Launch a Console against each of the query servers and execute a simple query, like
x=db.i("DbInternal","ProcessEventLog").where("Date=currentDateNy()").head(100) - From a browser, connect to
https://<web server FQDN>:8123/irisideand attempt to log in and create a console.
Install Example Data
Many of the example queries in the Deephaven documentation are based on the LearnDeephaven data set. This data set consists of three tables of historical data covering a few dates in the range from 2017-08-21 to 2017-08-25, plus 2017-11-01. The LearnDeephaven dataset, and its corresponding namespace, takes about 350MB on disk.
Historical data is accessed from disk "locally" by query server processes. Normally, historical data storage, which is under the path /db/Systems, is shared across Deephaven servers using NFS or some other type of sharable file system. Configuration of shared storage for historical data is covered in the Scaling to Multiple Servers section.
If the installation is a single-node test/dev system, no shared storage is needed, so LearnDeephaven can be installed immediately after installing the system. For other installations, with multiple servers, LearnDeephaven should be installed only after shared storage for historical data has been configured.
The LearnDeephaven data set is installed by running this command once on a server from which writes to the shared /db/Systems storage are allowed (or the only server, in the case of a single-node installation):
sudo /usr/illumon/latest/install/learn_install.sh
After installing the LearnDeephaven namespace, query workers will need to be restarted before they can query from it. LearnDeephaven is, by default, made readable for all Deephaven users.
Troubleshooting
Configuration scripts log their activities to /var/log/deephaven/install_configuration. Any logs containing sensitive information will only be visible to the irisadmin user; on a secure production system, these logs should be purged or moved to a more secure archive after system functionality has been fully verified.
Each step will also return status information towards the end of its output. Ensure that no step has reported "failed" before its exit. Do not proceed to next steps if a step has failed.
After install, component services will log their details to: /var/log/deephaven/<service/process name>/
The health of the etcd cluster can be checked with:
sudo DH_ETCD_DIR=/etc/sysconfig/illumon.d/etcd/client/root /usr/illumon/latest/bin/etcdctl.sh endpoint status -w table
If enabling etcd (step 11) fails with an Access Denied error, it may be necessary to reinitialize the systemd daemon:
sudo systemctl daemon-reexec
It is normal to see Authentication Server failures in the Configuration Server log while the Authentication Server is starting up. The Configuration Server must start first, as it is a dependency for the Authentication Server. The Configuration Server will then attempt to connect to the Authentication Server, and will retry while waiting for the Authentication Server to begin accepting connections.
If the Configuration Server client fails because it cannot find a matching Subject Alternative Name (SAN), check that /etc/sysconfig/illumon.d/dh-config/clients/single/host contains the correct name or IP address of the Configuration Server, and that /etc/sysconfig/deephaven/auth/truststore-iris.pem has a SAN for its configuration_server entry that matches the contents of the host file. Note that this will require reading the contents of the .pem file with something like OpenSSL that can decode the X509 formatting.
For example, run cat - | openssl x509 -text -noout and paste the certificate_server section of the .pem file to decode it.
If iris_keygen.sh is run more than once, such as because some arguments were incorrect on the first run, it may create multiple cluster keys. These can be seen under /etc/etcd/dh (hex coded directory names such as cc7e54d79). The contents of these directories will need to be consolidated before etcd_init.sh can be run. The typical situation is that there are two hex directories, and the one pointed to by latest contains only config, while the other contains only ssl:
- Execute
sudo mvto move ssl to/etc/etcd/dh/latest - Then rerun step 8 and continue the installation with step 9.
If an installation has failed and is re-run, especially if the new run is with a later build number, some installation steps may fail as they try to back up previous settings under /etc/sysconfig/deephaven. To pass these steps, it may be necessary to create the missing path (sudo -p mkdir <path that is missing>) and then use sudo touch <path that is missing>/somefile.txt to create some content in the path.
If nothing starts, check whether there is content under /etc/sysconfig/deephaven/dh-config/clients/single/. There should be at least host, port, and cacert files there. If these are missing, it could be because step 15 (set up the configuration sever) was not run on the same server as step 21a (package the configuration to copy to other servers). If that is the only piece missing, the installation may be repaired by running step 15 again on the server used for iris_keygen, running step 21a again on this same server, and then re-copying the .tgz file and re-running step 21b on the other servers to correct the configuration.
Installing Patch Updates
While running a particular release, there may be the need to install a patch update RPM to upgrade to a newer build version and apply fixes and enhancements to the Deephaven system. Such "build-to-build" updates normally do not require any manual configuration changes to the system and mainly replace product binaries and internal resource files with newer versions. An example would be updating from version 20200121.005 (build 5) to 20200121.008 (build 8). After installing the newer RPM on all servers the client update service will pick up the new versions of client files and these will be downloaded to clients the next time they connect with the Deephaven launcher.
1. On each server, stop Deephaven services: sudo monit stop all
2. On each server, install the updated RPM: sudo yum localinstall <updated_RPM>
3. On the node(s) running configuration server:
sudo monit start configuration_server; watch sudo monit summary
4. On the node(s) running authentication server:
sudo monit start authentication_server; watch sudo monit summary- Wait until the process is in Status 'OK'.
5. On every query node:
sudo monit start all; watch sudo monit summary- Wait until the process is in Status 'OK'.
6. On the main infra node:
sudo monit start all; watch sudo monit summary- Wait until the process is in Status 'OK'.
7. On any stand-alone servers, use the IllumonConfigurationUpdater to update client copies of binaries and resources, or manually copy files from a server's /usr/illumon/latest/java_lib path.
Adding Servers to the Installation
Additional servers (nodes) can be added to the Deephaven cluster after the initial installation. This can be done to improve fault tolerance of the system or to increase available compute resources. The most typical examples of adding nodes are:
- Adding etcd nodes. There should always be an odd number of etcd nodes in the cluster.
- Adding authentication server nodes. Having one or more backup authentication servers allows for continued use of the system in case the primary authentication server is inaccessible.
- Adding configuration server nodes. Having one or more backup configuration servers allows for continued use of the system in case the primary configuration server is inaccessible. etcd provides high availability and fault tolerance for the storage of configuration data, but the configuration server is the interface through which these data are provided to other Deephaven services.
- Adding dedicated servers for query processing or data import processing. This allows scale-out of the system to handle more users and/or larger volumes of data.
1. Install the Java JDK on the new server:
- e.g., (on CentOS, to install the latest Java 8 OpenJDK):
sudo yum install java-1.8.0-openjdk-devel
2. Install M/Monit:
sudo yum install monitsudo systemctl enable monitsudo systemctl start monit
3. Install the Deephaven RPM. This will create directory structures under /db, /usr/illumon, /etc/sysconfig/illumon.confs, /etc/sysconfig/illumon.d, and /etc/sysconfig/deephaven.
sudo yum localinstall ./illumon-db-1.20200121.012-1-1.rpm
4. Use sudo cp to copy the mysql connector jar (mysql-connector-java-5.1.44.jar or mysql-connector-java.jar) to /etc/sysconfig/illumon.d/java_lib on the new server. Installing the connector would have placed the jar initially in /usr/share/java/mysql-connector-java.jar on the server where yum was initially run during the install process.
5. Configure installation properties: sudo /usr/illumon/latest/install/set_iris_endpoints_prop.sh with arguments to indicate which services are hosted on which servers. This is run on the Configuration Service node.
sudo /usr/illumon/latest/install/set_iris_endpoints_prop.sh \
a. --config-server <server1.mycompany.com> \
b. --auth-servers <server1.mycompany.com> \
c. --merge-servers <server1.mycompany.com> \
d. --query-servers <server2.mycompany.com> <server3.mycompany.com> <server4.mycompany.com> \
e. --dbacl-writer-server <server1.mycompany.com> \
f. --dbacl-provider-server <server1.mycompany.com> \
g. --pqc-server <server1.mycompany.com> \
h. --global-rqd-server <server1.mycompany.com> \
i. --dbmerge-rqd-server <server1.mycompany.com> \
j. --console-rqd-server <server2.mycompany.com> \
k. --schema-editor-server <server1.mycompany.com>:30002
6. set_iris_endpoints_prop.sh will report on which file it created/updated (e.g. prop file: /etc/sysconfig/deephaven/illumon.d.1.20200121.008/resources/iris-endpoints.prop). This file then needs to be imported into etcd: sudo /usr/illumon/latest/bin/etcd_prop_file --import /etc/sysconfig/deephaven/illumon.d.1.20200121.008/resources/iris-endpoints.prop
7. If adding a new data import server (DIS), update the data routing YAML to reflect the new server and related namespaces/tables. (See: Data Routing Configuration via YAML.)
8. On the node where iris_keygen was run in step 13, package the configuration data that will be needed by the new node(s), copy it to the new node(s), and install it there.
- On the
iris_keygennode:sudo /usr/illumon/latest/install/config_packager.sh auth package - On the other nodes, after having copied the resultant
iris_auth.tgzfile:sudo /usr/illumon/latest/install/config_packager.sh auth unpackage
9. Configure monit services for the new node(s):
a. For a “classic three node setup”:
- dis:
sudo -E /usr/illumon/latest/install/monit_init.sh --role classic-dis - query servers:
sudo -E /usr/illumon/latest/install/monit_init.sh --role classic-query
b. Reload monit with sudo monit reload
10. On the server running the client update service, restart it, to pick up the new endpoint information so that clients will see it/them when they next run the launcher or configuration updater:
sudo monit restart client_update_service
11. If the node being added is a query server, run the controller reload on the server running the Deephaven controller service to rebuild the list of query servers that will be available within the system:
sudo service iris controller_tool --reload
Last Updated: 03 March 2020 06:22 -05:00 UTC Deephaven v.1.20200121 (See other versions)
Deephaven Documentation Copyright 2016-2020 Deephaven Data Labs, LLC All Rights Reserved