Configuration Overview
Most Deephaven server configuration is in the following locations:
/etc/sysconfig- This is where the Deephaven installation-specific files reside. Files under this path are not modified when a system update occurs. Of particular interest:
/etc/sysconfig/illumon.confs/illumon.iris.hostconfig- Also may be found via the soft-link/etc/sysconfig/illumon. This file controls the environment for each Deephaven server-side process (run via serviceiris <service name>)./etc/sysconfig/illumon.d/resources- Configuration files for each Deephaven server-side process (referenced by thehostconfig)./etc/sysconfig/illumon.d/schema- Database schema files (XML). This is the recommended location for customer database schema files./etc/sysconfig/illumon.d/java_lib- Custom user and third-party Java libraries. "Extension" libraries placed here will be found on the classpath./etc/sysconfig/illumon.d/override- This path contains any class files that should override those contained injava_libjars./etc/sysconfig/illumon.d/hotfixes- This path contains any jar files that should be used instead of those contained in thejava_libdirectories.
/usr/illumon- This is where Deephaven system files reside. These are not meant to be modified except when a new release occurs. The current release is referenced by the soft-link/usr/illumon/latest. While it should not be necessary to modify these files, it may be useful to be aware of the following:
/usr/illumon/latest/etc- System-wide internal configuration and defaults./usr/illumon/latest/java_lib- Deephaven system Java libraries.
Deephaven uses several formats of configuration data to control its operation. For core Deephaven services, there are three main forms of configuration:
- Java properties files - These are text files, usually named with a
.propextension, that store key-value pairs. These are the largest stores of Deephaven configuration data, and control most of its operations and behavior. - XML files - Some Deephaven processes and utilities use eXtensible Markup Language files. XML is a text format, but with specific requirements for delimitation of data elements, and with support for hierarchical representations of information.
- Other configuration files - These are also text files, but their format is specified by the applications that use them. The main example for Deephaven of this type of file is the
hostconfigfile that configures process startup for services. In this case, the file is actually a shell script.
There are also other configuration settings and other uses of the principal configuration files in Deephaven. The details of these are described in the following sections.
Properties Files
Most Deephaven processes have their own unique configuration (properties) file. The file is specified in hostconfig as CONFIGFILE=... for each Deephaven process. Each properties file includes IRIS-CONFIG.prop where common settings are specified, as well as iris-defaults.prop, where the Deephaven default properties are specified.
The Deephaven process properties file and IRIS-CONFIG.prop need to be in the CLASSPATH and are therefore stored in:
/etc/sysconfig/illumon.d/resources/*.prop
The iris-defaults.prop file is stored in /usr/illumon/latest/etc/ and should not be edited directly by customers. Any property in the default properties file can be overridden in IRIS-CONFIG.prop to be picked up by all Deephaven processes, or overridden in a later properties file for a specific Deephaven process.
Some of the properties in the properties files refer to .txt or .xml files as needed by the various Deephaven processes. If an absolute system path is specified by the property, it will be used. Otherwise, they are loaded from the CLASSPATH. These files typically are stored in the /etc/sysconfig/illumon.d/resources/ folder.
Properties Files Syntax
Properties files, or "prop" files, are Java constructs that provide applications with easy access to a collection of settings. Properties files can contain comments (starting with a pound/hash sign [#]) and key=value settings. Deephaven extensions allow other files to be included in properties files using an includefiles directive, as shown in the example below:
includefiles=iris-defaults.prop,my-settings.prop
...
########## Iris DB RemoteQueryDispatcher settings ##########
RemoteQueryUtils.hostnameSuffixesToTruncateForDisplay=
RemoteQueryDispatcherParameters.name=default
RemoteQueryDispatcherParameters.host=localhost
RemoteQueryDispatcherParameters.queryPort=22013
RemoteQueryDispatcher.workerPort=22012
RemoteQueryDispatcher.workerServerPorts=23000-23999
RemoteQueryDispatcher.webPort=8084
Note that everything before the first equals sign is the key name, and everything after it is the value. If a value is a list, it is up to the application to define how that list should be formatted. Some Deephaven lists (such as tailer configuration file names and includefiles names) are comma-delimited, while others (such as schema paths) are semi-colon delimited.
A property name without an assigned value (such as the RemoteQueryUtils.hostnameSuffixesToTruncateForDisplay property above) will be treated as defining the property to have an empty value (i.e. an empty string). This is not the same as if the property does not exist in the properties files.
Only one includefiles directive is allowed in a properties file, but it can list multiple files to include, and these can, in turn, include other files.
There is no uniqueness requirement when adding a setting into a properties file. Instead, the properties collection that applications use within Java provides a "last in, wins" view of the settings. If a value is set multiple times, in a single properties file, or in multiple properties files linked with includefiles, whichever setting is applied last is the one that is used. Properties files are evaluated from top to bottom. Properties file entries are always case-sensitive for the property name, and often case-sensitive for the value.
The iris-defaults.prop properties file is delivered with the Deephaven installation. It provides default values for settings that can be changed, but rarely need to be, and also provides initial values for properties that will most likely need to be updated in production environments. These latter properties might work in a single-machine test environment, but need to be set differently when Deephaven is scaled to multiple servers. As mentioned above, the recommendation is to have a custom properties file (or, potentially, multiple custom properties files for different services, servers, or users) that includes iris-defaults.prop or IRIS-CONFIG.prop at the top, and then has its own specific settings further down that add to or override the inherited settings.
Java also allows for properties to be set for a process by passing them as JVM arguments. These are of the form:
-DpropertyName=propertyValue
Settings using -D are applied after properties file(s) settings, so they have the highest priority and override settings taken from properties files.
The properties file that a Deephaven process will load is set with a -D property as well:
-DConfiguration.rootFile=myIrisSettings.prop
The process will attempt to load this file (myIrisSettings.prop) from the Java classpath. This involves searching both in filesystem paths and also inside any JAR files that are included in the classpath. The first instance of a file in the classpath that matches the name will be loaded. Any included files encountered while loading properties file(s) will also be found from the classpath. This loading happens when the Deephaven Configuration class is initialized by the process. After that, all properties are kept in memory, so in most cases changes to properties file settings will not be picked up until the processes that use them are restarted.
The Property Inspector Utility
The Property Inspector class in the Deephaven Util JAR can inspect properties files or chains of properties files to provide visibility into what properties files are being included, where properties are set, and where properties are duplicated or overridden.
On a Deephaven server, this utility can be executed using iris_exec, as follows:
/usr/illumon/latest/bin/iris_exec property_inspector
|
Parameter Value |
Description |
|---|---|
|
|
(required) The starting properties file to read. |
|
|
(optional) Format output as CSV (for easy import into a spreadsheet). |
|
|
(optional) Search mode. |
|
|
(optional) A specific property to search for. Asterisks can be used as wildcard characters here. |
Example:
The command below searches for all properties whose names start with SchemaConfig.: (Note: the "--" is required. It separates arguments to iris_exec from arguments to property_inspector. See: Schema Generator Classes.)
/usr/illumon/latest/bin/iris_exec property_inspector -- -pf iris-console.prop -pn SchemaConfig.*
When the command above is run, the following results are generated (edited for brevity/clarity):
Searching for: SchemaConfig.*, starting with file: "iris-console.prop"
Name: SchemaConfig.resourcePath.irisInternal --- Value: <devroot>/etc/dbinternal;<devroot>/configs/dbinternal --- Line: 408 --- File: iris-defaults.prop
Name: SchemaConfig.internalNamespaces --- Value: DbInternal --- Line: 409 --- File: iris-defaults.prop
Name: SchemaConfig.suffix --- Value: .schema --- Line: 410 --- File: iris-defaults.prop
Name: SchemaConfig.classPrefix --- Value: com.illumon.iris. --- Line: 411 --- File: iris-defaults.prop
Name: SchemaConfig.defaultListenerPackagePrefix --- Value: com.illumon.iris.intraday.gen. --- Line: 412 --- File: iris-defaults.prop
Name: SchemaConfig.resourcePath --- Value: /etc/sysconfig/illumon.d/schema/ --- Line: 40 --- File: IRIS-CONFIG.prop
Name: SchemaConfig.defaultListenerPackagePrefix --- Value: com.illumon.intraday.gen. --- Line: 41 --- File: IRIS-CONFIG.prop
Name: SchemaConfig.internalPath --- Value: <devroot>/java_lib --- Line: 7 --- File: iris-console.prop
Name: SchemaConfig.resourcePath --- Value: <devroot>/java_lib --- Line: 8 --- File: iris-console.prop
Configuration Files
Conf files are text files whose format varies depending on the requirements of the applications that use them. The main use of conf files in Deephaven is the hostconfig file, which is used in all configurations.
Hostconfig
The hostconfig file is normally located under /etc/sysconfig/illumon.confs, and named illumon.iris.hostconfig. The hostconfig file is sourced (run) by another bash script, which means it supports bash scripting to make if/then and case statement type decisions. This file provides information needed to start and monitor Deephaven processes. It contains details that must be passed to the processes as they are started, such as how much memory should be allocated, what account they should run under, and what properties file they should use.
Whenever a Deephaven service is started by Monit, it uses the Deephaven launch script to start the service, which sources the hostconfig file. For more information on Monit Services, see the Monit Manual.
For example, the following is a section of a hostconfig file that configures the Deephaven Controller process:
iris_controller)
CONFIGFILE=iris-controller.prop
EXTRA_ARGS="-j -Xms4G -j -Xmx4G -j -Xmn32m"
RUN_AS=irisadmin
WORKSPACE=/db/TempFiles/$RUN_AS/$proc
;;
In this case, the process will be directed to use the iris-controller.prop properties file, run under the irisadmin account, and be allocated 4GB of initial, and maximum, heap space, with 32MB of Eden space. In the EXTRA_ARGS line, the -j indicates to the Deephaven scripts that these are parameters to be passed through directly to the JVM.
If needed, additional processes to be managed by Monit can be added to the hostconfig file. If an existing process needs changes to allocated memory or other startup properties, those changes must be made in this file. See the Deephaven Operations Guide for additional documentation on Deephaven's use of Monit.
Other Configuration Files
Most other configuration files in Deephaven are text files that contain lists of values for various purposes:
- db_rqc_default_class_push_list.txt
- default_static_imports.txt
- default_class_imports.txt
- default_package_imports.txt
- authusers.txt
- superusers.txt
- dsakeys.txt
1. db_rqc_default_class_push_list.txt
This is the default file for listing classes that exist in the classpath of the client system and should be pushed to the class cache of the query worker at startup. An alternate file for this purpose can be specified by setting the property RemoteQueryClient.defaultClassPushList.
In general, classes pushed from this file will be classes that the user is developing and needs to test, or classes that only one or a very few users need. Production classes that are to be usable by most users should be deployed to query servers by building them into JARs and placing these JARs under /etc/sysconfig/illumon.d/java_lib.
2. Default files
These are the default files that contain a list of Java classes that are added to the query library used by Deephaven queries:
default_static_imports.txt
default_class_imports.txt
default_package_imports.txt
These file names can be overridden by the properties:
IrisDB.queryLibrary.defaultPackageImportList=
IrisDB.queryLibrary.defaultClassImportList=
IrisDB.queryLibrary.defaultStaticImportList=
3. /etc/sysconfig/illumon.d/resources/authusers.txt
The set of Deephaven users, groups and ACLs are stored in MySQL database. Customers can choose to use LDAP for storing user credentials. In some situations, customers may wish to maintain the set of Deephaven users in a local file by setting the property:
authentication.server.localusers.enabled=true
In this case, the authusers.txt file contains the list of Deephaven users in htpasswd format.
4. /etc/sysconfig/illumon.d/resources/superusers.txt
This file lists the local superusers as long as the property is set as follows:
authentication.server.localsuperusers.enabled=true
5. /etc/sysconfig/illumon.d/resources/dsakeys.txt
This filename can be overridden by the property:
authentication.server.authorizedkeys.file=...
The dsakeys.txt file lists the DSA keys for Deephaven users as long as the property is set as follows:
authentication.server.authorizedkeys.enabled=true
DSA keys are used in place of passwords for non-interactive users in scripts or batch jobs or delegated API calls. See: Database Authentication to learn more.
XML Files
XML (eXtensible Markup Language) files are also text files, and nominally human-readable, but, unlike conf files and properties files, XML files include more requirements around how data is formatted and delimited. The main structure of XML files is based around elements, which can be single line or multi-line, and which can encapsulate other elements to form hierarchies. Elements can also contain embedded text data directly as content and/or in the form of named attributes.
The main places where XML is used to store Deephaven configuration settings are:
- Tailer configuration files, which tell a tailer what files and paths it should monitor.
- Import/Merge script configuration files, which provide one way of automating frequently executed data import and merge operations.
- Schema files, each of which is an XML file without a root element.
- Workspace files, which persist the layout of a Deephaven client application (tabs, queries, etc).
See the Tailer XML Configuration Parameters, XML Files, and Schemas sections in the Importing Data guide for detailed information.
Environment Variables
Environment variables are used to set some of the global configuration for Deephaven, most commonly for bin utilities, which rely on JAVA_HOME, and also for the import/merge scripts.
In order to use Deephaven tools like iriscat (/usr/illumon/latest/bin/iriscat), JAVA_HOME must first be set to point to an installation directory that contains a Java 8 installation. This path will include a bin subdirectory that contains a Java runtime executable. Typically, this will be set to /usr/java/latest or /usr/java/latest-64. On Linux, this can be checked by running:
export | grep JAVA_HOME
It can be set similarly with:
export JAVA_HOME=path_to_java
Other environment variables, primarily used by the import/merge scripts, are covered in Appendix A of the Deephaven Importing Data guide.
Deephaven Launcher and Client Configuration
Client Components Update
When a new Deephaven console is launched from the Launcher, the Launcher will check whether the instance has the latest versions of JAR files and other files from the Client Update Service (CUS) associated with the instance. It will download newer files if updates are available. Once the console is running, it will check for changes every 10 minutes. If new files are found (because an update has been applied or a configuration file changed on the server), a message banner will appear on the client console to inform the user that the console is out of date. A relaunch of the console will then be required to download and apply the new files. Continuing to run the console with out of date components may appear to work fine. However, problems may arise when client-side settings are not correct for the current environment, or when the client is using classes that no longer match the versions installed on the server.
The getdown.txt file on the server (/var/www/lighttpd/iris/iris/getdown.txt) controls most of the Client Update Service behavior. This file is dynamically built by the Client Update Service when it starts. The main input the CUS uses to generate this file is getdown.txt.pre. Configuration changes should be made in getdown.txt.pre, as changes to getdown.txt will be overwritten when CUS restarts.
getdown.txt contains the settings detailed below (copied from getdown.txt.pre), and also a list of files to be downloaded. The contents of the generated getdown.txt file and all files to be downloaded are hashed and the values saved in digest2.txt. This is the file clients use to see whether there are updates to be applied, and to know what files to download.
When any of the files needed by the client are updated, you must restart the Client Update Service to regenerate the configuration files and digest. CUS is restarted automatically after a Deephaven product RPM is applied to a query server. The updated digest2.txt will allow running clients to see that updates are available when they next check for changes.
The script /etc/init.d/cus is responsible for reading the template getdown.txt.pre and generating the getdown.txt file, and copying the client binaries from the latest Deephaven release to the web directory to be distributed.
The main settings and sections in getdown.txt.pre and their purposes follow:
1. appbase
This indicates the URL from which all subsequent files will be downloaded. All other files are relative to this root.
appbase = http://irisprod.company.com/iris
The default page (index.html) for the parent of this path contains overview information about the Deephaven client and provides installer downloads. This page can be customized with environment-specific information, such as whom to contact for access to Deephaven.
2. ui.install_error
Certain errors will point to this page for more information. The default page provides contact information for Deephaven Data Labs support. It can be customized to add internal support information, if desired.
ui.install_error = http://irisprod.company.com/iris/error.html
3. ui.name
The default value is:
ui.name = Deephaven
However, users can customize this setting. For example:
ui.name = Deephaven Data Labs for Company Name Here
This will be the title of the application while downloading files.
4. classpath
This should not normally need to be modified. Resources will be searched for in the order these directories are listed, including searching inside JARs. Most Deephaven files are in the resources and java_lib directories. There are separate settings for classpaths on Windows, Linux, and OSX.
jvmarg = -classpathjvmarg = [windows]
"%APPDIR%\config\*;%APPDIR%\private_classes;%APPDIR%\private_jars\*;%APPDIR%\override\*;%APPDIR%\resources;%APPDIR%\java_lib\*"
jvmarg = [linux]
%APPDIR%/config/*:%APPDIR%/private_classes:%APPDIR%/private_jars/*:%APPDIR%/override/*:%APPDIR%/resources:%APPDIR%/java_lib/*
jvmarg = [mac]
%APPDIR%/config/*:%APPDIR%/private_classes:%APPDIR%/private_jars/*:%APPDIR%/override/*:%APPDIR%/resources:%APPDIR%/java_lib/*
5. Configuration.rootFile
This sets the properties file to be used by the client. The default is iris-console.prop.
jvmarg = -DConfiguration.rootFile=iris-console.prop
6. clean_target
This specifies directories under the instance directory whose contents should be completely replaced when updating. This is required for parts of the classpath that use wildcards to find JARs whose names will change from version to version.
clean_target = java_lib
clean_target = config
clean_target = integrations
clean_target = override
clean_target = hotfixes
clean_target = resources
7. code/resource
Code and resource entries in getdown.txt identify specific files for which digest values should be calculated, and that the Launcher should pull down to a client. The base path for these files is /var/www/lighttpd/iris/iris. The CUS init.d script rsyncs several server directories there prior to regenerating getdown.txt and updating the digest. The default paths are:
/usr/illumon/latest/java_lib/
/etc/sysconfig/illumon.d/java_lib/
/etc/sysconfig/illumon.d/override/
/etc/sysconfig/illumon.d/override/
/etc/sysconfig/illumon.d/hotfixes/
/etc/sysconfig/illumon.d/resources/
/etc/sysconfig/illumon.d/calendars/
/etc/sysconfig/illumon.d/chartthemes/
The script then goes on to exclude some items, such as configuration files not needed by client installations.
Additional files that are needed by Launcher clients should usually be added to /etc/sysconfig/illumon.d/java_lib/ or /etc/sysconfig/illumon.d/resources/. However, this will add the files to the classpath of server processes as well. Alternately, a new path could be added to the CUS init.d script, with a clean_target entry, if needed. Or, custom individual code entries could be added to getdown.txt.pre.
Like many other text configuration files, getdown.txt and getdown.txt.pre use the pound/hash symbol to indicate comment lines.
Note: jvmarg = … can also be used to configure any globally-applicable JVM arguments to be passed to the Deephaven console process.
Launcher Properties Files
When the Launcher starts a Deephaven console, a default installation will use the iris-console.prop properties file to control its settings. (See Configuration.rootFile above for details on specifying a different properties file.) This file, and all included properties files, must be in a location included in the classpath. They will typically be in <Program>/<instance>/resources, but can be in other folders or inside a JAR file.
Properties files and JAR files are downloaded automatically from the Deephaven server by the Launcher, so no persistent changes can be made by editing these files on the client. To make global changes to iris-console.prop, edit the "master" copy, under /etc/sysconfig/illumon.d/resources on the CUS Server, and restart the CUS once the changes have been made.
To instead apply some configuration changes to the properties of specific client installations, these can be made by adding property keys and values to one of the jvmargs.txt files. There are several copies of this file that have varying levels of applicability depending on the location:
<WorkspaceRoot>/jvmargs.txt- applies to all instances<WorkspaceRoot>/<instance_name>/jvmargs.txt- applies to all workspaces and consoles in the instance<WorkspaceRoot>/<instance_name>/workspaces/<workspace_name>/jvmargs.txt- applies to this Deephaven workspace<WorkspaceRootapplication_installation_path>/<instance_name>/workspaces/console/jvmargs.txt- applies to consoles in the instance
Settings from all applicable files will be combined. If there are settings that exist in more than one of the files, the last one evaluated will take precedence. They are evaluated in the order listed above. The settings in the jvmargs.txt files also override settings from properties files.
The format of jvmargs.txt is similar to other properties files in that blank lines are ignored and comments start with a pound/hash [#] symbol. However, as this file is being used to pass extra arguments into the Java command line, most of its key=value entries will start with -D. For example:
-DCsvExport.useFileSelectionDialog=true
Installation Location Information
Three types of files are stored during Deephaven installation and operation:
- Launcher files - These files are installed on a per-user basis or per-machine basis, depending on the actual installation option chosen. These files do not change, and they do not contain data, downloaded JARs, or workspace files.
- Program files (also known as instance files) - These files include the JARs and the configuration files downloaded and synchronized for each instance, as well as log files generated by the Launcher and Deephaven program.
- Workspace files - These files are the workspace settings, backups, and history files.
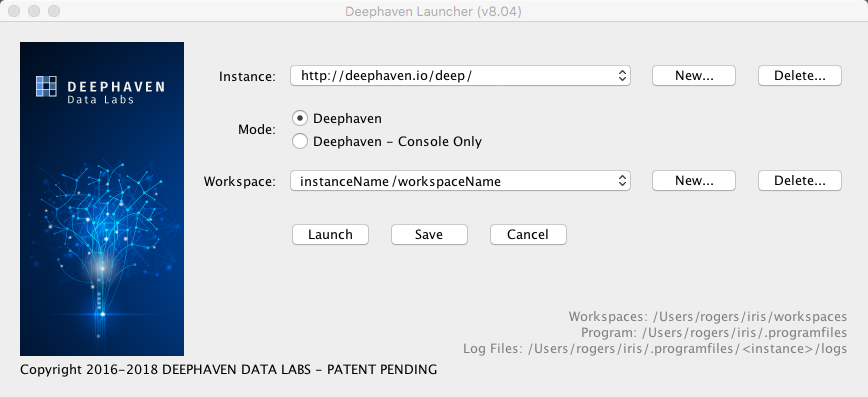
The Deephaven Launcher displays the locations of Workspaces, Program, and Log files at the bottom right, as shown here:
Windows Installation
The Deephaven Installer is used for all Windows installations (See: User Guide to Installing Deephaven).
When the Deephaven Launcher is Installed with the "Per-user" option, locations for all three file types can be chosen. The user's selections for the locations of Deephaven files are saved in the registry for reuse when updating the installation. The values are also saved in the Launcher directory for use by the Launcher (which does not use the registry). File locations can also be changed at a later time by changing system properties as described below.
When the Deephaven Launcher is installed with the " All users" option, it makes less sense to specify workspace and instance locations, so the defaults are always used. These default locations are detailed individually in the section below.
System administrators may change the defaults by setting properties in the system-wide launcher properties file. This works on shared systems (e.g., Linux, Citrix, etc.) and in Windows environments where a file can be distributed to all users.
Mac/Linux Installation
The Deephaven Installer is not used on Mac or Linux machines. Instead, users extract the Launcher files from a tar file and then launch the program by running a bash script in the extraction folder. For detailed instructions, see: User Guide to Installing Deephaven.
On a shared system, the files can be extracted into a shared location. Users do not need write access to the Launcher program folder. Defaults can be set for users by setting properties in the system-wide properties file.
Launcher Files
Whether or not the Deephaven Installer is used for the installation, the program will be started from a working directory containing the shell script or executable, and supporting JAR and resource files.
Program Files
A Deephaven instance specifies the server and port to which Deephaven should connect for that session. Users can configure multiple instances in the Deephaven Launcher.
The <programfiles>/<instance>/getdown.txt file enables an instance to appear as a choice in the Launcher. For example, if programfiles/foo/getdown.txt exists, then "foo" will be listed as an instance.
By default, program files and log files are stored under the following locations:
| Windows | %LOCALAPPDATA%/illumon |
| macOS and Linux | ~/iris/.programfiles
|
Workspace Files
Multiple workspaces can be created for each Deephaven instance. In the Launcher, the Workspace drop-down menu will list all available Workspaces for the selected Instance.
By default, workspace files are stored under the following locations:
| Windows | ~/Documents/Iris |
| macOS and Linux | ~/iris/workspaces
|
For example, instance "foo" and workspace "Default" will be in ~/iris/workspaces/foo/workspaces/Default.
Properties Files
When the Launcher starts, it reads properties from all the properties files it can find. System properties always take precedence. Property values will be updated to replace a leading ~ or ${user.home} with the user's home directory.
System-wide properties file:
The system-wide properties file (illumon.launcher.properties) is located in the Launch program folder:
| Windows | %PROGRAMDATA%/illumon/illumon.launcher.properties
|
| macOS and Linux | /etc/illumon.launcher.properties
|
Per-user properties file:
The per-user properties file (.illumon.launcher.properties) is located in ${user.home}:
~/.illumon.launcher.properties
Launcher properties file:
The Launcher properties file (illumon.launcher.properties) is located in the Launch program folder.
Instance properties file:
This is the .illumon.launcher.properties file located in an instance folder.
Other Properties Files:
IrisConfigurationLauncher.instanceRoot
|
This overrides the location for the Program files. |
IrisConfigurationLauncher.workspaceRoot
|
This overrides the location for the Workspace files. |
IrisConfigurationLauncher.logDir
|
The Launcher writes log files in the specified folder, or to |
IrisConfigurationLauncher.logdirsPrevious
|
The Launcher and Deephaven programs remove old log files from the log directory. If the log location is changed in |
|
|
These properties can be used to automatically provision initial instances by setting them in the system-wide properties file. |
IrisConsole.logPath
|
Governs the log file produced by the console. See: |
IrisConsole.logPaths.previous
|
The Launcher and Deephaven programs remove old log files from the log directory. If the log location is changed in |
IrisConsole.cusAuthString
|
If the Client Update Service (CUS) requires authentication, the auth string will be gathered by the Launcher. Because the Deephaven Console checks for updates and needs the same information, it passes the values in this string. Users can set this in a personal properties file to avoid the authentication dialog. See: User Guide to Installing Deephaven. |
-DIrisConsole.clearPreviousUser=true
|
When this property is set to true, the login screen will clear the previous user from the menu. This defaults to false, which means by default the login screen will remember the previous user. |
Previous_instance
|
These properties are used to set defaults in the Launcher UI to the last used settings. |
specified_server_url
|
This is set per-instance to the URL used when creating the instance. If there is a problem with the address given in |
Security Configuration
Public and Private Keys used by Deephaven
Auth Server TLS Keystore
(.p12 keystore file)
The Auth Servers TLS keystore contains the certificate and private key of a TLS enabled service. You must keep this file private, and not distribute it to clients. The Auth Servers keystore file should be unique per node, with a certificate that is signed (issued) by the CA in the TLS truststore file (see next section).
The default self signed key pair for the Auth Server is generated when installing the iris-config.rpm and saved to the .p12 keystore file. The keystore file is owned by user irisadmin with permission set to 400:
[-r-------- irisadmin irisadmin] keystore.authserver.p12
The Auth Server keystore file is also protected by a unique randomly generated password stored in base64 encoded format in a read-only hidden file owned by user irisadmin with permission set to 400:
[-r-------- irisadmin irisadmin] .auth_passphrase
Auth Server Keystore
Keystore Filename:/etc/sysconfig/illumon.d/auth/keystore.authserver.p12
Passphrase File:/db/TempFiles/irisadmin/.auth_passphrase
Properties Files:/etc/sysconfig/illumon.d/resources/iris-authentication-server.prop/etc/sysconfig/illumon.d/resources/iris-db-acl-write-server.prop
Keystore Property Value: tls.keystore=/etc/sysconfig/illumon.d/auth/keystore.authserver.p12
Passphrase Property: tls.passphrase.file=/db/TempFiles/irisadmin/.auth_passphrase
TLS Truststore
(tls.truststore - read from classpath)
The TLS truststore file contains the signed CA certificate (public key) of the self signed certificate from the Auth Server Keystore file. The public key (certificate) is exported from the Auth Server Keystore file and imported into the truststore. The corresponding private key in the Auth Server Keystore file is used by the Auth server to secure communications with clients.
All nodes and all clients need to have access to the truststore. A single tls.truststore should be used across all Deephaven nodes. If your organization has an existing PKI, then you can import your CA's certificate into a Java .p12 truststore for use with Deephaven.
The default truststore file is created when installing the iris-config.rpm:
Truststore Filename:/etc/sysconfig/illumon.d/auth/truststore-iris.p12
Passphrase File:/db/TempFiles/irisadmin/.auth_passphrase
Properties File:/etc/sysconfig/illumon.d/resources/IRIS-CONFIG.prop
Truststore Property Value:tls.truststore=truststore-iris.p12
Passphrase Property:tls.passphrase.file=/db/TempFiles/irisadmin/.auth_passphrase
Note: The passphrase is not used to protect this truststore file because its contents are public, but it is used as an integrity check to ensure the file was not tampered with. Customers can import their own trusted CA certificates into this trust store.
View Public Key Certificates in the Truststore:
PASS_PHRASE=$(sudo base64 --decode \
/db/TempFiles/irisadmin/.auth_passphrase)
/usr/lib/jvm/java-openjdk/bin/keytool -list -keystore \
/etc/sysconfig/illumon.d/resources/truststore-iris.p12 \
-storepass $PASS_PHRASE -rfc
Instead of using the uniquely generated files from the installation, customers can create their own keystore files with private keys and certificates signed by their own CA and update these properties accordingly.
Import your own root or intermediate CA certificate into the trust store:
/usr/lib/jvm/java-openjdk/bin/keytool \
-import -trustcacerts -alias iris \
-file /path/to/tls.crt -keystore \
/etc/sysconfig/illumon.d/resources/truststore-iris.p12 \
-storepass $PASS_PHRASE
Older Deephaven (Iris) installations may need to create certificates and keystores and update related configuration files:
# Gather some random strings for the passphrase
PASS_PHRASE=$(head /dev/urandom | tr -dc A-Za-z0-9 | head -c 15 | base64)
PASS_FILE=/db/TempFiles/irisadmin/.auth_passphrase
echo -n $PASS_PHRASE > $PASS_FILE
chmod 0640 $PASS_FILE
chown irisadmin:dbquery $PASS_FILE
# Generate keystore with 10 year self-signed cert
AUTHDIR="/etc/sysconfig/illumon.d/auth"
AUTH_CERT_NAME="authserver"
AUTH_CERT_ORG="CN=authserver, O=Deephaven Data Labs, L=Plymouth, ST=Minnesota, C=US"
AUTH_VALIDITY_DAYS=3650
AUTH_KEYSTORE_FILE="$AUTHDIR/keystore.authserver.p12"
AUTH_KEYSIZE=2048
AUTH_PASS_FILE=/db/TempFiles/irisadmin/.auth_passphrase
/usr/lib/jvm/java-openjdk/bin/keytool \
-genkey -alias "$AUTH_CERT_NAME" -keyalg RSA \
-sigalg SHA256withRSA -keysize "$AUTH_KEYSIZE" \
-storepass "$PASS_PHRASE" -keystore "$AUTH_KEYSTORE_FILE" \
-storetype PKCS12 \
-dname "$AUTH_CERT_ORG" -validity "$AUTH_VALIDITY_DAYS"
# Export the certificate portion of the self-signed cert
/usr/lib/jvm/java-openjdk/bin/keytool \
-export -alias "$AUTH_CERT_NAME" -file "$AUTH_CERT_FILE" \
-keystore "$AUTH_KEYSTORE_FILE" -storepass "$PASS_PHRASE"
# Import the certificate into the Iris truststore
/usr/lib/jvm/java-openjdk/bin/keytool \
-import -v -file "$AUTH_CERT_FILE" \
-alias "$AUTH_CERT_NAME" \
-storetype PKCS12 \
-keystore "$AUTH_TRUSTSTORE_FILE" -storepass "$PKEY" -noprompt
# Remove no longer needed cert file
rm "$AUTH_CERT_FILE"
DSA Keys
(authentication.server.authorizedkeys.file)
The authorized key file contains usernames and corresponding public keys. The authentication server uses these public keys for challenge response authentication. The user authenticating must have the corresponding private key.
DSA Keys File:/etc/sysconfig/illumon.d/resources/dsakeys.txt
Properties File:/etc/sysconfig/illumon.d/resources/iris-authentication-server.prop
DSA Keys Property:authentication.server.authorizedkeys.file=dsakeys.txt
Private Keyfile
(WAuthenticationClientManager.defaultPrivateKeyFile)
Users may authenticate using private key files. These should be only on the user's client machine, and provide access to Deephaven just as the user's password.
Controller Private Keyfile
(iris.authentication.keyfile)
The controller uses a key to authenticate to Deephaven. The controller must have permission to operate as other users. This key file should be deployed only to the controller, and not readable by other users.
Controller Key Pair
(PersistentQueryController.keyPairFile)
The Deephaven controller may store secrets such as JDBC passwords in its configuration. Consoles must be able to update these secrets, and to store them persistently in the Persistent Query Controller's cache files. This file should be only on the controller node. When a client needs to send a secret to the controller, it requests the public key. The controller decrypts secret data (e.g., passwords) using its private key before sending the secret to workers.
Web API WebSocket Server and Web Servers
Deephaven includes several Web HTTP(S) Services:
- Client Update Service
- Web API Service
- Web IDE Service
- Query Web Server
- Merge Web Server
- DIS Web Server
Some of the web based services are disabled at install time for the following reasons:
- Bringing up a web service with a self signed TLS certificate causes web browsers to display an untrusted error message with mitigation instructions.
- Bringing up the web services without TLS (i.e., using http cleartext) is a security risk on an untrusted network and could be an audit violation in many organizations. Furthermore, modern browsers will refuse to serve plain http web services.
It is recommend that only valid TLS trusted CA signed certificates be used for all web services.
However, some customers may choose to enable web services without TLS in a POC, Test or Lab environment.
Client Update Service
The Client Update Service (CUS) is powered by lighttpd to update clients with server side components including JAR files, properties, etc. The CUS is disabled by default due to reasons cited above.
Securing the Customer Update Service (CUS) with HTTPS
To securely enable the CUS on HTTPS port 443:
Obtain a TLS certificate signed by your trusted CA with the domain name matching the Deephaven server, e.g: myserver.mydomain.com
Concatenate your .crt and .key file together into a single PEM file.
For example:
cat /etc/ssl/private/lighttpd.key /etc/ssl/certs/lighttpd.crt \
> /etc/ssl/private/lighttpd.pem
On the Deephaven Server, edit the /etc/lighttpd/client-update-service.conf file and set the following properties:
server.port = 443
ssl.engine = "enable"
ssl.pemfile = "/etc/ssl/private/lighttpd.pem"
Update /var/www/lighttpd/iris/iris/getdown.txt.pre file as described in the previous section, replacing http with https:
For example:
appbase = https://myserver.mydomain.com/iris/
...
#ui.install_error = http://WEBHOST/iris/error.html
ui.install_error = https://myserver.mydomain.com/iris/error.html
Restart the CUS with monit:
sudo monit restart cus
The "Client Update Service" will be available at:
https://myserver.mydomain.com/
Securing the Customer Update Service (CUS) with User Authentication
By default, the CUS does not require user authentication. The CUS is powered by lighttpd and provides basic and digest authentication methods described by RFC 2617.
To enable authentication with users defined in a file, edit /etc/lighttpd/client-update-service.conf and uncomment the lines for mod_auth and mod_authn_file in the server.modules section. Also uncomment the line (further down in the file) to include "conf.d/iris-auth.conf".
Authorized users are stored in the htpasswd file:
/etc/lighttpd/illumon-cus.user
The htpasswd file contains the username and the crypt()'ed password separated by a colon. Each entry in the file is terminated by a single newline.
For example:
iris:$apr1$1xsLWNhw$.qiKafnbTpoNda/d6X77l.
You can use the htpasswd utility from the Apache distribution to manage htpasswd files. Note that not all versions of htpasswd default to use Apache's modified MD5 algorithm for passwords, which is required by lighttpd. You can force most to use MD5 by running:
htpasswd -nbm <user> <password>
Append the output of the above command to:
/etc/lighttpd/illumon-cus.user
More information on configuration options is available in lighttpd's documentation.
To Disable Authentication:
In order to disable the username/password requirement, edit:
/etc/lighttpd/client-update-service.conf
Change (comment out) the following lines:
 include "conf.d/iris-auth.conf"
  include "conf.d/iris-access_log.conf"
to read:
 #include "conf.d/iris-auth.conf"
  #include "conf.d/iris-access_log.conf"
Restart the CUS with monit: sudo monit restart client_update_service
Add Authorized users:Htpasswd -nbm <user> <password>
Append to /etc/lighttpd/illumon-cus.user file.
To Enable the CUS on cleartext HTTP port 80:
Note: This is not recommended. Only do this for testing only on a trusted private network.
On the Deephaven Server, edit the /var/www/lighttpd/iris/iris/getdown.txt.pre file. Set the appbase value, replacing WEBHOST with the FQDN (or IP address) of your Deephaven Server.
For example:
#appbase = http://WEBHOST/iris/
appbase = http://myhost.domain.com/iris/
...
#ui.install_error = http://WEBHOST/iris/error.html
>ui.install_error = http://myhost.domain.com/iris/error.html
In the M/Monit config folder, remove the .disabled extension from the Client Update Service configuration file name and run Monit reload. This will instruct the M/Monit daemon to reread its configuration and re-initialize:
cd /etc/sysconfig/illumon.d/monit
sudo mv cus.conf.disabled cus.conf
sudo monit reload
Check the status of the getdown service:
sudo monit status client_update_service
Once the "Client Update Service" is up and running, you can proceed to install and run the Launcher on client desktops. The installers for Windows, Mac and Linux desktops can be downloaded from the "Client Update Service" on your Deephaven Server at:
http://<IRIS_SERVER_ADDRESS>/
Note: IRIS_SERVER_ADDRESS is the same as WEBHOST above.
Web API Server TLS Keystore
(.p12 keystore file)
The Web API Server's TLS keystore contains the certificate and private key of a TLS enabled service. You must keep this file private, and not distribute it or store the file in a non-secure location such as a git repository. The Web API Server's keystore file should be unique per node, with a certificate that is signed (issued) by a trusted CA.
The default self signed key pair for the Web API Server is generated when installing the iris-config.rpm and saved to .p12 keystore file:[-r--r----- irisadmin dbquery ] webServices-keystore.p12
The Web Server keystore file is also protected by a unique randomly generated password stored in base64 encoded format in a read-only hidden file owned by user irisadmin and readable by dbquery group with permission set to 440:[-r--r----- irisadmin dbquery] .webapi_passphrase
Web API Server Keystore Properties
Keystore Filename:/etc/sysconfig/illumon.d/auth/keystore.webServices-keystore.p12
Passphrase File:/db/TempFiles/irisadmin/.auth_passphrase
Properties File:/etc/sysconfig/illumon.d/resources/web_api_service.prop
Keystore Property Value:tls.keystore=/etc/sysconfig/illumon.d/auth/webServices-keystore.p12
Passphrase Property:tls.passphrase.file=/db/TempFiles/irisadmin/.webapi_passphrase
Securing the Web API Server with your CA signed Certificate
Obtain a TLS certificate signed by your trusted CA with the domain name matching the Deephaven server, e.g: myserver.mydomain.com.
Backup the existing file keystore file:
sudo cp /etc/sysconfig/illumon.d/auth/webServices-keystore.p12 \
/etc/sysconfig/illumon.d/auth/webServices-keystore.p12.ORG
Import your CA cert and key files to the Web API Service keystore file:
For example:
STOREPASS=$(sudo cat /db/TempFiles/irisadmin/.webapi_passphrase | base64 --decode) openssl pkcs12 -export -in /etc/ssl/certs/tls.crt -inkey /etc/ssl/certs/tls.key -name webapi -out /etc/sysconfig/illumon.d/auth/webServices-keystore.p12 -passout pass:$STOREPASS
Set the correct permissions on the web services keystore file:
sudo chown irisadmin:dbquery \ /etc/sysconfig/illumon.d/auth/webServices-keystore.p12 sudo chmod 440 /etc/sysconfig/illumon.d/auth/webServices-keystore.p12
Update Query Server Prop File:
/etc/sysconfig/illumon.d/resources/iris-query-server.prop:
# Enable Web Sockets for Query Workers
RemoteQueryDispatcher.websocket.enabled=true
Restart Web API Service with Monit:
sudo monit restart web_api_service
Server Settings
Web API Server
API Server Properties File:/etc/sysconfig/illumon.d/resources/web_api_service.prop
API Server Default Settings:
# The keystore holding the SSL certificate to use for HTTPS.
# No key file means SSL is disabled and plaintext HTTP will be used instead.
This is not recommended.
# tls.keystore=
tls.keystore=/etc/sysconfig/illumon.d/auth/webServices-keystore.p12
tls.passphrase.file=/db/TempFiles/irisadmin/.webapi_passphrase
# The port listening for incoming http/https connections
Webapi.server.port=8123
# The key file to use when signing, verifying websocket reconnection
authentication.server.reconnection.keyfile=/etc/sysconfig/illumon.d/auth/priv-authreconnect.base64.txt
# The max duration (milliseconds) for a websocket reconnect key to be valid
authentication.server.reconnection.period=600000
# The provider that this installation is using for groups (LDAP, MySQL, etc.).
# Depending on this value, additional properties will be required.
IrisDB.groupProvider=mysql
DIS Web Server
DIS Server Property File:/etc/sysconfig/illumon.d/resources/iris-db-dis.prop
DIS Web Server Settings:
# DIS web server
DataImportServer.webserver.enabled=true
DataImportServer.webserver.port=8086
# HTTP Basic Auth, SSL must be enabled when authentication is required
DataImportServer.webserver.authenticationRequired=true
DataImportServer.webserver.sslRequired=true
tls.keystore=/etc/sysconfig/illumon.d/auth/webServices-keystore.p12
tls.passphrase.file=/db/TempFiles/irisadmin/.webapi_passphrase
Query Web Server
Query Server Properties File:/etc/sysconfig/illumon.d/resources/iris-query-server.prop
Query Web Server Settings:
# Query web server
RemoteQueryDispatcher.webserver.enabled=true
RemoteQueryDispatcher.webserver.port=8084
# HTTP Basic Auth, SSL must be enabled when authentication is required
RemoteQueryDispatcher.webserver.authenticationRequired=true
RemoteQueryDispatcher.webserver.sslRequired=true
tls.keystore=/etc/sysconfig/illumon.d/auth/webServices-keystore.p12
tls.passphrase.file=/db/TempFiles/irisadmin/.webapi_passphrase
Merge Web Server
Merge Server Property File:/etc/sysconfig/illumon.d/resources/iris-merge-server.prop
Query Web Server Settings:
# Query web server
RemoteQueryDispatcher.webserver.enabled=true
RemoteQueryDispatcher.webserver.port=8084
# HTTP Basic Auth, SSL must be enabled when authentication is required
RemoteQueryDispatcher.webserver.authenticationRequired=true
RemoteQueryDispatcher.webserver.sslRequired=true
tls.keystore=/etc/sysconfig/illumon.d/auth/webServices-keystore.p12
tls.passphrase.file=/db/TempFiles/irisadmin/.webapi_passphrase
Configuring Users with LDAP
The Deephaven authentication server allows the use of Lightweight Directory Access Protocol (LDAP) to validate usernames and passwords.
To log on with LDAP authentication, either the system must be set up to use a single default domain (see authentication.server.ldap.domain below), or the user name must be entered in the form of [email protected]. WIndows NT style logins (domain\user) cannot be used.
To configure Deephaven to authenticate users with LDAP, set the following properties in the configuration for the authentication server. In a typical installation, authentication server properties are set in the iris-authentication-server.prop file, located in /etc/sysconfig/illumon.d/resources.
Once the properties are set in iris-authentication-server.prop, set iris.enableManagedUserAuthentication in IRIS-CONFIG.prop to false and restart the authentication server, ACL server, and CUS for changes to take effect.
LDAP Properties
|
Properties |
Description |
|---|---|
|
|
Set to |
|
|
A comma-separated list of LDAP server hostnames |
|
|
The port number the LDAP service is listening to. This must be the same for all LDAP hosts. |
|
|
A comma-separated list of DNS SRV records to identify the hosts to use. The priority of the SRV records is respected. Within a given priority level, weights are ignored and hosts are selected randomly. If multiple SRV records are listed, all hosts from the first SRV record take priority over the hosts from the second SRV record. Because SRV records include a port number, the Note: If both |
|
|
Optional — A flag that determines how the authentication server will attempt to establish a secure connection to the LDAP server. There are three possible values:
|
|
|
A username with read access to the LDAP directory. |
|
|
The base64-encoded password for the rouser. This property is deprecated for security reasons. It is strongly recommended that all new installations use the
|
|
|
The path to the file containing the base64-encoded password for the rouser. It is recommended to use an absolute path (e.g., Note: To encode a password with base64 and store it in a file called "
|
|
|
The LDAP domain to search for users. |
|
|
A list of valid user domain names. This option is used when there are multiple domain names serviced by the LDAP server. For example, if the LDAP server contains the users "[email protected]", "[email protected]", and "[email protected]", then all three domains — "company1.net", "groupA.company1.net", and "company2.com" — would be listed under the property. If "company1.net" and "groupA.company1.net" are listed but "company2.com" is not, users "John" and "Mike" will be able to log in, and "Harry" will not. |
|
|
Determines whether users are required to include their domain name as part of their username when logging in. This is required when multiple |
authentication.server.ldap.domain
|
Domain name to use in conjunction with user names that do not include a domain. This value is only used when authentication.server.ldap.requireDomain is false. |
Adding Custom Trust Stores
Typically, when a client wants to add custom CA trust chains, they are added to Java's default trust store. This can be inconvenient because certificates added to the global trust store will affect all Java applications, which may not be desired. To avoid this situation, Deephaven's LDAP integration can be configured to use other trust stores in addition to the global java trust store.
Clients should first create a new trust store using the keytool utility and add any necessary trusted certificates to it. The following command will create a new trust store in the current directory named "ExampleStore" and add the certificate "MyCompanyCA" to it, aliased to the name "myCA":
keytool -import -file <path to Cert>/MyCompanyCA.cert -alias myCA -keystore ExampleStore
Repeat the same command for any other certificates required in order to add them all to the "ExampleStore" keystore.
The following properties are used to configure each additional trust store.
|
Properties |
Description |
|---|---|
|
|
The absolute path to the trust store file |
|
|
The password Deephaven should use to open the trust store. Note: the password must be base64-encoded. |
|
|
If the password is not provided through the password property, it must be stored in a password file that is specified with this property. It must be base64-encoded within this file. |
|
|
Optional — The trust store file's type. There are two possible values:
|
Testing LDAP Access
The ldapsearch command can be used to verify that the configured properties can be used to successfully bind to the LDAP directory. It is part of the openldap package and can be added to a Deephaven server using a package manager such as yum or apt. The following is a template for using this commandldapsearch.
ldapsearch -ZZ -h [hostname] -b "dc=mycompany,dc=net" -D "[rouser]" -s sub -W "(& (userPrincipalName=[user-name-to-test]) (objectClass=user))"
The -W option will cause ldapsearch to prompt for a password.
The -ZZ option is to require use of STARTTLS and a successful upgrade to TLS on the session. To test a configuration with LDAPS, a full LDAPS URI can be specified by using the -H flag instead of -h:
ldapsearch -H ldaps://[hostname]:[port] -b "dc=mycompany,dc=net" -D "[rouser]" -s sub -W "(& (userPrincipalName=[user-name-to-test]) (objectClass=user))"
When testing with the -ZZ option, ldapsearch will fail if TLS cannot be established, while the -Z option instead will report the TLS error but still continue to try to authenticate the user. These two options are comparable to the STARTTLS and TRYSTARTTLS options for Deephaven tlsflags.
Running ldapsearch without any of -H, -Z, or -ZZ, will attempt connect without TLS and also without requiring SSL. While ldapsearch can connect without requiring SSL, Deephaven always requires SSL to establish a connection to an LDAP server. One way to verify whether an SSL session can be established is by using openssl. For example, the following will attempt to connect to the LDAP server and validate its connection. The Verify return code at the end of its output should indicate 0 (okay). If it reports a problem verifying the certificate chain, it will probably be necessary to import the server's certificate (see Adding Custom Trust Stores, above).
openssl s_client -connect [hostname]:636
Verification of the SSL connection with a certificate to be imported can be done by specifying the certificate as an argument to the openssl utility:
openssl s_client -connect [hostname]:636 -CAfile [full path to certificate]
Example Configurations and Test Commands
Below are several example LDAP configurations and corresponding ldapsearch commands that can be used to test them. These examples assume the password for the read-only user is "example-pass", which is represented by the base64 string ''ZXhhbXBsZS1wYXNz".
One Domain, STARTTLS
This example configuration uses one domain and will connect securely using STARTTLS.
authentication.server.ldap.enabled=true
authentication.server.ldap.hosts=ldap1.mycompany.net
authentication.server.ldap.domain=mycompany.net
authentication.server.ldap.rouser=readuser
authentication.server.ldap.ropass=ZXhhbXBsZS1wYXNz
The following command could be used to test this configuration:
ldapsearch -ZZ -h ldap1.mycompany.net -b "dc=mycompany,dc=net" -D "[email protected]" -s sub -W "(& (userPrincipalName=[user-name-to-test]) (objectClass=user))"
One Domain, STARTTLS, full LDAP DN used as the rouser:
This example configuration is similar to the previous one, but uses a complete LDAP DN as the read-only user, instead of a simple user name:
authentication.server.ldap.enabled=true
authentication.server.ldap.hosts=ldap1.mycompany.net
authentication.server.ldap.rouser=CN=readuser,OU=Users,DC=mycompany,DC=net
authentication.server.ldap.ropass=ZXhhbXBsZS1wYXNz
The following command could be used to test this configuration:
ldapsearch -ZZ -h ldap1.mycompany.net -b "dc=mycompany,dc=net" -D "CN=readuser,OU=Users,DC=mycompany,DC=net" -s sub -W "(& ([email protected]) (objectClass=user))"
One Domain, STARTTLS, with LDAP Servers Defined by SRV Records
This example configuration uses one domain, STARTTLS to connect securely, and retrieves the appropriate LDAP server names using a DNS service record.
authentication.server.ldap.enabled=true
authentication.server.ldap.services=_ldap._tcp.mycompany.net
authentication.server.ldap.domain=mycompany.net
authentication.server.ldap.rouser=readuser
authentication.server.ldap.ropass=ZXhhbXBsZS1wYXNz
On most systems, the dig command can be used to verify the SRV record:
dig -t SRV _ldap._tcp.mycompany.net
The of dig output will specify the hostnames that provide the LDAP service:
;; ANSWER SECTION:
_ldap._tcp.mycompany.net. 60 INSRV0 100 636 ldap1.mycompany.net.
_ldap._tcp.mycompany.net. 60 INSRV0 100 636 ldap2.mycompany.net.
The hostnames returned can be tested using the same ldapsearch command as the previous example.
One Domain, LDAPS
This example configuration uses one domain and will connect securely using LDAPS.
authentication.server.ldap.enabled=true
authentication.server.ldap.hosts=ldap1.mycompany.net
authentication.server.ldap.port=636
authentication.server.ldap.tlsflags=LDAPS
authentication.server.ldap.rouser=readuser
authentication.server.ldap.ropass=ZXhhbXBsZS1wYXNz
The following command could be used to test this configuration:
ldapsearch -H ldaps://ldap1.mycompany.net:636 -b "dc=mycompany,dc=net" -D "[email protected]" -s sub -W "(& (userPrincipalName=[user-name-to-test]) (objectClass=user))"
Multiple Domains, LDAPS
This example configuration supports authenticating users in multiple domains and will connect securely using LDAPS.
authentication.server.ldap.enabled=true
authentication.server.ldap.hosts=ldap1.mycompany.net,ldap2.mycompany.net
authentication.server.ldap.port=636
authentication.server.ldap.tlsflags=LDAPS
authentication.server.ldap.searchDomain=mycompany.net
authentication.server.ldap.validDomains=mycompany.net,altcompany.com
[email protected]
authentication.server.ldap.ropass=ZXhhbXBsZS1wYXNz
The following command could be used to test this configuration:
ldapsearch -H ldaps://ldap1.mycompany.net:636 -b "dc=mycompany,dc=net" -D "[email protected]" -s sub -W "(& (userPrincipalName=[user-name-to-test]@altcompany.net) (objectClass=user))"
Last Updated: 20 August 2019 09:54 -06:00 UTC Deephaven v.1.20180917
Deephaven Documentation Copyright 2016-2018 Deephaven Data Labs, LLC All Rights Reserved