Schemas
A Deephaven table schema is an XML document that describes a table. A schema must include a table's namespace, name, column names and data types. In addition to specifying the structure of the data, a schema can include directives controlling how data is imported and stored.
Schema files can be created by directly constructing XML files (e.g., using a text editor), or can be generated using built-in tools. In most cases, the easiest way to create or edit a schema file is by using the Deephaven Schema Editor. This tool is covered in detail in Schema Creation Tools.
This part of the documentation covers general schema requirements and features. Additional optional sections of schema are detailed in the Importing Batch Data and Ingesting Streaming Data. For information on additional schema attributes needed for external imports (such as from a CSV file, an XML document, or JDBC connection) or for ticking/streaming data, see Importing Data.
Basic Table Attributes
Metadata is imported to the database using XML-based schema files that contain definitions like the following examples:
<Table namespace="Ise" name="Quotes" storageType="NestedPartitionedOnDisk">
<Partitions keyFormula="__WRITABLE_PARTITIONS__[abs((__NS_TN__ + Ticker)
.hashCode() + __DAY_OF_YEAR__) % __NUM_WRITABLE_PARTITIONS__]"/>
<Column name="Date" dataType="String" columnType="Partitioning" />
<Column name="Ticker" dataType="String" columnType="Grouping" />
<Column name="Size" dataType="int" columnType="Normal" />
<Column name="Price" dataType="double" columnType="Normal" />
</Table>
<Table namespace="Korea" name="Securities" storageType="SplayedOnDisk">
<Column name="UnderlyingId" dataType="int" columnType="Grouping" />
<Column name="Id" dataType="int" columnType="Normal" />
<Column name="Ticker" dataType="String" columnType="Normal" />
<Column name="SecurityType" dataType="String" columnType="Normal" />
<Column name="Expiration" dataType="DateTime" columnType="Normal" />
</Table>
Each schema file contains definitions for exactly one table, and must follow the naming convention <namespace>.<table>.schema. For example, the above examples would be named Ise.Quotes.schema and Korea.Securities.schema. Deephaven will search for schema files in all directories defined by the semicolon-delimited SchemaConfig.resourcePath property.
The following three attributes are necessary for all Table elements:
|
Attribute |
Description |
|---|---|
|
|
The system namespace (e.g., |
|
|
the name of this table (e.g., |
|
|
|
Partitions
Deephaven has two distinct uses of the term "partition" as it applies to schemas. Both are required for partitioned tables (i.e., those using the NestedPartitionedOnDisk storage type).
- A partitioning column is a String column that must contain an identifiable value for each set of data appended to the table. This is required for all partitioned tables.
- The historical storage partitions, along with the partitioning key formula, are used to share table data across multiple storage locations as the data is merged into the historical database. This is required for all partitioned tables.
Typically, some form of date is used for the partitioning column value, but any string that meaningfully partitions the data can be used. Table data is associated together on disk by the partitioning column value, so queries will be more efficient if the partitioning value is a criterion commonly used for including or excluding data in a query.
Partitioning columns are specified by using the columnType="Partitioning" attribute in a column definition. Currently, partitioned tables must have exactly one such column. Further information on column definitions is provided below.
When writing merged historical table data to disk, Deephaven will place partitions of the input data in a directory identified by the namespace, storage partition, column partition, and table name.
Partition Key Formulas
Historical storage partitions correspond to directories available for historical storage on the disk; for scaling and performance benefits, these are normally mapped to different physical storage devices, whether local or network-connected.
Historical storage partitions are specified using the Partitions element, which uses the keyFormula attribute to map table rows to the available storage partitions. Specifically, this formula is used by merge operations in an updateView operation, the result of which is used to assign rows to a storage partition .
The following QueryScope parameters are available as input to the formula, in addition to the columns of the table:
|
Parameter |
Description |
|---|---|
|
|
An array of partition name strings corresponding to directories found at |
|
|
The number of available partitions (i.e., |
|
|
A string representing the namespace |
|
|
A string representing the table name |
|
|
A string representing the namespace and table name, joined with slash as a separator (e.g., |
|
|
The partitioning column value for this merge operation |
|
|
The day of the year, only available when |
|
|
A complete formula that automatically chooses a single partition for all data based on |
In addition, the following substitutions will be applied, in order to make writing appropriate partitioning formulas easier:
|
Token |
Substitution Description |
|---|---|
|
|
A complete formula that chooses a single partition for all input data, attempting to achieve balanced partition usage over long time horizons. The preferred way to write a formula that only refers to the |
|
|
A complete formula that uses the first grouping column (if there is one) in order to spread data across all available partitions, attempting to achieve balanced partition usage over long time horizons. Assuming the first grouping column is the most significant, keeps all grouped data together. Falls back to the same behavior as |
|
|
A complete formula that uses all grouping columns (if there are any) in order to spread data across all available partitions, attempting to achieve balanced partition usage over long time horizons. Effectively spreads grouped data across multiple partitions, which may be useful for queries. Falls back to the same behavior as |
|
|
A string representing the name of the first grouping column (i.e., the first column definition with the attribute |
|
|
An array of strings representing the names of the grouping columns (i.e., column definitions with the attribute columnType="Grouping"). Only available if there are grouping columns. |
Conventions and Recommendations
Some common conventions to follow:
- Large Tables: Tables with large amounts of data per column partition typically try to balance across all available storage partitions, while keeping related data together, often choosing to use a grouping column as part of the formula to achieve this.
- The easiest way to achieve this is to use the following formula, relying on token substitution:
${autobalance_by_first_grouping_column} - For an expanded example, the
Ise/Quotestable above might use the following formula:__WRITABLE_PARTITIONS__[abs(Objects.hash(__NS_TN__, Ticker) + __DAY_OF_YEAR__) % __NUM_WRITABLE_PARTITIONS__] - This serves to distribute data with the same value for the Ticker column together, while spreading data across all available partitions, taking into account day of year, namespace, and table name in order to approximate long term load balancing.
- The easiest way to achieve this is to use the following formula, relying on token substitution:
- Small tables: Tables with small amounts of data per column partition often simply use
${autobalance_single}, keeping data in a relatively compact format while utilizing all historical partitions over longer time horizons in order to approximate load balancing.
Columns
The <Column> elements contain the detailed information to define each table's columns, including the column's name, data type, and role as a partitioning or grouping column. At minimum these elements must contain the following attributes.
|
Attribute |
Description |
|---|---|
|
name |
Required – The name of the column as it will be stored in the database |
|
dataType |
Required – The type of the data stored in a column. This can be one of the following:
Note: Deephaven also supports other friendly names for some types, for instance, Integer will be automatically treated as int. This treatment does not apply, however to array types. An array of 32-bit values must be declared as int[]. |
|
columnType |
Optional – The role of the column in the table, one of the following: |
|
objectCodec |
Optional - A java class which controls how the column is stored on disk. See below for details on the provided codecs:
|
| objectCodecArguments |
Optional - Argument(s) provided to the objectCodec. How this value is interpreted depends on which codec is specified.
|
| symbolTable |
For String columns only, this specifies whether or not a symbol table will be used to store the data. Supported values are:
If it is not provided, the value of |
| encoding |
For String columns only, this determines the encoding used to store the value. Supported values are:
If it is not provided, a default encoding of ISO_8859_1 is used. |
Column Codecs
Each codec is mapped to a single column data type and may be used only with that type. The codec does not affect how the data appears in the Deephaven console. Custom codecs may be provided on the Deephaven classpath by implementing the com.illumon.util.codec.ObjectCodec<T> interface. The following are provided with Deephaven. For columns of these types, it is much more space efficient to use one of these codecs than to rely on the default java serialization.
|
Class Name |
Column Type |
Arguments |
|---|---|---|
|
|
|
The |
|
|
|
If specified, precision is used to specify the maximum number of decimal digits storable by this column. This codec uses the same encoding as |
|
|
|
If size is specified, values are encoded as fixed-size values. If not, a variable size encoding is used. A flag indicating nullability may also be specified (defaults to |
Following is an example for a simple schema; additional elements will be added in later sections.
<Table name="TestTable" namespace="TestNamespace" storageType="NestedPartitionedOnDisk">
<Partitions keyFormula="__PARTITION_AUTOBALANCE_SINGLE__"/>
<Column name="Partition" dataType="String" columnType="Partitioning" />
<Column name="Alpha" dataType="String" columnType="Grouping"/>
<Column name="Bravo" dataType="int" />
<Column name="Charlie" dataType="double" />
<Column name="Delta" dataType="double" />
<Column name="Echo" dataType="StringSet" />
</Table>
Schema Sections that Control Data Ingestion
Within the table definition of a schema, other sections can be added to provide instructions on how data can be added to the table. For batch data, instructions are provided in an ImportSource block. For streaming data, they are provided in a Logger, LoggerListener, or Listener block. Details on these sections are covered in the chapter on data import.
For information on schema directives for batch data imports, see Importing Batch Data.
For information on schema directives for streaming data, see Streaming Data.
CopyTable Schemas
One table layout may be used for multiple tables. When this is required, it is not necessary to replicate the entire source schema definition for each new table. Instead, a schema definition can use the CopyTable element instead of the Table element, referring to another source table for its definition. The CopyTable element then uses the source table's schema for all definitions, including columns, imports, loggers and listeners.
The schema file naming convention of <namespace>.<table>.schema also applies to CopyTable schema files. The namespace and table in the CopyTable schema filename should be those of the duplicate table, not the source table.
A CopyTable definition contains the following attributes:
namespace- the duplicate table's namespacenamespaceSource- the source table's namespacename- the duplicate table's namenameSource- the source table's name
For example, the following would use the definition of the table ExampleTable from the namespace ExampleNamespace for a table called ExampleTableCopy in the namespace CopyTableNamespace:
<CopyTable namespace="CopyTableNamespace" namespaceSource="ExampleNamespace" name="ExampleTableCopy" nameSource="ExampleTable" />
A duplicate table functions in the same manner as any other Deephaven table. Data can be imported through the importer classes or real-time ingestion, partitions will be generated in the same ways, intraday data can be merged to the historical database, and queries will work as expected.
Loggers and listeners are not regenerated by the generate_loggers_listeners script for CopyTable definitions, as the loggers and listeners from the source table should be used for the duplicate table.
Note: Chained CopyTable definitions are not supported at this time; a CopyTable must refer to a fully defined Table schema.
Schema Creation Tools
Overview
Schema Requirements
Before importing batch data into Deephaven, a table schema must be created to define the layout of the table that will receive the data. Depending on the type and layout of the source data, a suitable schema may only need the correct column names and data types, or it may also need additional import instructions that govern how data will be transformed and otherwise handled during the import process.
The two currently supported types of batch source data for which schemas are needed are CSV (comma-separated value) and JDBC (Java Database Connectivity.) If example data is available in one of these formats, that example data can be used to create a best guess Deephaven schema as a starting point. This is usually the easiest way to create a new schema, especially for complex data sets, and this method can be used even if the batch format will not be how data will be loaded once the Deephaven schema is in regular use.
Tables that will receive streaming data, from a Logger, have similar requirements to those that will be used for batch imports. Whether a table receives data from batch imports, streaming sources, or both, the basic requirements of the schema are the same. At a minimum a schema must contain the column names and datatypes, and some basic information about how the table's data will be stored. These requirements are detailed in the Schema section.
Creating Schema Files
A schema file for a Deephaven table can be manually created using a text editor. This is typically done by picking an existing schema file to use as a starting point, and then copying, pasting, and modifying it to create a suitable layout for the new table. This does not require any special tools, but it can be tedious for large tables, or when many tables are needed. To simplify this process, Deephaven includes schema creation classes and tools that can analyze data sets and infer column details and import instructions, and that can also generate and validate sections and entries within the schema files. The schema creation tools make schema creation faster and easier, and help avoid issues related to formatting and syntax.
In many cases, these tools can create ready-to-use schema files just from example data, but sometimes there will be insufficient information available in the data set to automatically interpret it, or the user may want to make some deliberate changes to the data during import. As such, any schema files generated by these tools should be reviewed, and if needed, modified by an administrator prior to being added to the Deephaven system.
The schema creator tool itself can be used to create a new schema from scratch, edit an existing schema, or derive a new schema from example data. When using example data, there are two source types currently supported: CSV and JDBC.
CSV
CSV refers to a variety of text file data formats. Although they are called "comma-separated", the delimiter could in fact be some other character (such as a tab or semicolon). Other details of formatting are similarly flexible. There is no official standard for CSV formatting, so Deephaven provides flexibility when defining how to interpret and transform text data from CSV files into structured storage in Deephaven tables.
Because CSV is a text file format that provides no metadata, the schema generation tool must analyze all data that it finds in a sample data file. Like CSVs used to import data into Deephaven, CSVs used for schema generation must include a header row with column names. The schema generation process can be simplified and accelerated somewhat by using a sample of data, as long as there are enough rows to clearly demonstrate the formats and ranges of data values that will be included in normal imports.
For non-String columns, the schema generator will scan all the values in the supplied CSV file to ensure the inferred data type remains valid for all values in the column. As an example, the first value for a column might be 4. This would cause the schema generator to tentatively categorize this column as an integer type (short or long, depending on settings). If a 5.5 was encountered in a subsequent row, the generator would "promote" the column to a floating point datatype. If another value in the column included non-numeric characters, such as XYZ, the generator would then mark the column as a String column. Once a column has been designated as a String column, no other checking is done, as Strings are always valid to accept any data from a CSV.
If a column is empty for all rows, it is marked as a String and a warning message is written to the log. In this case, the administrator should examine the generated schema and validate the generated XML before adding it to Deephaven. Date/time values are also a special case, where the schema generator will attempt to match the format of the date/time string to a known format for which it can provide a conversion formula. Like the earlier example with numbers and Strings, if a date/time column has multiple different formats in it, it will end up being marked as a String column, since no single formula could be found that matched all of the column's data.
JDBC
Java Database Connectivity is a standard that describes how data store drivers provide common Java interfaces to a wide variety of databases and other data storage mechanisms. Unlike CSV, JDBC provides data type information for columns, and the abilities to filter and manipulate data using a SQL query.
In most cases, it is easier to generate schema files from JDBC than from CSV. This is because of the result set metadata that JDBC data sources provide (or can provide.) The default behavior of the JDBC schema generator is to request data types of the result set columns from the data source. These data types are then mapped to Deephaven data types to provide the schema details.
For cases where the data source cannot provide column data type information, or where the source database is not ideally configured to store the data (e.g., numbers or date/times in String fields), the JDBC schema generator provides options to scan data as is done in the CSV schema generator, or to use a combination of data scanning and metadata.
XML
XML (eXtensible Markup Language) is a container format that can contain sequential and/or hierarchical data. Like CSV, XML by itself does not provide or guarantee a particular layout to the data. Simpler data sets that use XML typically have one element per record, are not hierarchical, and use either attributes or element values to store record values. More complex XML feed may include metadata, common data updates, and hierarchically related records. Deephaven provides "generic" XML data import capabilities that can accomodate most of the simpler forms. The more complex XML data feeds, including those that include data that must be imported to multiple tables in a single operation, require custom importers that are specific to the data format encapsulated within the XML (e.g., FIXML).
Although XML documents can include metadata, there is no standard as to how such column data types and other such information should be formatted. Therefore, for generic XML imports, Deephaven treats XML files similarly to how it handles CSV files. To find column data types, the schema generation tool analyzes all data that it finds in a sample data file. In addition, if named (rather than positional) values are used, the schema generator will also scan all importable elements to find column names that will be needed for the table.
For non-String columns, the schema generator will scan all the values in the supplied XML file to ensure the inferred data type remains valid for all values in the column. As an example, the first value for a column might be 4. This would cause the schema generator to tentatively categorize this column as an integer type (short or long, depending on settings). If a 5.5 was encountered in a subsequent row, the generator would "promote" the column to a floating point datatype. If another value in the column included non-numeric characters, such as XYZ, the generator would then mark the column as a String column. Once a column has been designated as a String column, no other checking is done, as Strings are always valid to accept any data from a XML.
If a column is empty for all rows, it is marked as a String and a warning message is written to the log. In this case, the administrator should examine the generated schema and validate the generated XML before adding it to Deephaven. Date/time values are also a special case, where the schema generator will attempt to match the format of the date/time string to a known format for which it can provide a conversion formula. Like the earlier example with numbers and Strings, if a date/time column has multiple different formats in it, it will end up being marked as a String column, since no single formula could be found that matched all of the column's data.
The Schema Editor
The Schema Editor utility greatly simplifies the process of creating and editing schemas in Deephaven. In addition to the convenience of the graphical user interface, the Schema Editor validates characteristics like column names and ensures correct formatting of the schema file. This means problems with schema definitions can be found and fixed immediately, or avoided entirely, rather than requiring multiple cycles of attempted import and additional editing. The utility also allows for preview of data parsing, and testing of data import, which again allows for faster and easier schema development.
The Schema Editor provides a number of options for working with schema files and batch data, such as editing and cloning an existing schema, inferring a new schema from example data, and creating import queries to automate the import of data with a schema.
The Schema Editor can be accessed by clicking the Advanced button found at the top of the Deephaven Console.
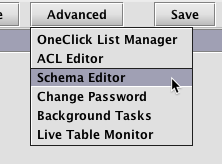
Note: The Schema Editor is only available to users who are listed in the iris-schemamanagers ACL group in Deephaven. If the Schema Editor option is not shown in the drop-down menu, you are not a member of that group, and not authorized to use the editor.
After selecting Schema Editor in the drop-down menu, a dialog window will provide options for renaming the Panel Title, selecting a Query Host (required), adjusting the Heap Size, or providing additional JVM Arguments. See below:
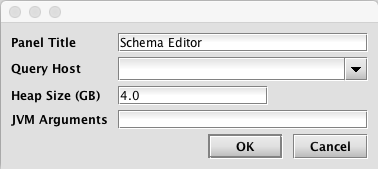
Make any changes as appropriate or accept the defaults and click OK.
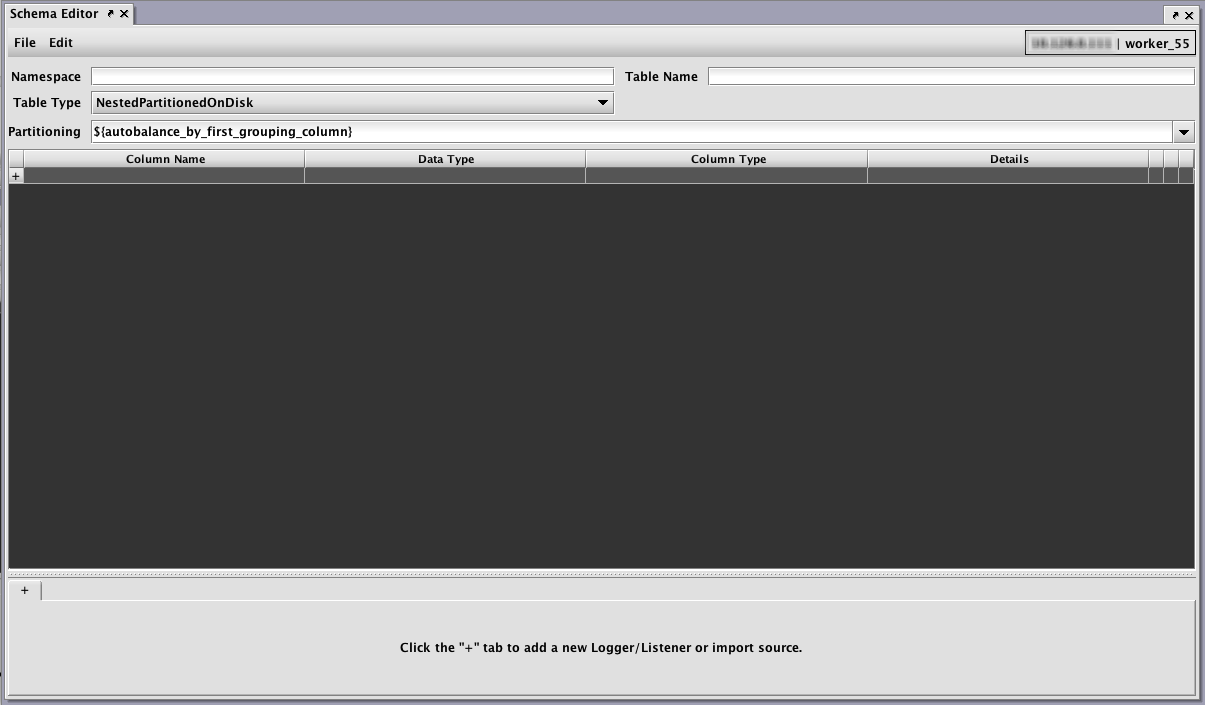
The Schema Editor window will open.
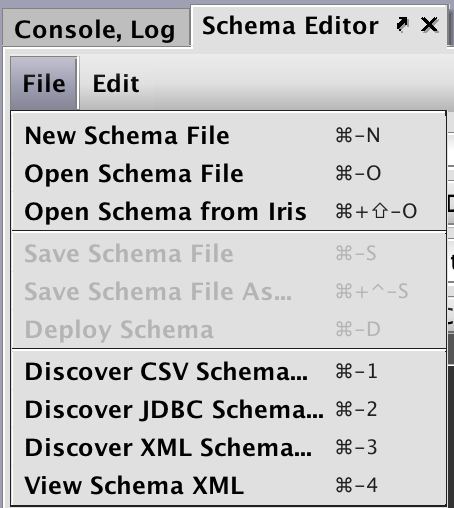
As shown in the File menu above, the following options are available:
- New Schema File enables users to create a new schema from scratch, with all properties manually entered.
- Open Schema File enables users to open and then edit or clone an existing schema file.
- Open Schema from Iris enables users to open and then edit or clone an existing schema that has already been deployed to a Deephaven installation.
- Save enables users to save a new or edited schema to a file.
- Save As enables users to save a new or edited schema to a file with a specific name.
- Deploy enables users to install and deploy the schema on the server.
- Discover CSV Schema… enables users to review the schema layout information from a sample from a CSV-based data file.
- Discover JDBC Schema… enables users to review the schema layout information from a sample data set from a JDBC-based source.
- Discover XML Schema… enables users to review the schema layout information from a sample XML-based data file.
- View Schema XML enables users to view the XML file generated for a schema.
Table and Column Properties
Once a schema has been loaded in the editor, the Schema Editor window presents a set of core table properties followed by a grid of column properties, and then a tabbed set of sections at the bottom. The bottom part of the form is for optional sections of the schema such as ImportSources and Logger/Listener details.
For example, the following image shows a fairly complex schema in the Schema Editor after opening the PersistentQueryConfigurationLogV2 table from the DbInternal namespace.

Each row in the top section represents a column in the table, with its name, data type, column type, and other attributes displayed. Special attributes, such as character set encoding for String columns, can be edited by clicking the ellipsis button  at the right of the row. The other attributes (name, data type, and column type) can be edited directly in the grid by typing, or by selecting from drop-down lists.
Properties such as column names are validated immediately when they are entered, while other properties, such as the requirement for a partitioning column, are checked when a schema is saved or deployed.
The up/down arrows  at the right can be used to change the order of the columns in the schema file. (Note: this positioning will be reflected in queries of the table that don't provide other column ordering information). Columns can also be reordered by dragging and dropping their rows with a mouse.
The X button  on the left will delete the column in that row. Undo/redo is supported for most operations in the Schema Editor, so accidental deletions or edits of columns can be easily reverted.
To add a new column to the table, click the button with the plus sign  , which can be found on the left side of the table properties table after the last row. The row for the new column will be added with a name like
 NewRow (with a numeric suffix, if there is already a NewRow entry). The new row can then be renamed, moved to a different location, and have its data type and other properties edited.
Note: if a class other than the built-in Deephaven data types is to be used for a column data type (or elsewhere in the Schema Editor, such as for a Logger SystemInput) that class will need to be available in the class path of the server where the Schema Editor is being run. Ideally, this should be done by adding the correct JAR file(s) to /etc/sysconfig/illumon.d/java_lib, so the class will also be available later when the schema is used.
For a String column, pressing the ellipsis button at the right of the panel brings up the Edit Column dialog. For example, clicking on this for the ScriptCode column shows the following options.
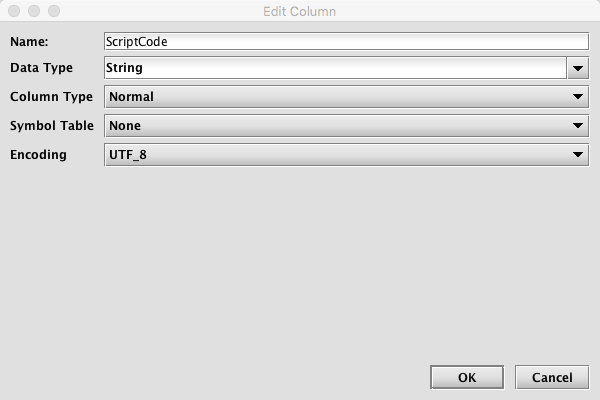
This dialog allows the user to change a column's attributes.
- Name - this is the column name; changing it has the same effect as changing the Column Name by editing it directly in the panel.
- Data Type - this is the column's data type; changing it has the same effect as changing it directly in the panel.
- Column Type - this is the column's type; it provides the same options as clicking it directly in the panel.
- Symbol Table - this provides the option to select the symbol table attribute. If changed, the attribute will appear in the column panel's Details section.
- Encoding - this provides the option to select the encoding attribute. If changed, the attribute will appear in the column panel's Details section.
Logger, Listener, Logger/Listener, and ImportSource Properties
The tabs in the bottom section of the Schema Editor contain information found in the Logger, Listener, Logger/Listener, and ImportSource blocks of the schema XML. If a new schema is discovered from CSV or JDBC, an ImportSource section is automatically added in the lower section of the interface. To manually add one or more of these sections, click the + tab at the left of the tab set in the lower area of the form as shown below.

Like the upper portion of the Schema Editor, selecting a tab in the lower section enables you to view and edit the properties associated with that schema component.
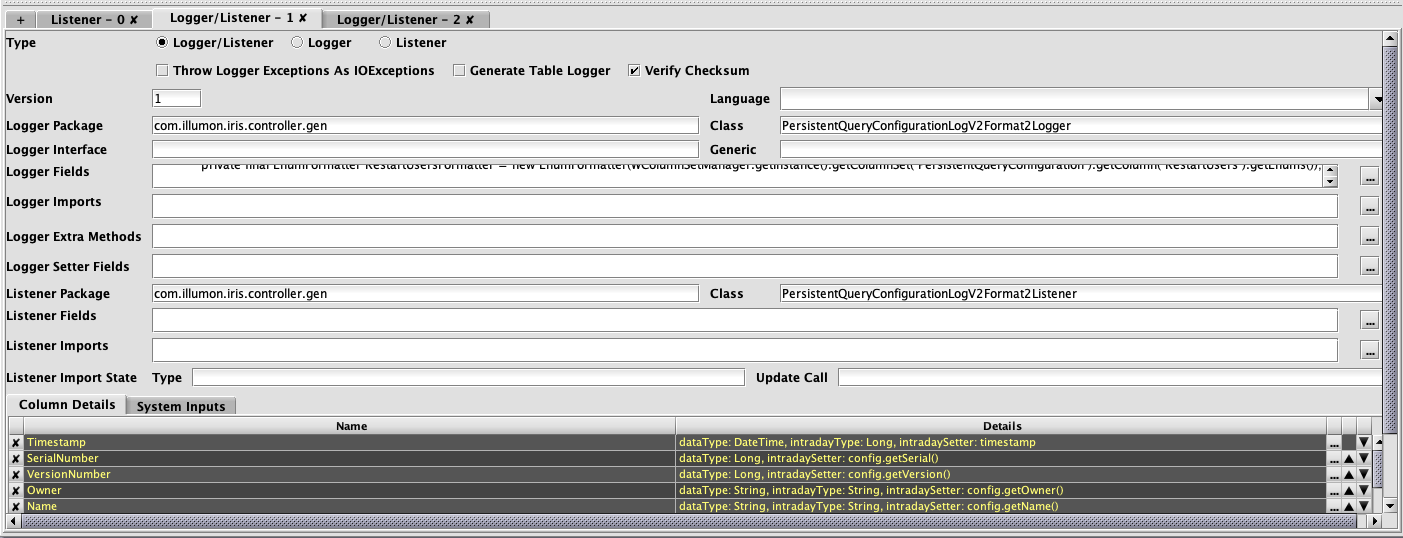
The X button can be used to delete an entry, and the ellipsis button can be used for editing details. Also, the buttons with the up/down arrows can be used to reorder the rows (as can drag-and-drop). However, order of columns is not significant for the Logger, Listener, or ImportSource sections of schema files. Like the upper section, the last row of the table in the lower section has the button with the plus sign , which is used for adding new entries.
Entries in ImportSource, Logger, and Listener sections of schema files can have more, and more complex, details than those of the columns themselves, so most editing in the lower section is performed after clicking the ellipsis button , with different dialogs providing the attributes that are valid for the selected entry.
For instance, the details for the Owner column above:
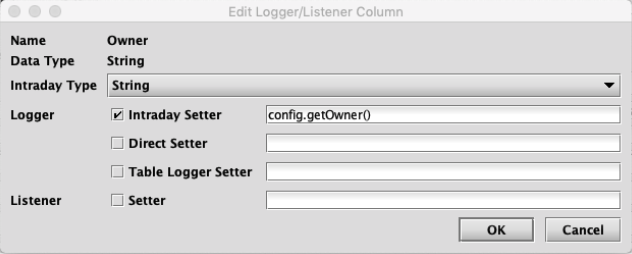
In this case, the check boxes for Direct Setter and Setter are not selected because these attributes are not needed and not specified for the Owner column. It is common in the dialogs for editing these types of details to include many optional attributes whose use is controlled by check boxes.
Within the ImportSource tab, there are also fields used by the CSV and JDBC importers. These are used to test the import process and when creating scheduled import jobs.
The Preview Iris Table button will create an in-memory table in Deephaven and import the data from the selected source using the current schema. This allows validation of the schema and import settings without having to deploy the schema and without having to create table data files on the server. The import preview is generated on the Deephaven server, so any files, classes, or database connectivity required for the import must be available from your Worker. This is because imports run on the server, and this makes the preview more consistent with the eventual import job.
The Create Import Query button allows the entered details to be used to create scheduled import jobs in Deephaven. This is equivalent to creating a new CsvImport,JdbcImport or XmlImport query in the Query Config panel of the Console.
Discovering Schema Layout from Example Data
The "Discover" options from the Schema Editor's File menu provide access to the CSV and JDBC schema generator classes. They allow the user to select a data source that contains example data representative of the data that will be stored in the table whose schema is being created. Note: These classes are documented earlier in this chapter.
The "Discover" actions add to the schema generator classes by providing interactive dialogs where the arguments needed by the classes can be entered, and by automatically populating the output of the schema generation classes into the schema document being edited.
Discover Schema from CSV
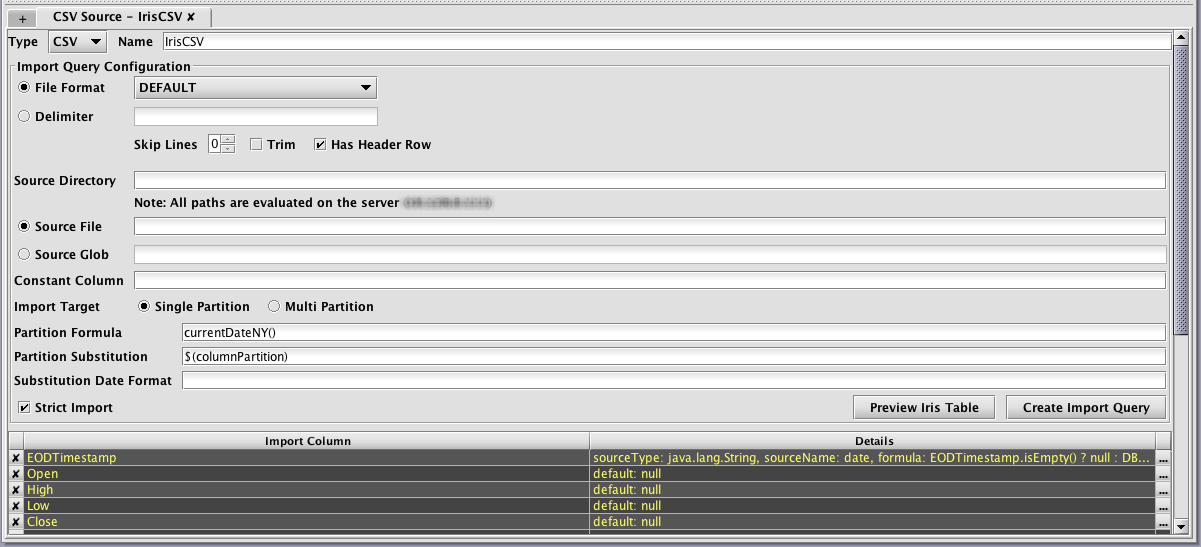
Selecting Discover CSV Schema… from the Schema Editor's File menu generates the Discover Schema from CSV dialog window, as shown below
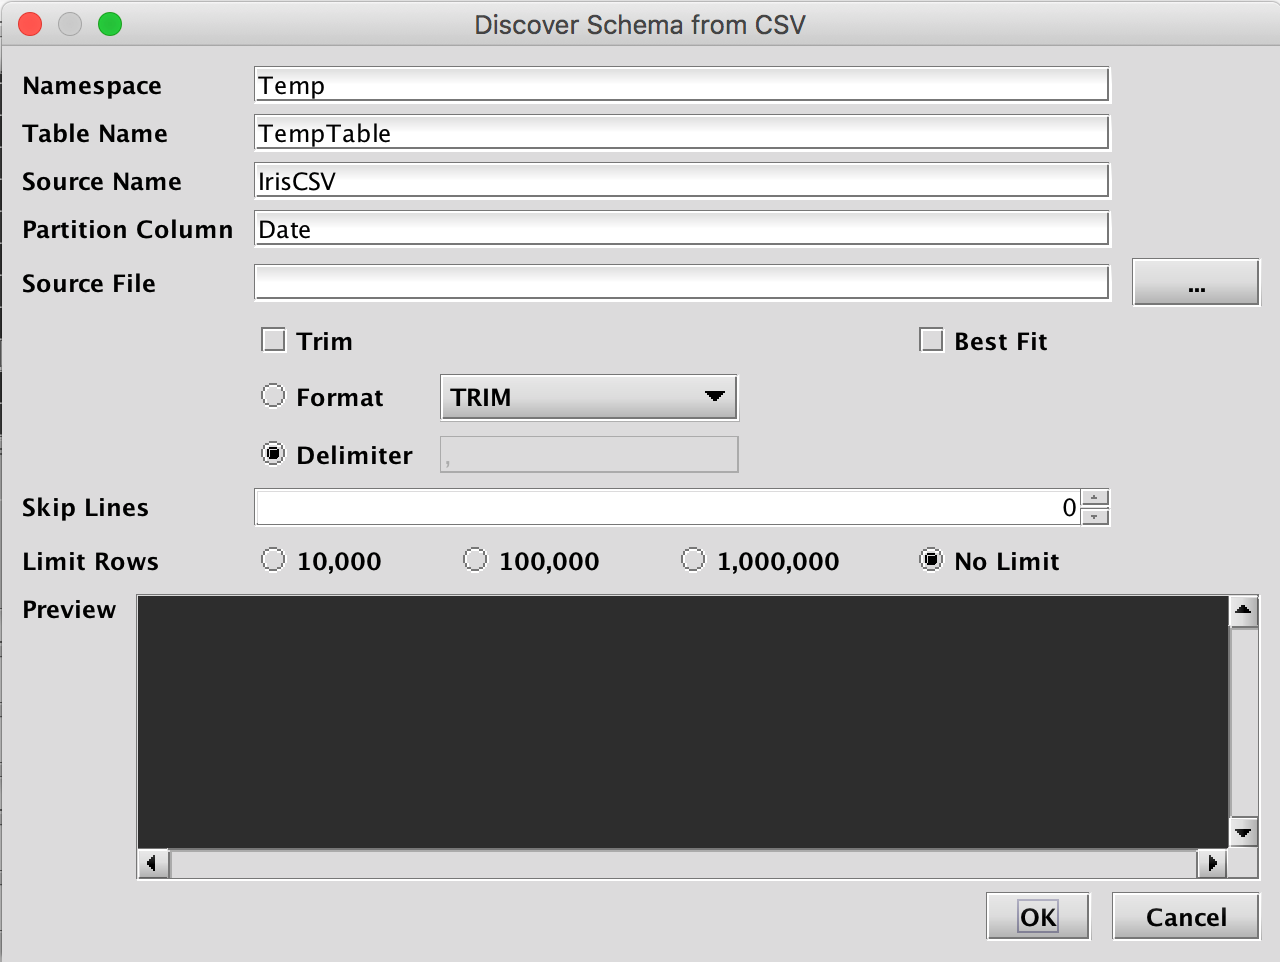
This window provides attributes needed to execute the CSV schema generator class. When launched, default values are generated for most fields. The namespace and table name properties can be entered here, or later in the main Schema Editor pane. The only required entry to proceed is the Source File that will be parsed and analyzed. This file name can be typed in, or manually selected after clicking the ellipsis button. Once selected, the Preview panel allows the user to quickly see whether properties such as the file format, delimiter, and number of lines to skip, are correct for this file. Note: The Preview panel initially reads a few rows from the file, and will load more rows as the user scrolls to the bottom of the grid.
The Limit Rows setting can be used to speed analysis of CSV data when the sample file is large. However, this requires the values found in the first rows of the table are sufficiently representative of those found later in the data set.
Discover Schema from JDBC
Selecting Discover JDBC Schema… from the Schema Editor's File menu generates the Discover Schema from JDBC dialog window, as shown below.
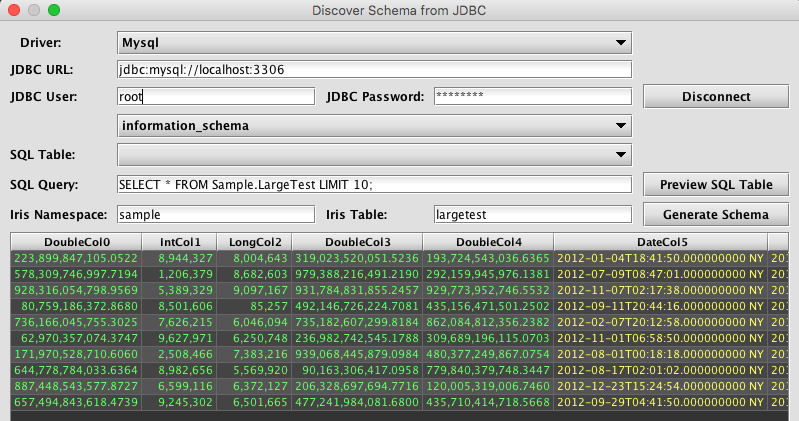
The Discover Schema from JDBC dialog window provides an interactive way to use the JDBC schema generator. Like the JDBC schema generator class, this dialog requires parameters such as a JDBC Driver to use and the JDBC connection URL. The username and password are also required.
Unlike the discover process for CSV, the Discover Schema from JDBC process actually connects to the data source. This allows the schema editor to interactively browse the tables, which subsequently makes import query creation easier.
Once the user clicks Connect and successfully connects to the data source, other fields will be enabled, which allows the user to view catalogs and tables that are available from that data source. For example, when MySQL is selected as the Driver, the user will then be presented with a list of databases using the unlabeled drop-down menu above SQL Table. The user can then see tables available from the selected database in the SQL Table list. Note: these lists are only for reference, and do not change what database or table is "current" for the JDBC connection. In the case of MySQL, for example, either the database to use must be specified in the URL, or the query would need to include the database name(s) as a prefix to any tables referenced in the query.
The import query can be added to the SQL Query field and then tested/previewed by clicking Preview SQL Table. If the source table is large, preview will be faster if the query includes a row-limiting clause, such as LIMIT for MySQL or TOP for SQL Server. However, it is important this limit be removed from the actual import query used when creating a JDBC import job.
After completing one of the discovery dialogs, the Schema Editor will populate the main form with table properties, column details, and an ImportSource section returned by the schema generator class. These properties should then be reviewed and adjusted as needed (e.g., correcting data types, renaming columns, etc).
Discover Schema from XML
Selecting Discover XML Schema… from the Schema Editor's File menu generates the Discover Schema from XML dialog window, as shown below.
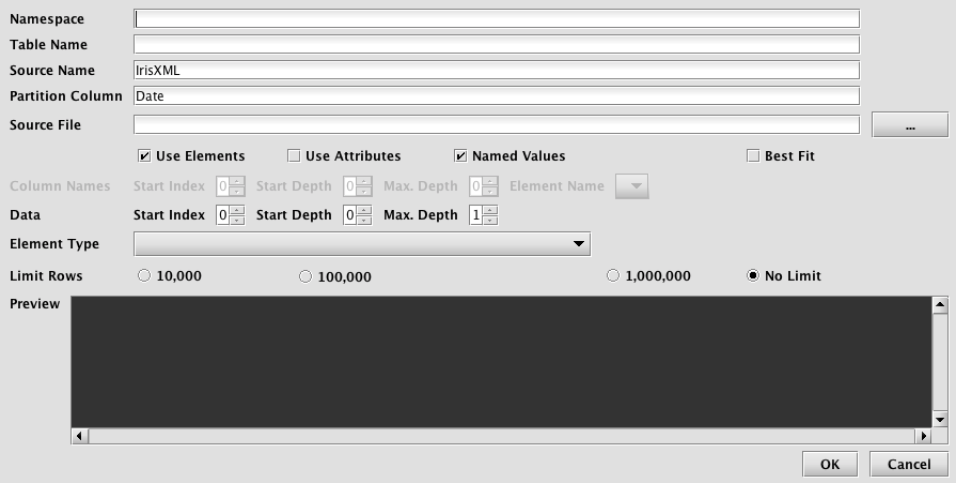
This window provides attributes needed to execute the XML schema generator class. When launched, default values are generated for most fields. The namespace and table name properties can be entered here, or later in the main Schema Editor pane. The only required entry to proceed is the Source File that will be parsed and analyzed. This file name can be typed in, or manually selected after clicking the ellipsis button. Once selected, the Preview panel allows the user to quickly see whether parsing properties are correct for this file. Note: The Preview panel initially reads a few rows from the file, and will load more rows as the user scrolls to the bottom of the grid.
XML itself is simply a container format that provides various ways to store data. As such, only certain uses of XML lend themselves to generic import by the Deephaven XML importer. The XML parsing settings of this dialog allow tuning of the XML importer to handle a variety of common XML data organization formats. In order to be importable by this tool, an XML file must have data that can be loaded into a single table, and that has unique field names per record. A data file can have field names included with the data (named elements or named attributes), or can use positional fields, with a separate section of the document providing the field names.
Parsing settings:
- Named Values - When checked, field values within the document will be named. E.g. a value called Price might be contained in an element named Price, or an attribute named Price. When cleared, field names (column names) will be specified somewhere in the document separate from the data, and the data values will be stored positionally. (See below for an example of data that uses positional values)
- Element and/or Attribute values can be used when importing data. At least one must be selected.
- Use Elements - When checked, field values will be taken from element values. E.g. <Price>10.25</>
- Use Attributes - When checked, field values will be taken from attribute valued. E.g. <Record ID="XYZ" Price="10.25" />
- Column Names - This section is enabled when Named Values is cleared
- Start Index - Starting from the root of the document, the index (1 being the first top-level element in the document after the root) of the element under which column names can be found.
- Start Depth - Under the element indicated by Start Index, how many levels of first children to traverse to find an element that contains column names.
- Max Depth - Starting from Start Depth, how many levels of element paths to traverse and concatenate to provide a list that can be selected under Element Name.
- Element Name - The name or path of the element that will contain column names.
- Data - This section is for selecting the data elements themselves to be traversed when importing data, inferring column types, and, when Named Values is checked, finding column names.
- Start Index - Starting from the root of the document, the index (1 being the first top-level element in the document after the root) of the element under which data can be found.
- Start Depth - Under the element indicated by Start Index, how many levels of first children to traverse to find an element that contains data.
- Max Depth - Starting from Start Depth, how many levels of element paths to traverse and concatenate to provide a list that can be selected under Element Name.
- Element Name - The name or path of the element that will contain data.
Example of a portion of a positional XML file:
<dataset>
...
<column-names type="array">
<column-name>Date</column-name>
<column-name>Open</column-name>
<column-name>High</column-name>
<column-name>Low</column-name>
<column-name>Close</column-name>
<column-name>Change</column-name>
<column-name>Traded Volume</column-name>
<column-name>Turnover</column-name>
<column-name>Last Price of the Day</column-name>
<column-name>Daily Traded Units</column-name>
<column-name>Daily Turnover</column-name>
</column-names>
...
<data type="array">
<datum type="array">
<datum type="date">2018-02-15</datum>
<datum nil="true"/>
<datum type="float">8.16</datum>
<datum type="float">7.933</datum>
<datum type="float">8.004</datum>
<datum nil="true"/>
<datum type="float">15379343.0</datum>
<datum type="float">123125796.0</datum>
<datum nil="true"/>
<datum nil="true"/>
<datum nil="true"/>
</datum>
<datum type="array">
<datum type="date">2018-02-14</datum>
<datum nil="true"/>
<datum type="float">8.134</datum>
<datum type="float">7.898</datum>
<datum type="float">8.1</datum>
<datum nil="true"/>
<datum type="float">17604928.0</datum>
<datum type="float">141650721.0</datum>
<datum nil="true"/>
<datum nil="true"/>
<datum nil="true"/>
</datum>
This file has column names under dataset\column-names\column-name elements, and data values matched positionally under dataset\data\datum\datum elements.
Its import settings look like this:
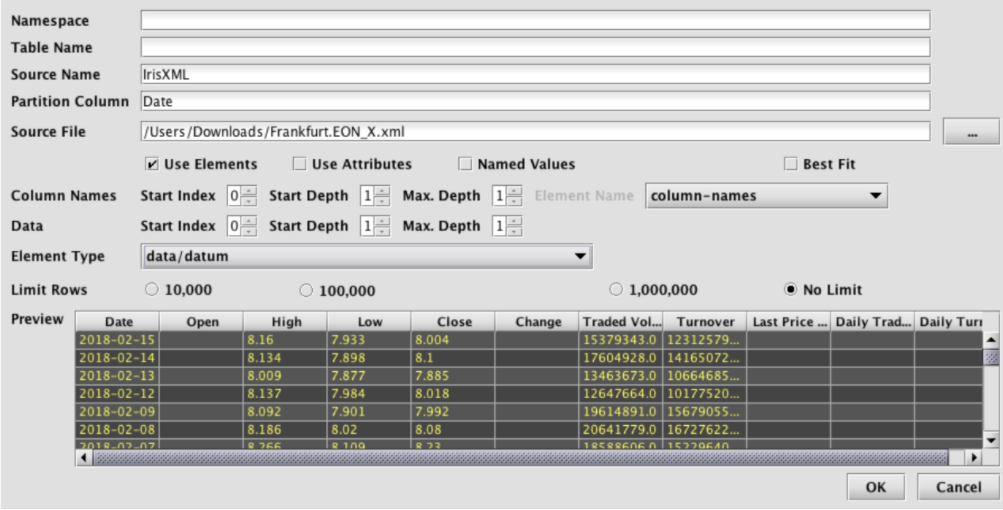
In many cases it will be easiest to experiment with XML parsing settings, and view the preview results, to find the correct settings.
The Limit Rows setting can be used to speed analysis of XML data when the sample file is large. However, this requires that the values found in the first rows of the table are sufficiently representative of those found later in the data set.
Saving and Deploying the Schema
Once the schema has been created or edited into a desired state, it can be saved or deployed.

Like many editing tools, the Schema Editor allows Save and Save As. If Save is selected, but the file has never been saved before, the Save As dialog will be displayed instead. Schema files are saved or loaded on the machine where the Schema Editor is running.
The Deploy option is the equivalent of using the deploy_schema script. It will install the schema on the server and create or update the associated table definition and the table will then be available for import, logging, and querying activities.
Manually Modifying Schema Files
In the earlier example, the schema file produced was suitable to deploy and use for importing data. However, in some cases, it may be necessary to modify a schema file before using it. Some reasons for modifying a generated schema file include:
- Multiple grouping columns – The schema generators allow for the option of specifying a column to be marked as
columnType="Grouping". If multiple grouping columns are needed, this change can be easily made by editing the generated file. - Empty source columns marked as String – if a sample file has no data for a column, it will be created as a String column. If the type is known, it can be changed by editing the generated file. Note that it will probably be necessary to also add an
ImportColumnwith adefault="null"to ensure import continues when it encounters the empty fields. String fields can be empty, but a field being parsed into a numeric type must have a default if the source has any empty values. - Boolean types – The schema creators do not recognize Boolean types;
Y/Nwill be marked as char, and1/0will be marked long or short, depending on settings.True/Falsewill be handled as String. Customization of the schema would be needed to make the column a Boolean column when these are known to be Boolean values. - BigDecimal types – The CSV schema creator uses long or double as its largest numeric types. If
BigDecimalis needed for storing data accurately, the column data types should be changed manually. - Renaming or reformatting names for the Deephavencolumns – If the legalized column names from the source are not ideal for the Deephaven table, the names can be changed in the schema file.
ImportColumnentries will also need to be created or updated to correctly map source names to target names. - Adding formulae for other special types (e.g., date/time values in unrecognized formats) – If a date/time or other special field is in a format that does not match any of the existing converters, that field will be marked as String. The schema file could then be edited to change the column type and add an
ImportColumnentry with a formula to convert these data during import. See below for details on adding custom converters for other special data conversions. - Adding derived columns – In some cases it may be desirable to parse or reformat a column during import, or even combine multiple columns when calculating the value for new column (e.g., if a date/time value is in one field, and its time zone is in another). Such custom formulae, column mappings, and use of custom field writers must be manually added to the generated schema file.
Refer to the Importing Data Guide for details on definitions, and creating custom formulae, transforms, or field writers to extend the capabilities of generated schema files.
Converters and Adding Custom Converters
The schema creators have a number of built-in converters to recognize various date/time formats. Unrecognized formats will result in a date/time field being treated as String. If ambiguous data is included, such that multiple converters match all the data values, the column will also be treated as String, and a warning message will be written to the log.
|
Built-in Converter |
Matching Data |
|---|---|
|
ISO format with date only |
2017-08-30 |
|
ISO UTC date/time with optional sub-second precision (no T) |
2017-08-30 11:59:59.000Z |
|
ISO UTC date/time with optional sub-second precision (with T) |
2017-08-30T11:59:59.000Z |
|
ISO UTC two digit offset date/time with millisecond precision |
2017-08-30T11:59:59.000+04 |
|
ISO UTC four digit offset date/time with millisecond precision |
2017-08-30T11:59:59.000+0400 |
|
ISO UTC two digit offset date/time with microsecond precision |
2017-08-30T11:59:59.000123+04 |
|
ISO UTC four digit offset date/time with microsecond precision |
2017-08-30T11:59:59.000123+0400 |
|
ISO time zone date/time with optional sub-second precision |
2017-08-30T11:59:59.000 NY |
|
Exchange timestamp (will be converted to NY time) |
2017-08-30T11:59:59.000 |
|
Timestamp UTC with optional sub-second precision |
2017-08-30 11:59:59 or 2017-08-30 11:59:59.123456 |
|
SQL Server default format |
AUG 30 2017 11:59AM |
Converters for other formats can be included by adding their details to a property file used by the schema creator process. Here is an example converter that could be added in a property file:
SchemaCreator.converter.name.1=USDateTimeSeconds1SchemaCreator.converter.pattern.1=^((0?\\d)|(1[0-2]))\\/(([0-2]?\\d)|(3[0-1]))\\/\\d{4} (([0-1]?\\d)|(2[0-3])):[0-5]\\d:[0-5]\\d$SchemaCreator.converter.formula.1=new DBDateTime(new java.text.SimpleDateFormat("MM/dd/yyyy HH:mm:ss").parse($TARGETNAME$).getTime()*1000000)SchemaCreator.converter.sourceType.1=StringSchemaCreator.converter.targetType.1=DateTime
There are five components that comprise the definition for the custom converter. All five are required. Note the format of the property names: SchemaCreator.<atrribute name>.<unique index of the convertor>. The index value must match across the five properties. The values do not have to start at 1, or be sequential, but it is important to ensure index numbers across multiple property files do not collide.
These five pieces can appear in any order and do not have to be contiguous, but all five pieces must be present if any one of them is present. If an incomplete converter entry is detected when a schema creator process starts, the process will fail and will log details about which components of the definition are missing.
name- Thenameattribute is mainly for convenience in identifying a particular converter.pattern- The pattern is of particular importance. This regular expression string is used to match data the converter can process. It must be very specific so this converter does not overlap any other converters, and so this formula is not given any data that it cannot process. The example regex limits the month portion of strings it will match to numbers less than 13, which helps avoid matches to non-US date strings where the day would be written before the month. When trying to find a converter to use for complex data, the schema generator will try to find one and only one converter whose pattern matches all the non-empty values from the sample data. Note that all backslashes in any property values must be escaped by doubling them. In this example, the regex will match date/time strings like this one: 01/11/1975 11:10:23formula- The formula contains a Java expression that will be used to convert the source data to the target data type. It must include the$TARGETNAME$token, which will be replaced with the column name by the schema generator. In this case, a JavaSimpleDateFormatis being used to parse the date/time string into a Java Date. Then the.getTime()method is used to get an epoch milliseconds value for theDate. Deephaven uses epoch nanoseconds, so this value is then multiplied by one million and passed to theDBDateTimecreator method to return aDBDateTime.sourceType- ThesourceTypecontrols how the importer will interpret a value before passing it to the formula. It will usually be String, but if the source value was already an epoch value, for instance, then the source type might be long instead of String.targetType- ThetargetTypemust match the type produced by the formula. This is used by the schema generator to set the appropriate column type for columns that match the regex pattern.
Schema Generator Classes
The schema generator classes are Java classes that can read sample data and infer column properties and needed import operations from the data values. They can be used directly from the command line, in batch files, or as classes within a Java application.
These are the schema generator classes and the command lines used to invoke them. You may use iris_exec to invoke any of the schema creators without arguments, to display the available options. The arguments are also described in detail in this document..
|
Class Name |
Command Line Interface |
|---|---|
|
|
iris_exec csv_schema_creator <launch args> -- <schema creator args>
|
|
|
iris_exec jdbc_schema_creator <launch args> -- <schema creator args>
|
|
|
iris_exec xml_schema_creator <launch args> -- <schema creator args>
|
|
|
iris_exec json_schema_creator <launch args> -- <schema creator args>
|
The table schema files created from these processes also support merge operations, and allow specification of a grouping column and/or the partitioning column name. After a schema file is generated, it is highly recommended the user review the schema and the log file, and update details as needed. The user must then copy the schema file to an appropriate location in their Deephaven installation and run the schema deployment script or class to create a table definition from the schema. See below for more details on the contents of a generated schema file and the types of changes that might be needed.
CsvSchemaCreator
The following arguments are available when running the CsvSchemaCreator class:
-ns or --namespace <namespace>
-tn or --tableName <name>
-sp or --schemaPath <path>
-sf or --sourceFile <file name or file path and name>
-fd or --delimiter <delimiter character>
-ff or --fileFormat <format name>
-pc or --partitionColumn
-gc or --groupingColumn
-spc or --sourcePartitionColumn
-sn or --sourceName <name for ImportSource block>
-sl or --skipLines <integer value>
-lp or --logProgress
-bf or --bestFit
-tr or --trim
-om or --outputMode
|
Parameter Value |
Description |
|---|---|
|
|
The namespace to use for the new schema (required). |
|
|
The table name to use for the new schema (required). |
|
|
An optional path to which the schema file will be written. If not specified, this will default to the current working directory and will create or use a subdirectory that matches the namespace. |
|
|
The name of the CSV file to read (required). This file must have a header row with column names. |
|
|
Field delimiter (optional): Allows specification of a character other than the file format default as the field delimiter. If delimiter is specified, fileFormat is ignored. This must be a single character. |
|
|
fileFormat (optional): The Apache commons CSV parser is used to parse the file itself. Five common formats are supported:
|
|
-pc |
Optional name for the partitioning column if schema is being generated. If this is not provided, the importer will default to Date for the partitioning column name. Any existing column from the source that matches the name of the partitioning column will be renamed to source_[original column name]. |
| -spc |
Optional column to use for multi-partition imports. For example if the partitioning column is "Date" and you want to enable multi-partition imports based on the column source_date, specify "source_date" with this option (this is the column name in the data source, not the Deephaven column name).
|
|
-gc |
Optional column name that should be marked as |
|
-sn |
Optional name to use for the generated |
|
-sl |
Optional number of lines to skip from the beginning of the file before expecting the header row. If not provided, the first line is used as the header row. |
|
-lp |
If present, additional informational logging will be provided with progress updates during the parsing process. |
|
-bf |
If present, the class will attempt to use the smallest numeric types to fit the data in the CSV. For example, for integer values, short will be used if all values are in the range of -32768 to 32767. If larger values are seen, the class will then move to int and eventually long. The default behavior, without -bf, is to use long for all integer columns and double for all floating point columns. |
|
-tr |
Similar to the |
|
-om |
Either |
JdbcSchemaCreator
The following arguments are available when running the JdbcSchemaCreator class:
-ns or --namespace <namespace>
-tn or --tableName <name>
-sp or --schemaPath <path>
-jd or --driverClass <fully qualified class name of the JDBC driver>
-cu or --connectionUrl <data source specific connection URL>
-jq or --jdbcQuery <SQL query to execute against the data source>
-am or --assessmentMethod <META_ONLY, DATA_ONLY, or BOTH>
-pc or --partitionColumn
-spc or --sourcePartitionColumn
-gc or --groupingColumn
-sn or --sourceName <name for ImportSource block>
-lp or --logProgress
-bf or --bestFit
-om or --outputMode
-is or --importStyle
-op or --outPackage
-lf or --logFormat
-un or --useNanos
-sc or --sourceCasing
-dc or --destCasing
|
Parameter Value |
Description |
|---|---|
|
-ns |
The namespace to use for the new schema (required). |
|
-tn |
The table name to use for the new schema (required). |
|
-sp |
An optional path to which the schema file will be written. If not specified, this will default to the current working directory and will create or use a subdirectory that matches the namespace. |
|
-jd |
The fully-qualified class name of the driver to load to connect to the data source. In most cases, the corresponding JAR file will need to be available in the classpath of the schema creator process. |
|
-cu |
Information needed to find and connect to the data source. See below for more details. |
|
-jq |
The full query string to execute against the data source. In most cases, this will need to be delimited with double-quotes. |
|
|
|
|
|
Optional name for the partitioning column if schema is being generated. If this is not provided, the importer will default to |
-spc
|
Optional column to use for multi-partition imports. For example if the partitioning column is "Date" and you want to enable multi-partition imports based on the column source_date, specify "source_date" with this option (in case they differ, this is the Deephaven column name, not the raw original column name).
|
|
-gc |
Optional column name that should be marked as |
|
-sn |
Optional name to use for the generated |
|
-lp |
If present, additional informational logging will be provided with progress updates during the parsing process. |
|
|
If present, the class will attempt to use the smallest numeric types to fit the data in the CSV. For example, for integer values, short will be used if all values are in the range of -32768 to 32767. If larger values are seen, the class will then move to int and eventually long. The default behavior, without |
|
-om |
Either |
|
-is |
Either |
|
-op |
The output package name (i.e., |
|
-lf |
Optional (default unspecified). Logger format number. Used to version log files if table schema is changed. |
|
-un |
Optional (defaults to |
|
-sc |
Optional unless destination casing is given. Specifies the casing to expect for source column names. If both this and destination casing are specified, column names will be converted accordingly. Legal values are: |
|
-dc |
Optional unless source casing is given. Determines the Deephaven column name format. If both this and destination casing are specified, column names will be converted accordingly. Legal values are: |
XmlSchemaCreator
The following arguments are available when running the XmlSchemaCreator class:
-ns or --namespace <namespace>
-tn or --tableName <name>
-sp or --schemaPath <path>
-sf or --sourceFile <file name or file path and name>
-xi or --startIndex
-xd or --startDepth
-xm or --maxDepth
-xt or --elementType
-ev or --useElementValues
-av or --useAttributeValues
-pv or --namedValues
-pc or --partitionColumn
-spc or --sourcePartitionColumn
-gc or --groupingColumn
-sn or --sourceName <name for ImportSource block>
-lp or --logProgress
-bf or --bestFit
-om or --outputMode
|
Parameter Value |
Description |
|---|---|
|
|
The namespace to use for the new schema (required). |
|
|
The table name to use for the new schema (required). |
|
-sp |
An optional path to which the schema file will be written. If not specified, this will default to the current working directory and will create or use a subdirectory that matches the namespace. |
|
-sf |
The name of the CSV file to read (required). This file must have a header row with column names. |
| -xi | Start Index: Starting from the root of the document, the index (1 being the first top-level element in the document after the root) of the element under which data can be found. |
| -xd | Start Depth: Start Depth - Under the element indicated by Start Index, how many levels of first children to traverse to find an element that contains data to import. |
| -xm | Max. Depth: Starting from Start Depth, how many levels of element paths to traverse and concatenate to provide a list that can be selected under Element Name. |
| -xt | Element Type: The name or path of the element that will contain data elements. |
| -ev | Element Values: Indicates that field values will be taken from element values. E.g. <Price>10.25</> |
| -av | Attribute Values: Indicates that field values will be taken from attribute values. E.g. <Record ID="XYZ" Price="10.25" /> |
| -pv | Positional Values: When omitted, field values within the document will be named. E.g., a value called Price might be contained in an element named Price, or an attribute named Price. When this option is included, field names (column names) will be taken from the table schema, and the data values will be parsed into them by matching the position of the value with the position of column in the schema. |
|
-pc |
Optional name for the partitioning column if schema is being generated. If this is not provided, the importer will default to Date for the partitioning column name. Any existing column from the source that matches the name of the partitioning column will be renamed to source_[original column name]. |
| -spc |
Optional column to use for multi-partition imports. For example if the partitioning column is "Date" and you want to enable multi-partition imports based on the column source_date, specify "source_date" with this option (this is the column name in the data source, not the Deephaven column name).
|
|
-gc |
Optional column name that should be marked as |
|
-sn |
Optional name to use for the generated ImportSource block in the schema. If not provided, the default of IrisXML will be used. |
|
-lp |
If present, additional informational logging will be provided with progress updates during the parsing process. |
|
-bf |
If present, the class will attempt to use the smallest numeric types to fit the data in the XML. For example, for integer values, short will be used if all values are in the range of -32768 to 32767. If larger values are seen, the class will then move to int and eventually long. The default behavior, without -bf, is to use long for all integer columns and double for all floating point columns. |
|
-om |
Either |
Example XML Schema File
The following is an example of a schema file that was created using the schema creator to inspect a XML file. There are two main sections to this schema: the ImportSource block near the top, and the Column details towards the bottom. The Column details define the properties of each column in the table, while the ImportSource sections provides instructions related to importing data from a particular format of source - in this case, a CSV file.
<Table name="OrderInfo" namespace="Sample" storageType="NestedPartitionedOnDisk">
<ImportSource name="IrisXML" type="XML">
<ImportColumn name="source_Date" sourceName="Date" sourceType="String" formula="source_Date.isEmpty() ? null :
DBTimeUtils.convertDateTime(source_Date.replace(" ","T").replace("Z"," UTC"))" />
<ImportColumn name="Max_value" sourceName="Max-value" />
<ImportColumn name="Product_code" sourceName="Product-code" />
<ImportColumn name="BackOrder" default="null" />
<ImportColumn name="Macro_value" sourceName="Macro-value" />
</ImportSource>
<!-- Directives for overnight merge operations. Everything in one storage partition daily, chosen round-robin. -->
<Partitions keyFormula="__PARTITION_AUTOBALANCE_SINGLE__" multiday="0,1,2,3,4,5" />
<Column name="Date" dataType="java.lang.String" columnType="Partitioning" />
<Column name="source_Date" dataType="com.illumon.iris.db.tables.utils.DBDateTime" columnType="Normal" />
<Column name="Max_value" dataType="double" columnType="Normal" />
<Column name="Product_code" dataType="java.lang.String" columnType="Grouping" />
<Column name="Quantity" dataType="long" columnType="Normal" />
<Column name="BackOrder" dataType="long" columnType="Normal" />
<Column name="Warranty" dataType="char" columnType="Normal" />
<Column name="Comments" dataType="java.lang.String" columnType="Normal" />
<Column name="Macro_value" dataType="java.lang.String" columnType="Normal" />
</Table>The CSV provided to the schema creator for the preceding example follows:
Date,Max-value,Product-code,Quantity,BackOrder,Warranty,Comments,Macro-value
2017-08-30 11:59:59.000Z,3,XYZ,35,,Y,,
2014-02-12 12:03:41.221Z,129892,ABC,888,,N,Drop ship via UPS,
1998-11-03 04:12:32.323Z,0.62,FIN03,16000,3000,N,Wait for complete supply before shipping,The schema generators "legalize" column names when reading details of a data set. If a source column name is valid for a column name in Deephaven, and is not in conflict with the partitioning column name, it will be used directly as the column name in the schema. If there is some problem or conflict, the schema generator will modify the name to make it valid, and will also add mapping instructions for the importer to use later. This can be seen in several columns of the preceding sample schema. For example, the column name
Max-valuein the source file is not valid for a column name (hyphens are not allowed). Therefore, the schema generator renamedMax-valuetoMax_value, and added anImportColumnentry withsourceName="Max-value"to mapMax-valuefrom the source file toMax_valuein the Deephaven table.Besides mapping different source and target names,
ImportColumnentries are used by the schema creators to add default values for sparse primitive columns (e.g., numeric columns that are sometimes empty) and to add formulas needed to parse or convert source data to Deephaven types.The
BackOrdercolumn is an example where the source data was sometimes empty, so the schema creator added a default of "null". Without the default, import would fail when the importer attempted to parse an empty value into a long.The
source_Datecolumn provides an example of two types ofImportColumnoperations: it is being renamed, from Date in the source file tosource_Date, and it has a formula to reformat its string representation of date/time data into a form that can be passed toconvertDateTimeto convert it to Deephaven'sDBDateTimetype. Note that the type of thesource_Datecolumn isDBDateTime, to match the output ofconvertDateTime.
JsonSchemaCreator
The JSON schema creator will create a single table by recursively "flattening" the JSON objects in the specified file. Type inference is then run on this using the same logic as the CSV schema creator.
The input file should contain plain JSON objects, not comma separated or an array. For example, the following is a legal file with three objects, which will result in three rows: {a:1} {a:2} {a:3}
You may have multiple JSON objects on a single line, and/or the JSON objects may span multiple lines.
Nested objects are recursively expanded, with the column name for each field derived from the full "path" to that field. The path separator can be specified with the -fps argument. Array elements are numbered with a zero-based index.
For example, the following maps to a schema with the columns "a", "b_c", "b_d", "e0", "e1", "e2" and a row with values 1, 2, 3, 4, 5, 6; (the path separator used here is "_")
{ "a":1, "b":{ "c":2, "d":3 }, "e":[4,5,6] }
The following arguments are available when running the JsonSchemaCreator class:
-ns or --namespace <namespace>
-tn or --tableName <name>
-sp or --schemaPath <path>
-sf or --sourceFile <file name or file path and name>
-pc or --partitionColumn
-gc or --groupingColumn
-spc or --sourcePartitionColumn
-sn or --sourceName <name for ImportSource block>
-sl or --skipLines <integer value>
-lp or --logProgress
-bf or --bestFit
-om or --outputMode
-fps or --fieldPathSeparator
|
Parameter Value |
Description |
|---|---|
-ns
|
Namespace (required): Namespace in which to find the target table.
|
|
|
|
|
|
An optional path to which the schema file will be written. If not specified, this will default to the current working directory and will create or use a subdirectory that matches the namespace. |
|
|
The name of the JSON file to read (required). |
|
|
Optional name for the partitioning column if schema is being generated. If this is not provided, the importer will default to |
|
|
Optional column to use for multi-partition imports. For example if the partitioning column is " |
|
|
Optional column name that should be marked as columnType="Grouping" in the schema. If multiple grouping columns are needed, the generated schema should be manually edited to add the Grouping designation to the additional columns.
|
|
|
Optional name to use for the generated ImportSource block in the schema. If not provided, the default of IrisJSON will be used.
|
-lp
|
If present, additional informational logging will be provided with progress updates during the parsing process. |
-bf
|
If present, the class will attempt to use the smallest numeric types to fit the data. For example, for integer values, short will be used if all values are in the range of -32768 to 32767. If larger values are seen, the class will then move to int and eventually long. The default behavior, without |
-om
|
Either |
-fps
|
If present, specifies a character or string to use when generating column names from nested JSON data. Defaults to underscore ("_"). |
Schema-related Scripts
Once schemas have been defined, they must be made visible to Deephaven (deployed), and if any custom loggers and listeners are defined, these must be generated.
Deephaven properties define how Deephaven searches for schemas. The logger/listener generation can be done from deployed schemas, or from another location prior to schema deployment so the generated loggers can be integrated with the customer application before being deployed to Deephaven.
Two scripts are provided for these steps, and are described below:
deploy_schemadeploys schemas to a Deephaven database, making their described tables available for use.generate_loggers_listenersgenerates the logger and listener classes from schemas.
These scripts can be used during the initial setup of a new Deephaven system, as well as to update configuration when schemas are added or modified. Re-running the scripts is safe, even if nothing has changed since the last time they were run.
Schema Locations and Properties
Several properties define how Deephaven locates and processes schema files. These schema location properties include a list of locations (directories or JAR files) in which schemas can be found, delimited by semicolons or spaces. When looking for schema files, Deephaven (including the deployment and logger/listener generation scripts) will search all subdirectories of the specified locations for files with the .schema extension, as well as looking within JAR files in those directories and subdirectories for .schema files. To avoid excessive file and JAR searches, it is recommended schemas be located in their own directory tree separate from the application code.
The schema location properties allow the following substitutions:
<devroot>- this refers to the installation directory of the Deephaven software, usually/usr/illumon/latest.<workspace>- this refers to the workspace of the process.
The following properties specify the locations of schema files.
SchemaConfig.resourcePath- this defines the locations of customer schema files. In a typical installation it will point to the location of the deployed customer configuration, but it can be changed to use any location, including, for example, a customer's installed application directory. A typical value would be:SchemaConfig.resourcePath=/etc/sysconfig/illumon.d/schema/SchemaConfig.internalPath- this defines the locations of Deephaven internal schemas (for the DbInternal namespace) and should not normally be changed. The default value is:SchemaConfig.internalPath=<devroot>/etc/dbinternal
In addition, the following properties control other aspects of schema behavior:
SchemaConfig.allowedNamespaces- this optional property specifies the system namespaces allowed on the server. It can be used to restrict the namespaces visible on a server to a subset of those defined by the schema files, or to make namespaces available to scripts that are not defined by schemas (e.g., if a namespace has been deleted, but a script depends on it). If it is not defined, then the list of available namespaces is based on the schema files. Note that this does not apply to user namespaces.SchemaConfig.defaultListenerPackagePrefix- defines the default listener package prefix used if one is not defined in a schema. Any generated listeners will use this value followed by the namespace converted to lowercase if they don't have their own package defined in their schema file. The default value is:SchemaConfig.defaultListenerPackagePrefix=com.illumon.iris.intraday.gen
Deploying Schemas to Deephaven
Once schemas are defined or after they are changed, they must be made available to the Deephaven database. This is done through the DatabaseTools class, usually by running the deploy_schema script. The script uses the host configuration file's deploy_schema entry (which specifies an appropriate property file and workspace), and the properties described above from that property file, to find the schemas and write the appropriate table definitions under /db/Systems definitions directories. Until this step is done, schemas are not visible to Deephaven.
Use the following to call the schema deployment script:
sudo service iris deploy_schema
The script needs no parameters, as all of its configuration is already present in the host configuration file and related properties files. As it runs, the script shows details about how Java was started and the property files read. Following this, output similar to the following should appear. This indicates all of the tables that were found and deployed.
Note: The DbInternal tables are part of every Deephaven installation, while other tables will vary based on the customer schemas.
Writing table definition 1 of 8 : ExampleNamespace.ExampleTable ... done.
Writing table definition 2 of 8 : DbInternal.BinaryLogHeader ... done.
Writing table definition 3 of 8 : DbInternal.PersistentQueryConfigurationLog ... done.
Writing table definition 4 of 8 : DbInternal.PersistentQueryConfigurationLogV2 ... done.
Writing table definition 5 of 8 : DbInternal.PersistentQueryStateLog ... done.
Writing table definition 6 of 8 : DbInternal.QueryOperationPerformanceLog ... done.
Writing table definition 7 of 8 : DbInternal.QueryPerformanceLog ... done.
Writing table definition 8 of 8 : DbInternal.UpdatePerformanceLog ... done.
Deploying Schemas During Intraday Data Ingestion
Schema changes made while intraday data is being written to a table (for instance, through the tailer and data import server) will require special attention as Deephaven does not automatically handle schema changes while data is being ingested. This can be accomplished using the following procedure.
- First, ensure that the tailer is not sending data for the changed table by examining its log file (usually
/db/TempFiles/irisadmin/logs/LogtailerMain<tailername>.log.current), and stop the tailer. - Move or rename any existing binary log files for that table for the day so they won't be found by the tailer. For example if the
UpdatePerformanceLogschema was being changed:
sudo mkdir /db/TempFiles/save
sudo mv /db/TempFiles/irisadmin/logs/DbInternal.UpdatePerformanceLog*.bin.* /db/TempFiles/save
- Assuming the table's internal partition is determined by the tailer configuration, update the tailer's XML configuration file and change (or add) the
internalPartitionSuffixattributefor the changed table so that new intraday data will be written to a different location. If the internal partition is instead determined by theinternalPartitionRegexattribute, update the logger to ensure it's logging with a different filename. For example:internalPartitionSuffix="TableVersion2" - If the new schema includes listener changes, the Data Import Server will need to be restarted so it can use the new listener classes.
- Finally, once the new schema is deployed, the tailer can be restarted.
Note that queries may not find the previously written intraday data for the day after this procedure is complete, but merges will find and write it correctly.
Last Updated: 20 August 2019 09:54 -06:00 UTC Deephaven v.1.20180917
Deephaven Documentation Copyright 2016-2018 Deephaven Data Labs, LLC All Rights Reserved