Getting Started
Deephaven has two main ways to ingest data: batch or streaming. Batch, or static, data is imported in relatively large chunks, usually on some schedule. Streaming, or "ticking", data arrives continuously, as events occur.
Importing batch data into Deephaven is fairly easy, as Deephaven provides built-in tools that simplify most of the required tasks. However, setting up a new streaming data source is more complicated. While there are tools in Deephaven to help with this, there are more tasks involved, as well as the need for data-source specific executables that feed new events to Deephaven processes. (See Streaming Data for details of setting up a new streaming source).
There are multiple options for configuring Deephaven to import batch data from a new source. All of the details of these options are explained in the following sections of this document, however, the simplest and quickest approach, which will work for most scenarios, is covered below.
- Create a schema for the new table.
A schema describes the layout of the table - its columns and data types - and also includes instructions for importing data from different batch sources. The Schema Editor tool is the easiest way to create a new schema, especially if a sample of the data to be imported is available for the Schema Editor to inspect. - Create and schedule queries to load and process data into the new schema.
These import and merge queries can be created directly from the Schema Editor tool, or from the Persistent Query Configuration Editor.
An example of this process is presented in Example 3 - Batch Data Import Using the Schema Editor and Query-based Importing
NOTE: One consideration when importing batch data is that, by default, Deephaven will not display freshly imported batch data for today's date to users. The preferred method for making this data accessible is to merge it. Additional details about how this data is handled and other options for displaying it are covered in the next sections.
Overview
The data used with Deephaven is generally imported by a system administrator. Therefore, you should follow the instructions provided by your system administrator in regard to accessing data. However, the following is provided as an overview of how data is imported and then stored in the system.
There are two main categories of data in Deephaven: intraday and historical. Intraday data is stored in the order in which it was received - appended to a table. Historical data is partitioned, usually by date, into sets that will no longer have any new data appended, and can be arranged based on criteria other than arrival time. The merge process is used to read the intraday data and reorganize it as it writes it out as historical data. All new data coming into Deephaven is first written as intraday data. The typical flow is to import or stream new data into intraday, and then (usually nightly) merge it to historical. Once historical data has been validated, the intraday versions of the data can be removed.
Deephaven is designed so each enterprise can customize their own installation, including the data being imported and the authorization to access the data. The following diagram is a very generalized view of the data import process:

Although merging data is recommended, it is not required. Merged data can be more efficient to store, and is faster to retrieve for queries, but it is also possible to use old data that has been left unmerged in intraday.
Note: Imported data is immediately available through intraday queries (db.i) unless the data was imported with today's date as its partitioning value, and the TableDataServiceFactory.defaultMode has not been set to LOCAL.
The Merge and Data Validation Processes
All new data added to an Deephaven installation is first stored in the Intraday database. Typically this data is periodically merged into the Historical database where it stored for long-term use. The process of reorganizing time-series data from an intraday partition and writing it into a historical partition is accomplished by the com.illumon.iris.importers.MergeIntradayData class. Like the batch data import classes, this class can be used directly, or from import scripts or import queries. Again, import queries are the preferred method to use this class, as they provide an easier to use interface, scheduling, execution history, and dependency chaining.
The data merge step by itself only handles reorganizing the data and copying it from intraday to historical. It does not validate or remove the intraday version of the partition; at the current time these steps must be performed through the use of on-server scripts. Validation of merged data is done by running a validator class, to check that values are within expected ranges; e.g. that no more than a specified percentage of rows have null values in one of the fields. A typical data "lifecycle" consists of some form of ingestion to intraday, followed by merge, validation, and then, after successful validation, deletion of the intraday data, including the directory that contained the intraday partition.
See: Appendix C: Data Merging Classes for further information.
Importing Batch Data
Data Types and Sources
The following data types and sources are currently supported by Deephaven:
- Binary Import - Deephaven binary log files
- CSV - Comma-separated values
- JDBC - Java Database Connectivity
- XML - eXtensible Markup Language
- Deephaven Binary Log Files
- Other - Virtually any data type can be imported into Deephaven with the proper importer class.
Additionally, data can be imported from commercial sources such as the following:
- Quandl
- MayStreet
Please consult your system administrator for additional information about importing other data types or sources.
Import Metadata
In the simplest cases, there will be a one-to-one match of columns from a data import source to the Deephaven table into which data is being imported, and the data values will all "fit" directly into the table columns with no conversion or translation needed. In other cases, things may not be so simple.
When source and destination column names don't match, or data does need to be manipulated during import, the ImportSource section of the schema provides instructions for the importer to use in driving the import process.
Schema files created with the Schema Editor based on sample data will have an ImportSource block defined and may have needed transformation rules automatically created. Details of syntax and available mapping and transformation capabilities of the import process can be found in the ImportSource XML topic below.
Batch Import Processes
Deephaven provides batch data import classes that can read data from CSV, JDBC, XML and binary log file sources and write it to intraday tables. These classes can be used directly, or through provided scripts or import queries in the Deephaven UI. These methods are designed for any size of data and for persistent import of data that will probably be shared by multiple users. For temporary import of a single small dataset see Importing Small Datasets.
Using queries to import data through the Deephaven UI is the preferred method of using the import classes. In addition to providing a graphical user interface for creating and editing import tasks, the query-based import methods include task scheduling, dependency chaining, and a single location to view history and status for imports that have been run.

Importing Data with Queries
Deephaven allows you to run batch import and merge jobs via the familiar Deephaven console in the form of persistent queries.
Note: the appropriate schema files should already be deployed before this stage. Review Schemas for additional information on that process.
Data import queries enable authorized users to import and merge data through the Deephaven Console instead of using command line interfaces.
To start an import or merge process, click the Query Config button in the Deephaven Console.
When the window opens, click the New button shown on the right side of the interface. This will open the Persistent Query Configuration Editor.
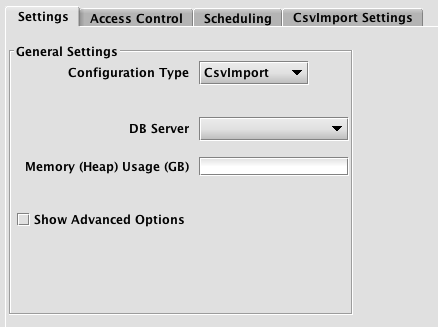
In the Settings tab, click the Configuration Type drop-down menu to reveal the options shown below.
- BinaryImport
- CsvImport
- JdbcImport
- Merge
- ReplayScript
- RunAndDone
- Script
- Validate
- XmlImport
BinaryImport, CsvImport, JdbcImport and XML are used for importing data from Deephaven binary log, CSV, JDBC, and XML data sources respectively. Merge is used for merging intraday data to historical data. Validate is used to validate data and to delete merged intraday data.These configurations are further described below.
Note: When configuring an import or merge query, it is essential that you select a DB_SERVER, which is running as the dbmerge user. The dbquery user, used for user queries, does not have permission to write to Deephaven system tables.
ReplayScript, RunAndDone and Script pertain to running scripts in the Deephaven Console. These options are further described in the section describing the Persistent Query Configuration Viewer/Editor.
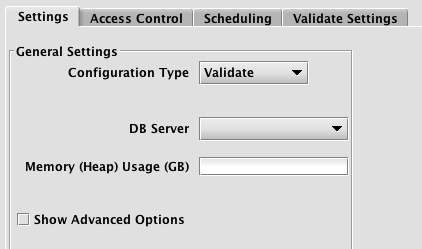
BinaryImport
BinaryImport is used to import data from binary log files into an intraday partition. The binary log files must be available on the server on which the query will run; it is not for loading files on the user's system into Deephaven. The binary log files must be in the Deephaven binary log file format, usually generated by an application using a generated Deephaven logger.
When BinaryImport is selected, the Persistent Query Configuration Editor window shows the following options:

To proceed with creating a query to import binary import files, you will need to select a DB Server and enter the desired value for Memory (Heap) Usage (GB).
Options available in the Show Advanced Options section of the panel are typically not used when importing or merging data. To learn more about this section, please refer to the Persistent Query Configuration Viewer/Editor.
The Access Control tab presents a panel with the same options as all other configuration types, and gives the query owner the ability to authorize Admin and Viewer Groups for this query. For more information, please refer to Access Control.
Clicking the Scheduling tab presents a panel with the same scheduling options as all other configuration types. For more information, please refer to Scheduling.
Clicking the BinaryImport Settings tab presents a panel with the options pertaining to importing binary log files:
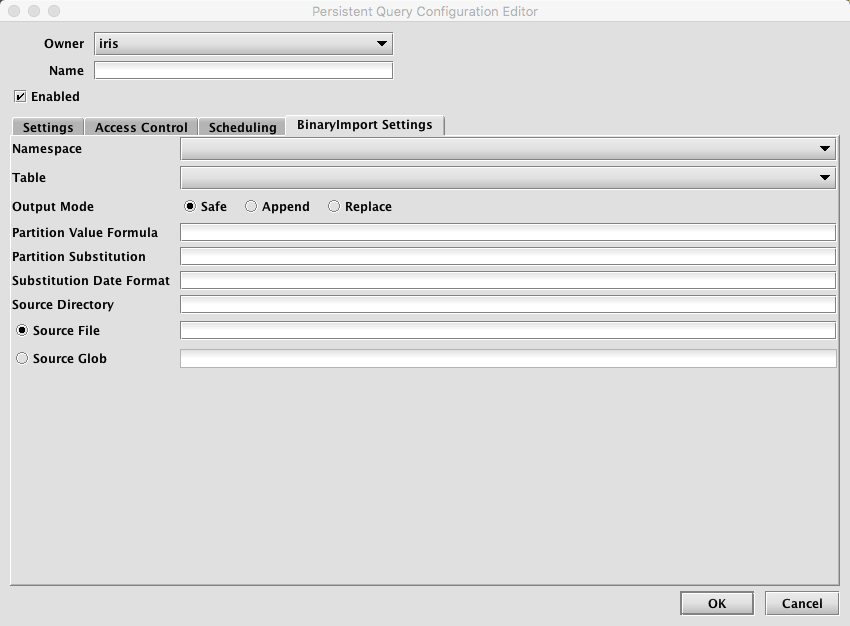
BinaryImport Settings
- Namespace: This is the namespace into which you want to import the file.
- Table: This is the table into which you want to import the data.
- Output Mode: This determines what happens if data is found in the fully-specified partition for the data. The fully-specified partition includes both the internal partition (unique for the import job) and the column partition (usually the date).
- Safe - if existing data is found in the fully-specified partition, the import job will fail.
- Append - if existing data is found in the fully-specified partition, data will be appended to it.
- Replace - if existing data is found in the fully-specified partition, it will be replaced. This does not replace all data for a column partition value, just the data in the fully-specified partition.
- Partition Formula: This is the formula needed to partition the binary file being imported. Note that BinaryImport only supports single-partition imports. If a specific partition value is used it will need to be surrounded by quotes. For example:
currentDateNy()
"2017-01-01" - Partition Substitution: This is a token used to substitute the determined column partition value in the source directory, source file, or source glob, to allow the dynamic determination of these fields. For example, if the partition substitution is "
PARTITION_SUB", and the source directory includes "PARTITION_SUB" in its value, thatPARTITION_SUBwill be replaced with the partition value determined from the partition formula. - Substitution Date Format: This is the date format that will be used when a Partition Substitution is used. The standard Deephaven date partition format is
yyyy-MM-dd(e.g.,2018-05-30), but this allows substitution in another format. For example, if the filename includes the date inyyyyddMMformat instead (e.g.,20183005), that could be used in the Date Substitution Format field. All the patterns from the Java DateTimeFormatter class are allowed. - Source Directory: This is the path to where the binary log files are stored on the server on which the query will run.
- Source File: This the name of a single binary log file to import.
- Source Glob: This is an expression used to match multiple binary log file names.
CsvImport
CsvImport is used to import data from a CSV file into an intraday partition. The CSV file must be available on the server on which the query will run; it is not for loading a file on the user's system into Deephaven.
When CsvImport is selected, the Persistent Query Configuration Editor window shows the following options:
To proceed with creating a query to import a CSV file, you will need to select a DB Server and enter the desired value for Memory (Heap) Usage (GB).
Options available in the Show Advanced Options section of the panel are typically not used when importing or merging data. To learn more about this section, please refer to the Persistent Query Configuration Viewer/Editor.
The Access Control tab presents a panel with the same options as all other configuration types, and gives the query owner the ability to authorize Admin and Viewer Groups for this query. For more information, please refer to Access Control.
Clicking the Scheduling tab presents a panel with the same scheduling options as all other configuration types. For more information, please refer to Scheduling.
Clicking the CsvImport Settings tab presents a panel with the options pertaining to importing a CSV file:
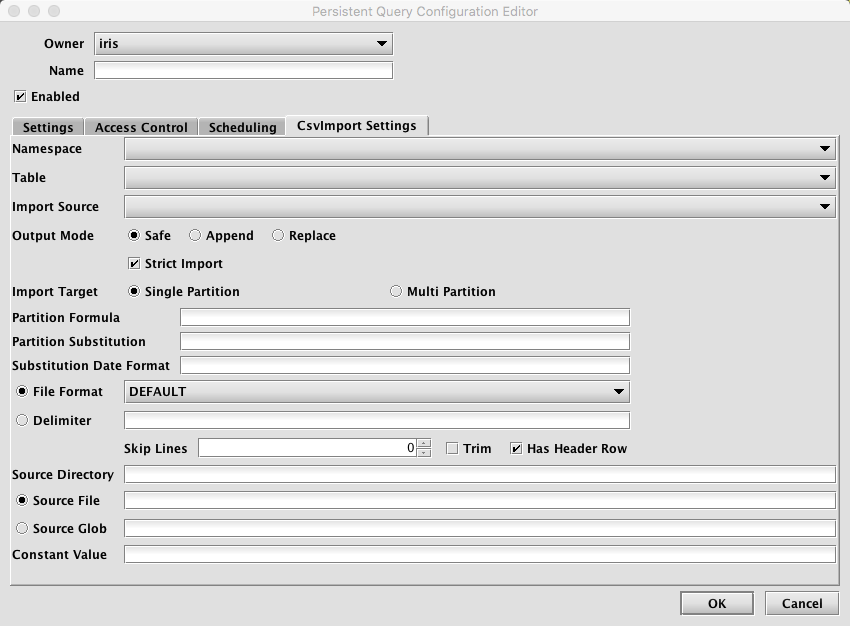
CsvImport Settings
- Namespace: This is the namespace into which you want to import the file.
- Table: This is the table into which you want to import the data.
- Output Mode: This determines what happens if data is found in the fully-specified partition for the data. The fully-specified partition includes both the internal partition (unique for the import job) and the column partition (usually the date).
- Safe - if existing data is found in the fully-specified partition, the import job will fail.
- Append - if existing data is found in the fully-specified partition, data will be appended to it.
- Replace - if existing data is found in the fully-specified partition, it will be replaced. This does not replace all data for a column partition value, just the data in the fully-specified partition.
- Import Source: This is the import source section of the associated schema file that specifies how source data columns will be set as Deephaven columns.
- Strict Import does not allow tables with missing column values to adjust and become Deephaven tables.
-
Single/Multi Partition: This controls the import mode. In single-partition, all of the data is imported into a single Intraday partition. In multi-partition mode, you must specify a column in the source data that will control to which partition each row is imported.
- Single-partition configuration
Partition Formula: This is the formula needed to partition the CSV being imported. If a specific partition value is used it will need to be surrounded by quotes. For example:
currentDateNy()
"2017-01-01"Partition Substitution: This is a token used to substitute the determined column partition value in the source directory, source file, or source glob, to allow the dynamic determination of these fields. For example, if the partition substitution is "
PARTITION_SUB", and the source directory includes "PARTITION_SUB" in its value, thatPARTITION_SUBwill be replaced with the partition value determined from the partition formula.Substitution Date Format: This is the date format that will be used when a Partition Substitution is used. The standard Deephaven date partition format is
yyyy-MM-dd(e.g.,2018-05-30), but this allows substitution in another format. For example, if the filename includes the date inyyyyddMMformat instead (e.g.,20183005), that could be used in the Date Substitution Format field. All the patterns from the Java DateTimeFormatter class are allowed.- Multi-partition configuration
Import Partition Column: This is the name of the database column used to choose the target partition for each row (typically "
Date"). There must be an corresponding Import Column present in the schema, which will indicate how to get this value from the source data. - File Format: This is the format of the data in the CSV file being imported. Options include
DEFAULT,TRIM,EXCEL,TDF,MYSQL,RFC4180andBPIPE*. - Delimiter: This can be used to specify a custom delimiter character if something other than a comma is used in the file.
- Source Directory: This is the path to where the CSV file is stored on the server on which the query will run.
- Source File: This the name of the CSV file to import.
- Source Glob: This is an expression used to match multiple CSV file names.
- Constant Value: A String of data to make available as a pseudo-column to fields using the CONSTANT sourceType
* Note: BPIPE is the format used for Bloomberg's Data License product.
JdbcImport
When JdbcImport is selected, the Persistent Query Configuration Editor window shows the following options:

This is similar to the options presented in the previous CsvImport window except for the JdbcImport Settings tab.
Clicking the JdbcImport Settings tab presents a panel with the options pertaining to importing from a JDBC database:
JdbcImport Settings
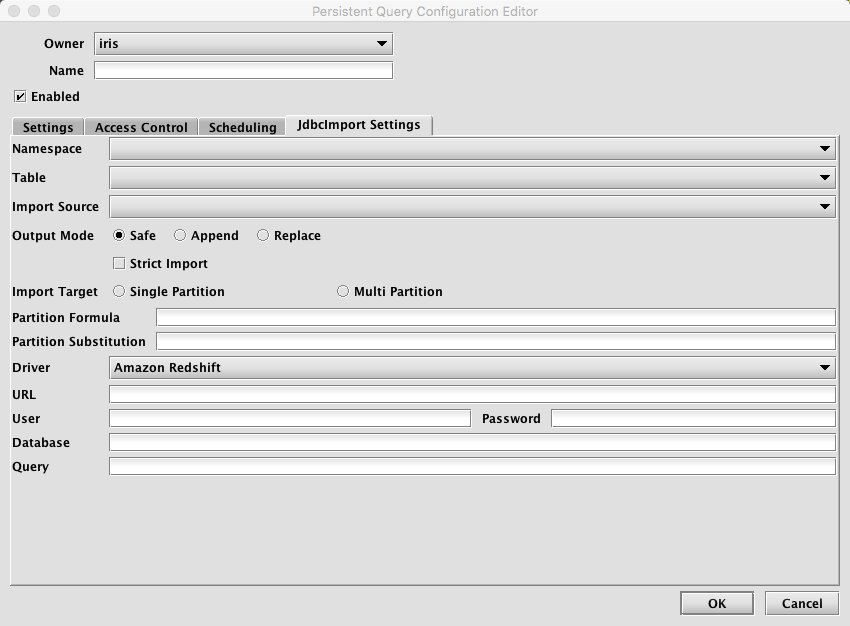
- Namespace: This is the namespace into which you want to import the file.
- Table: This is the table into which you want to import the data.
- Output Mode: This determines what happens if data is found in the fully-specified partition for the data. The fully-specified partition includes both the internal partition (unique for the import job) and the column partition (usually the date).
- Safe - if existing data is found in the fully-specified partition, the import job will fail.
- Append - if existing data is found in the fully specified partition, data will be appended to it.
- Replace - if existing data is found in the fully specified partition, it will be replaced. This does not replace all data for a column partition value, just the data in the fully-specified partition.
- Import Source: This is the import source section of the associated schema file that specifies how source data columns will be set as Deephaven columns.
- Strict Import does not allow tables with missing column values to adjust and become Deephaven tables.
- Single/Multi Partition: This controls the import mode. In single-partition, all of the data is imported into a single Intraday partition. In multi-partition mode, you must specify a column in the source data that will control to which partition each row is imported.
- Single-partition configuration
- Multi-partition configuration
- Driver: This is the name of the driver needed to access the database. It defaults to
Mysql. - URL: This the URL for the JDBC connection.
- Query: This is the query detailing what data you want to pull from the database.
Partition Formula: This is the formula needed to partition the CSV being imported. If a specific partition value is used it will need to be surrounded by quotes. For example:
currentDateNy()
"2017-01-01"Partition Substitution: This is a token used to substitute the determined column partition value in the query, to allow the dynamic determination of this field. For example, if the partition substitution is "
PARTITION_SUB", and the query includes "PARTITION_SUB" in its value, thatPARTITION_SUBwill be replaced with the partition value determined from the partition formula.
Import Partition Column: This is the name of the database column used to choose the target partition for each row (typically "Date"). There must be an corresponding Import Column present in the schema, which will indicate how to get this value from the source data.
In JDBC multi-partition mode, it is highly recommended that your SQL query order the data by the partition column (e.g. "SELECT * FROM table ORDER BY date"). It is much more efficient to import large tables in partition order because the importer need not close and reopen destination partitions multiple times.
XmlImport
XmlImport is used to import data from an XML file into an intraday partition. The XML file must be available on the server on which the query will run; it is not for loading a file on the user's system into Deephaven.
Deephaven's support for XML files allows loading files into a single table. See the Schema section for more details about the layout considerations of XML files when importing into Deephaven.
When XmlImport is selected, the Persistent Query Configuration Editor window shows the following options:
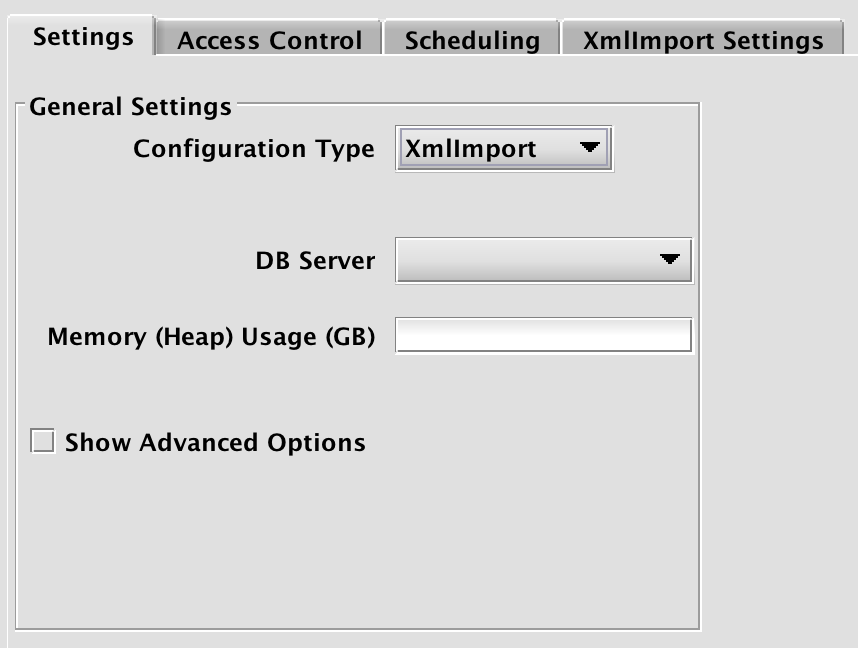
To proceed with creating a query to import a XML file, you will need to select a DB Server and enter the desired value for Memory (Heap) Usage (GB).
Options available in the Show Advanced Options section of the panel are typically not used when importing or merging data. To learn more about this section, please refer to the Persistent Query Configuration Viewer/Editor.
The Access Control tab presents a panel with the same options as all other configuration types, and gives the query owner the ability to authorize Admin and Viewer Groups for this query. For more information, please refer to Access Control.
Clicking the Scheduling tab presents a panel with the same scheduling options as all other configuration types. For more information, please refer to Scheduling.
Clicking the XMLImport Settings tab presents a panel with the options pertaining to importing a XML file:
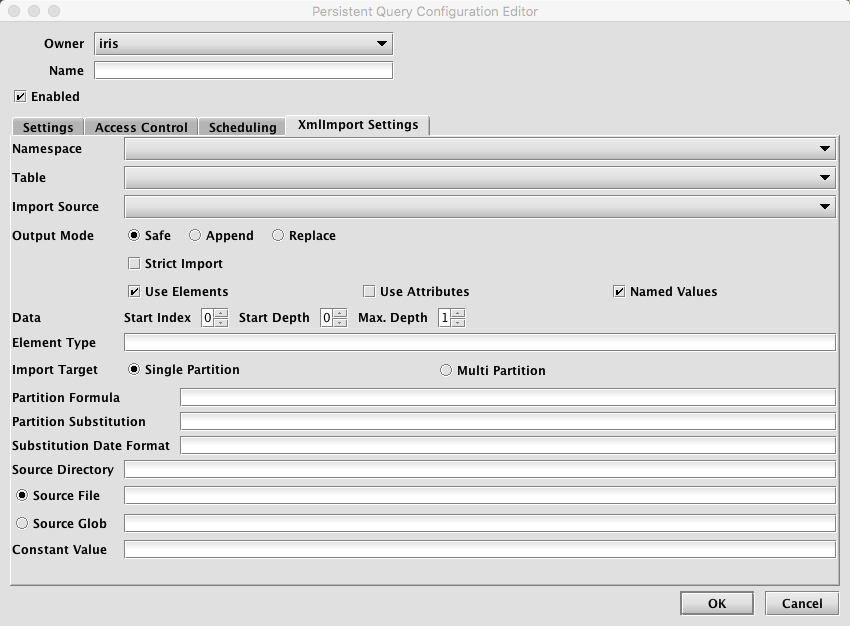
XmlImport Settings
- Namespace: This is the namespace into which you want to import the file.
- Table: This is the table into which you want to import the data.
- Output Mode: This determines what happens if data is found in the fully-specified partition for the data. The fully-specified partition includes both the internal partition (unique for the import job) and the column partition (usually the date).
- Safe - if existing data is found in the fully-specified partition, the import job will fail.
- Append - if existing data is found in the fully-specified partition, data will be appended to it.
- Replace - if existing data is found in the fully-specified partition, it will be replaced. This does not replace all data for a column partition value, just the data in the fully-specified partition.
- ImportSource: This is the import source section of the associated schema file that specifies how source data columns will be set as Deephaven columns.
- Strict Import does not allow tables with missing column values to adjust and become Deephaven tables.
- XML File Reading Settings:
Use Elements- Take import values from the contents of XML elements. At least one ofUse ElementsorUse Attributesmust be selected.Use Attributes- Take import values from the values of XML attributes. At least one ofUse ElementsorUse Attributesmust be selected.Named Values- When checked, element or attribute names are used for column names; when cleared, values will be assigned to columns positionally in the order they are found. Note that positional values will be parsed from the XML in the order of the columns in the table. As such, the table schema for documents that do not used Named Values, must closely match the layout of columns in the XML document.
- Data:
- Start Index - The number of the element, starting with the root itself (0), from the root of the XML document where the importer will expect to find data.
- Start Depth - How many level down, under the Start Index element, the importer should traverse to find data elements.
- Max. Depth - When data elements may contain data in child elements, this determines how many levels further down the importer should traverse while looking for import values.
- Element Type - The string name of the data element type. In some cases, this may be a / delimited path to the types of elements that should be imported.
- Single/Multi Partition: This controls the import mode. In single-partition, all of the data is imported into a single Intraday partition. In multi-partition mode, you must specify a column in the source data that will control to which partition each row is imported.
- Single-partition configuration
Partition Formula: This is the formula needed to partition the XML being imported. If a specific partition value is used it will need to be surrounded by quotes. For example:
currentDateNy()
"2017-01-01"Partition Substitution: This is a token used to substitute the determined column partition value in the source directory, source file, or source glob, to allow the dynamic determination of these fields. For example, if the partition substitution is "PARTITION_SUB", and the source directory includes "PARTITION_SUB" in its value, that PARTITION_SUB will be replaced with the partition value determined from the partition formula.
Substitution Date Format: This is the date format that will be used when a Partition Substitution is used. The standard Deephaven date partition format is
yyyy-MM-dd(e.g.,2018-05-30), but this allows substitution in another format. For example, if the filename includes the date inyyyyddMMformat instead (e.g.,20183005), that could be used in the Date Substitution Format field. All the patterns from the Java DateTimeFormatter class are allowed.
- Multi-partition configuration
Import Partition Column: This is the name of the database column used to choose the target partition for each row (typically "Date"). There must be a corresponding Import Column present in the schema, which will indicate how to get this value from the source data.
- Single-partition configuration
- Source Directory: This is the path to where the XML file is stored on the server on which the query will run.
- Source File: This the name of the XML file to import.
- Source Glob: This is an expression used to match multiple XML file names.
- Constant Value: A String of data to make available as a pseudo-column to fields using the CONSTANT sourceType
In most cases, it will be easier to test XML parsing settings using the Discover Schema from XML option of the Schema Editor utility. This allows a quick preview of the results of different settings, so the correct index, element type, etc, can be easily determined.
Merge
When Merge is selected, the Persistent Query Configuration Editor window shows the following options:
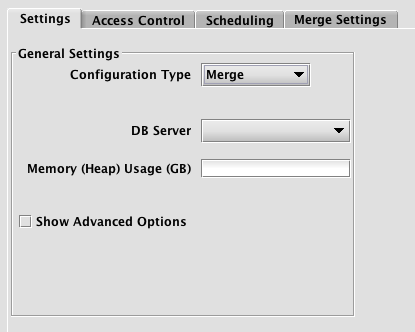
This is similar to the options presented in the previous CSV and JDBC configuration types window except for the new Merge Settings tab.
Note: Merges for multi-partition imports cannot be run from a persistent query at present. This must be done from the command line.
Clicking the Merge Settings tab presents a panel with the options pertaining to merging data to a file already in Deephaven:
Merge Settings
- Namespace: This is the namespace into which you want to import the file.
- Table: This is the table into which you want to import the data.
- Partition Value Formula: This is the formula needed to partition the data being merged. If a specific partition value is used it will need to be surrounded by quotes. For example:
currentDateNy()"2017-01-01"
- Table Data Service Mode: Specifies how input data to merge should be found and read. Options include:
LOCAL- Accesses all data from the file hierarchy under the Deephaven database root directory
LOCAL_COMPOSITE_WITH_INTRADAY_PROXY_SERVER- Accesses historical data in the same manner asLOCAL, but accesses intraday data via a proxy server, i.e.,db_tdcp.LOCAL_COMPOSITE_WITH_INTRADAY_REMOTE_SERVER- Accesses historical data in the same manner asLOCAL, but accesses intraday data via a remote service, i.e.,db_ltds.LOCAL_COMPOSITE_WITH_INTRADAY_IMPORT_AND REMOTE_SERVER- Accesses historical data in the same manner asLOCAL, but accesses intraday data via a composite remote service, i.e.,db_disfor same-day system intraday data,db_ltdsfor previous system intraday data, anddb_rutsfor user intraday data.LOCAL_WITH_ACTIVE_USER_LOGGER- Accesses historical data in the same manner asLOCAL, but accesses user intraday data via a remote service, i.e.,db_ruts.
- Sort Column Formula: An optional formula to sort on after applying column groupings. If no formula is supplied, data will be in source order except where reordered by grouping.
- Low Heap Mode: Whether to run in low heap usage mode, which makes trade-offs to minimize the RAM required for the merge JVM's heap, rather than maximizing throughput
- Force: Whether to allow overwrite of existing merged data
- Thread Pool Size: The number of concurrent threads to use when computing output order (i.e. grouping and sorting) or transferring data from input partitions to output partitions. More threads are not always better, especially if there is significant reordering of input data which may degrade read cache efficiency.
Once you have configured all the settings needed for your query, click the OK button in the lower right corner of the Persistent Query Configuration Editor window.
Typically, a merge query should have a dependency on an import query configured in the Scheduling tab.
Merge queries can also be created from an import query. After creating an import query with the Schema Editor, you will be prompted to create the corresponding merge. If you have an import query without a corresponding merge, an option to Create Merge Query will be available in the Query Config panel's context (right-click) menu.
Validate
Validate queries are used to validate data that has been loaded into Deephaven, and to delete intraday data (usually after it has been merged into the historical database). When Validate is selected, the Persistent Query Configuration Editor window shows the following options:
To proceed with creating a query to validate data, you will need to select a DB Server and enter the desired value for Memory (Heap) Usage (GB).
Options available in the Show Advanced Options section of the panel are typically not used when validating. To learn more about this section, please refer to the Persistent Query Configuration Viewer/Editor.
The Access Control tab presents a panel with the same options as all other configuration types, and gives the query owner the ability to authorize Admin and Viewer Groups for this query. For more information, please refer to Access Control.
Clicking the Scheduling tab presents a panel with the same scheduling options as all other configuration types. For more information, please refer to Scheduling.
Selecting the Validate Settings tab presents a panel with the options pertaining to validating data, as shown below.
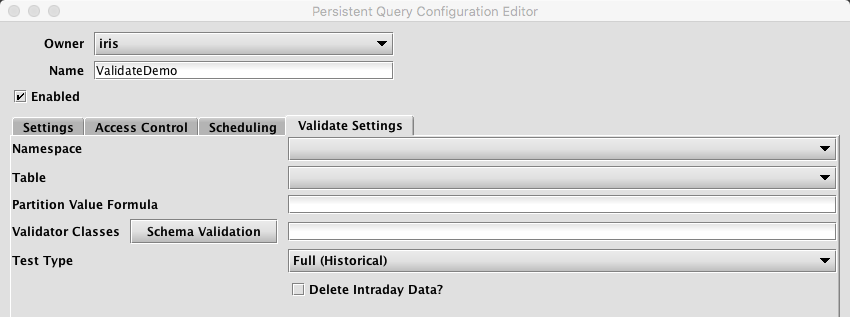
Validate Settings
- Namespace: This is the namespace for which data will be validated.
- Table: This is the table for which data will be validated.
- Partition Formula: This is the formula needed to determine the partition being validated. If a specific partition value is used it will need to be surrounded by quotes. For example:
currentDateNy()
"2017-01-01" - Validator Classes: This is the list of classes to be run to validate the data. If Schema Validation is selected, the default schema-based validation class will be selected, in which case the validation from the table's schema will be used. If no classes are chosen, then no validation will be performed (this may be useful if the query is only being used to delete intraday data).
- Test Type: this determines the type of test being run. Options include the following:
- Simple (Intraday) - runs a simple test against intraday data.
- Full (Intraday) - runs the full test suite against intraday data.
- Full (Historical) - runs the full test suite against historical data.
- Both (Intraday and Historical) - runs the full test suite against both intraday and historical data.
- Delete Intraday Data?: When selected, the corresponding intraday data will be deleted. If a validator is selected, the intraday data will be deleted only if all validation succeeds. If no validator is selected, the intraday data will be deleted when the query runs.
When a Validate query fails, the first validation failure exception is shown in the query panel's ExceptionDetails column, along with the total number of failures. Additional failures are not shown in the query panel, but must be retrieved from the text log, or from the Process Event Log for the worker that ran the query.
The following example query retrieves the failed test case details from the Process Event Log for a specific worker. The worker name should be visible in the query panel:
pelWorker=db.i("DbInternal", "ProcessEventLog").where("Date=currentDateNy()", "Process=`worker_63`", "LogEntry.contains(`FAIL`)")
Bulk Data Ingestion
Bulk data ingestion enables an administrator to easily import, merge, and validate data for multiple partition values. Instead of creating individual queries for each dataset, the bulk ingestion process enables users to add Bulk Copy options to an existing Import, Merge and/or Validation query configuration.
Users start with an existing persistent query - typically an Import query used for day-to-day data ingestion. Bulk Copy options/parameters can then be added to the query configuration to specify the range of partitions that need to be imported - typically a range of dates. Once these options are entered, Deephaven automatically creates individual, transient (short-lived) queries - one for each data partition - that will run when resources permit to import each individual dataset. Once each dataset has been imported, the transient query used to import that dataset will be erased.
Additional options are also available for simultaneously creating the respective Merge and Validation queries, which will also run in order (as resources permit) following the completion of the data import process. The Bulk Merge and Bulk Validate queries are dependent on the earlier queries in the chain. For example, a Bulk Merge query for a given partition value will only run if the Bulk Import query successfully completed, and a Bulk Validate query will run only if the Bulk Merge query successfully completed.
For example, to load 100 day's worth of CSV data in bulk (e.g.,100 files), the existing day-to-day CSV import query for that data could be chosen as the base query. The range of partitions, 100 different business dates in this case, is then added to the Bulk Copy options for the query. Once the new parameters are entered, Deephaven generates 100 individual transient queries to handle the import of those 100 datasets. These queries run whenever resources are available, thereby automating the entire process of importing a year's worth of data. Furthermore, merge and data validation queries for each dataset can also be generated in the same process.
Configuring the Bulk Copy Configuration
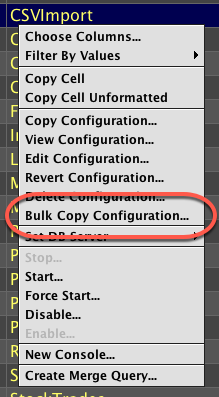
Open the Query Config panel in Deephaven. Right-clicking on any Import, Merge, or Validate query will generate the menu shown below. Select Bulk Copy Configuration.
This opens the Bulk Copy Dialog window, which is shown below.

To begin, first choose either Date Partitioning or Other Partitioning.
If Date Partitioning is chosen, the following options are presented:
- Start Date: this is the starting date for the bulk operation, in
yyyy-MM-ddformat. When selected, Start Date will display a date chooser. - End Date: this is the ending date for the bulk operation, in
yyyy-MM-ddformat. When selected, End Date will display a date chooser. - Business Days Only: if selected, then only business days will be used for the bulk operation. Queries will not be created for weekends and holidays.
- Business Calendar: if the Business Days Only checkbox is selected, then a Business Calendar must also be chosen.
Depending on the type of query configuration originally chosen (Import, Merge, or Validate), the following additional buttons may appear in the Bulk Copy Dialog window:
- Edit Bulk Query: Selecting this option will allow you to edit the parameters for the bulk version of the underlying Import, Merge or Validate query. Edits are typically made to change the scheduling or other parameters. However, edits will only apply to the new bulk queries being processed The underlying query that was copied earlier will not be impacted.
- Create Bulk Merge Query: If the original configuration is an Import query, selecting Create Bulk Merge Query allows the user to create a set of Merge queries that will run for the same partition values used for the bulk import process. This set of Merge queries will run only when its respective set of Import queries successfully completes.
When selected, the Persistent Query Configuration Editor will open and present options to configure the Bulk Merge query. If a Merge query already exists that uses this namespace/table, the settings for that Merge query will be copied into the base settings for the new Bulk Merge query. Otherwise, the setting used for the new Bulk Merge query will be based on the original Import query. In either case, the settings can be edited by selecting Edit Configuration in the Bulk Copy Dialog window. - Delete Bulk Merge Query: This option appears only if a Bulk Merge Query has been created. Selecting Delete Bulk Merge Query will delete the Bulk Merge query associated with this Bulk Import process. Note: If there is a corresponding Bulk Validate query for the Bulk Merge query, both will be deleted when Delete Bulk Merge Query is selected.
- Create Bulk Validate Query: If the original configuration is a Merge query, selecting Create Bulk Validate Query allows the user to create a set of Validate queries that will run for the same partition values used for the Bulk Merge process. This set of Validate queries will run only when its respective set of Merge queries successfully completes.
When selected, the Persistent Query Configuration Editor will open and present options to configure the Bulk Validate query. If a Validate query already exists that uses this namespace/table, the settings for that Validate query will be copied into the base settings for the new Bulk Validate query. Otherwise, the setting used for the new Bulk Validate query will be based on the original Merge query. In either case, the settings can be edited by selecting Edit Configuration in the Bulk Copy Dialog window. - Delete Bulk Validate Query: This option appears only if a Bulk Validate Query has been created. Selecting Delete Bulk Validate Query will delete the Bulk Validate query associated with this Bulk Merge process.
- Delete Merge & Validate Queries: This button is only shown when Bulk Merge and Bulk Validate queries have been created. Selecting it removes both. A Bulk Validation query cannot run without a corresponding Bulk Merge query.
If Other Partitioning is chosen, the following options are presented:
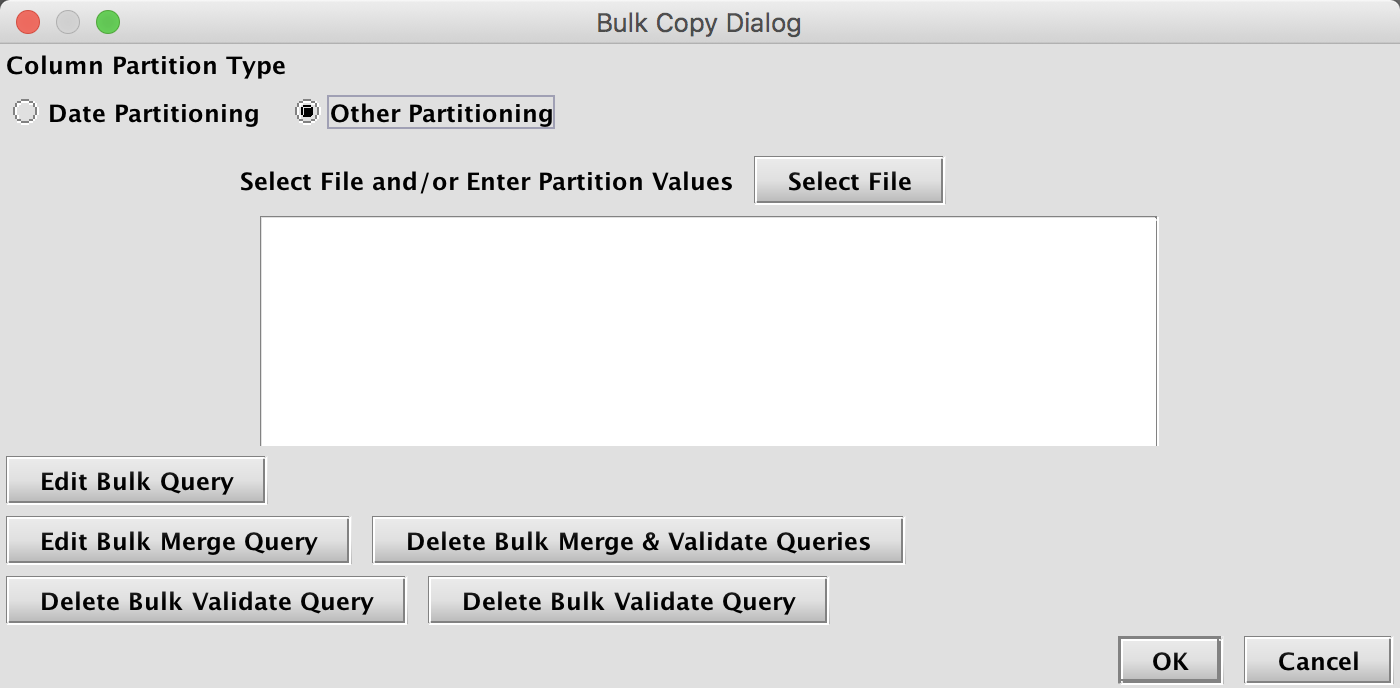
When Other Partitioning is selected, the user must input a list of chosen partition values in the empty text field shown. These can be added manually (typed directly into the window) with each partition value listed on a new line. Or, Select File can be used to choose and then open a file. The file's contents will be read into the window and used to determine the partitioning values. Each line in the file will be a separate column partition value.
Depending on the type of query configuration originally chosen (Import, Merge, or Validate), the following additional buttons may appear in the Bulk Copy Dialog window:
- Edit Bulk Query: Selecting this option will allow you to edit the parameters for the bulk version of the underlying Import, Merge or Validate query. Edits are typically made to change the scheduling or other parameters. However, edits will only apply to the new bulk queries being processed The underlying query that was copied earlier will not be impacted.
- Create Bulk Merge Query: If the original configuration is an Import query, selecting Create Bulk Merge Query allows the user to create a set of Merge queries that will run for the same partition values used for the bulk import process. This set of Merge queries will run only when its respective set of Import queries successfully completes.
When selected, the Persistent Query Configuration Editor will open and present options to configure the Bulk Merge query. If a Merge query already exists that uses this namespace/table, the settings for that Merge query will be copied into the base settings for the new Bulk Merge query. Otherwise, the setting used for the new Bulk Merge query will be based on the original Import query. In either case, the settings can be edited by selecting Edit Configuration in the Bulk Copy Dialog window. - Delete Bulk Merge Query: This option appears only if a Bulk Merge Query has been created. Selecting Delete Bulk Merge Query will delete the Bulk Merge query associated with this Bulk Import process. Note: If there is a corresponding Bulk Validate query for the Bulk Merge query, both will be deleted when Delete Bulk Merge Query is selected.
- Create Bulk Validate Query: If the original configuration is a Merge query, selecting Create Bulk Validate Query allows the user to create a set of Validate queries that will run for the same partition values used for the Bulk Merge process. This set of Validate queries will run only when its respective set of Merge queries successfully completes.
When selected, the Persistent Query Configuration Editor will open and present options to configure the Bulk Validate query. If a Validate query already exists that uses this namespace/table, the settings for that Validate query will be copied into the base settings for the new Bulk Validate query. Otherwise, the setting used for the new Bulk Validate query will be based on the original Merge query. In either case, the settings can be edited by selecting Edit Configuration in the Bulk Copy Dialog window. - Delete Bulk Validate Query: This option appears only if a Bulk Validate Query has been created. Selecting Delete Bulk Validate Query will delete the Bulk Validate query associated with this Bulk Merge process.
- Delete Merge & Validate Queries: This button is only shown when Bulk Merge and Bulk Validate queries have been created. Selecting it removes both. A Bulk Validation query cannot run without a corresponding Bulk Merge query.
When a Bulk Import, Merge or Validate query is saved, each query is given the name of its base query, with the partitioning value appended with a "-". For example, a Bulk Import query might be named MyImport-2017-01-01.
ImportSource XML
Additional metadata to control and modify the import process is added in an ImportSource XML block of the schema. This is demonstrated below, with an expanded version of the previous schema:
<Table name="CsvNames5" namespace="Import" storageType="NestedPartitionedOnDisk">
<ImportSource name="JDBC1" type="JDBC">
<ImportColumn name="FirstName" sourceName="first_name" />
<ImportColumn name="LastName" sourceName="last_name" />
<ImportColumn name="Gender" sourceName="gender" />
<ImportColumn name="Race" sourceName="race" />
<ImportColumn name="FirstNameLength" sourceName="first_name" formula="FirstNameLength.length()" sourceType="String" />
</ImportSource>
<Partitions keyFormula="__PARTITION_AUTOBALANCE_SINGLE__"/>
<Column name="Date" intradayType="none" dataType="String" columnType="Partitioning" />
<Column name="FirstName" dataType="String" columnType="Normal" /><Column name="LastName" dataType="String"columnType="Grouping" />
<Column name="Gender" dataType="String" columnType="Normal" />
<Column name="Race" dataType="String" columnType="Normal" />
<Column name="FirstNameLength" dataType="int" columnType="Normal" />
<Column name="FLNameRatio" dataType="double" columnType="Normal" />
</Table>
Multiple ImportSource blocks can be added to allow various import instructions for different sources or types of import. The type attribute is required; currently supported values are "CSV","JDBC" and "XML". The name attribute is optional. When the import runs, if no ImportSource name is specified, the importer will use the first ImportSource block that matches its type. If no matching block is found (for type, and, if specified, for name), then the import will attempt to auto-match columns as it would if no ImportSource blocks existed.
To support multi-partition imports, you must have an ImportColumn for the partition column indicating how to partition each row (e.g., <ImportColumn name="Date" sourceName="trade_date"/> where trade_date is the CSV/JDBC column name).
An ImportSource block can contain multiple types of entries, including ImportColumn, Imports, maxError, arrayDelimiter and ImportTransform. These options are described below:
|
Entry Type/ Attribute |
Description |
|---|---|
|
|
Each entry describes how to map values for one column from the source data to the target table's schema |
|
The name of the target column in the Deephaven table, which must exactly match the name attribute of one of this schema's Column elements. This attribute is required; others are optional. Note: An |
|
The name of the column in the source data whose values should be mapped into the target column specified by name. This is used for mapping from a different column name in the source table, such as when a source name is not a valid Deephaven column name. Also use this attribute on the partition column when configuring multi-partition imports. |
|
The data type of the source data. This is used when data types must be translated during the import process. If As an example, |
|
Indicates whether null values will be accepted for this column. If the nullable attribute is present, it must be " Note: for primitive types, which do not natively support null values, the database uses reserved values to represent null. Null default values from |
|
This allows specification of Java code to do simple manipulations of data based on the source value itself. In the example noted earlier, the |
|
Similar to formula, transform creates a new function during the import using the details of the |
|
The value to use when import or parsing of the source value fails or the source is null. The default value must be type compatible with the target column type; for boolean columns, this would be lowercase " |
|
The full name of a custom class to use as the field writer for the column. Custom field writer classes must derive from the |
|
(CSV only) If this attribute is set to " |
|
(CSV only) Allows overriding the cache size for columns that will be cached. The default size is 1024 entries. |
|
Other attributes as needed to control transform functions. (e.g., |
|
The packages to import. A default set of packages is imported to support built-in functions and import tasks, but additional packages can be specified to provide other functions or support custom transforms. Imports can be just the qualified package/class name, or the full import Beside the internal imports used by the field writers, these imports are automatically added in the field writer context:
|
|
|
|
The maximum number of allowed parsing errors before failing the import. The default is 0. Allowed errors that will increment |
|
|
A string to be used as a delimiter when parsing array data. The default delimiter is a comma. |
|
|
See Custom Transforms below |
|
The name of a custom transform function, and will be the name sought when an |
|
The Java code that will be compiled as part of the setter for an |
Custom Transforms
Custom transforms can be added to the ImportSource block as ImportTransform elements. These elements must:
- Have a
Bodyelement that contains the text of the transform function - Have a
nameattribute that matches the name used in the transform attribute ofImportColumnsthat use the transform - Implement a
getFunctionfunction that returns a function matching the specification of the interface
At runtime, getFunction is passed to the ImportColumnDefinition of the column that is being set, and a boolean value indicating whether strict (true) or permissive (false) data checking has been selected. The ImportColumnDefinition allows getFunction to access details like the target column name, the target column type, and any ImportColumn details by using getImportColumn(), which provides access to functions such as getAttributeValue().
The following shows an example of a custom transform element that could be specified in the schema (Note: this is actually the built-in dbDateTimeFromLong transform):
<ImportTransform name="Sample">
<Body>
getFunction(ImporterColumnDefinition col, boolean strict)
{
String precision = col.getImportColumn().getAttributeValue("transformPrecision");
switch (precision) {
case "millis":
return (long value) -> new DBDateTime(DBTimeUtils.millisToNanos(value));
case "micros":
return (long value) -> new DBDateTime(DBTimeUtils.microsToNanos(value));
case "nanos": return DBDateTime::new;
default: return null;
}
</Body>
</ImportTransform>
When compiling the transform function, the target, and, if defined, source, data types are used to find a suitable Java functional interface with which to declare the getFunction. In the case of the example above, the target column type is DBDateTime, and the sourceType="long" attribute is added to the ImportColumn. This combination of source and target types is then used to create and execute the resultant function as a LongFunction<DBDateTime>.
A much simpler example follows:
<ImportTransform name="Sample">
<Body>
getFunction(ImporterColumnDefinition column, Boolean strict) {
return (long value) -> (2 * value);
}
</Body>
</ImportTransform>
If this is used for a column whose type is long, this will be mapped to a LongUnaryOperator, which takes a long and returns a Long. If the sourceType is not specified, the importer will attempt to use the target column type for matching a function interface.
If the function being returned from getFunction has a declared return type, this return type must exactly match the target column type for which the transform will be used. For example, a transform that will provide values for a Long column and that has a declared return type, must be declared Long, not long. However, the simpler, and recommended, implementation is to include only the transform body in the return from getFunction, so the system can perform implicit type conversion when compiling the transform.
Primitive Types and Boxed Types in Transforms
Not every combination of primitive types is supported by the Lambda interfaces used to pass transform functions into field writers. The supported combinations for unboxed primitive types are any combination of source and target of int, double, and long.
Therefore, a transform that reads a long value from the source and transforms it to a double value in the target table would use the primitive types of long and double.
However, a transform that reads a byte value and writes a short value would not be able to use primitive types. The importer will map this transform as a Function<Byte, Short> Note the capitalization. Byte and Short are the boxed (class-based) versions of the primitive types byte and short. This means there is extra overhead in the transform process to use the larger class-based versions of the data types.
Note: This concern with boxing of primitive types is only applicable to transforms. If the data can be implicitly converted (e.g., map a short to an int), or converted with a formula, then no boxing occurs. If the translation is too complex for a formula, another option for such primitive types is to write a custom FieldWriter. Since the FieldWriter classes are not interfaced through Lamdba functions, they have no limitations on which primitive data types they can use for source or target.
Another thing to be aware of is that primitive types that have a "null" default will be set to values from com.illumon.iris.db.tables.utils.QueryConstants when their sources are null. While these may be boxed when they are passed into a transform, they will not be automatically converted to true null values. If special handling is needed for null values in the transform, either check for equality to the QueryConstants values, or use a boxed type for the sourceType property of the column so these values will be preserved as null.
Array Types
The importers support long[] and double[] array types. From the source, these are expected to be strings (either a string field from JDBC or a column value in CSV). Formatting of the string is as a bracketed list of values. Brackets can be square brackets [ ], parentheses ( ), or curly braces { }. The delimiter can be specified with arrayDelimiter, but the default delimiter is a comma. Empty arrays [] are also supported.
An example array of double strings follows: [1.5, 6.4, 8.0, 2.2322, 88, 16.02]
Custom FieldWriter Classes
Custom FieldWriter classes can be used where a field writer needs to use values from multiple source columns, or where it is more desirable to package transform logic into a FieldWriter class rather than in an in-line transform or imported code. Custom field writers must extend the source-specific FieldWriter class (i.e., CsvFieldWriter for CSV imports or JdbcFieldWriter for JDBC imports.) They must implement a specific constructor, and must also implement the processField method.
An example of a custom field writer for JDBC follows:
public class JdbcMultiColumnExample extends JdbcFieldWriter{
private final RowSetter setter;
private final ResultSet rs;
private final ImporterColumnDefinition column;
private int rowCount;
//This is the constructor format that is required for custom JdbcFieldWriters
public JdbcMultiColumnTest(Logger log, boolean strict, ImporterColumnDefinition column, RowSetter setter, ResultSet rs, String delimiter) {
super(log, column.getName());
this.setter = setter;
this.column = column;
this.rs = rs;
rowCount = 0;
}
@Override
public void processField() throws IOException {
try {
setter.set(rs.getString("FirstName") + " " + rs.getString("LastName"));
rowCount++;
} catch (SQLException e) {
throw new RuntimeException("Failed to concatenate FirstName and LastName for target field: " + column.getName());
}
}
}
A custom field writer for CSV would be similar, but would not include RecordSet in its constructor arguments, and would require CsvRecord as an argument for processField.
JdbcFieldWriters must extend JdbcFieldWriter and implement a constructor that accepts:
Logger.class= logger instance passed down from mainImporterColumnDefinition.class= column definition of column to which this field writer will be attached (includingImportColumn, and target information)RowSetter.class=rowsetterfor the target columnResultSet.class= JDBC result set with the current row. The field writer should only read values from result set metadata and current row data, not change the position of the result set or close it.String.class= delimiter value used for array parsing functionsBoolean.class= strict value to indicate whether data checking is strict (true) or relaxed (false)
CsvFieldWriters must extend CsvFieldWriter and implement a constructor that accepts:
Logger.class= logger instance passed down from mainImporterColumnDefinition.class= column definition of column to which this field writer will be attached (includingImportColumn, and target information)RowSetter.class= row setter for the target columnString.class= delimiter value used for array parsing functionsBoolean.class= strict value to indicate whether data checking is strict (true) or relaxed (false)
Built-in Functions and Transforms
Some functions and transforms are built into the importer framework and can be used when designing ImportSource entries. Transforms often require other attributes to control their behavior. Functions can be used in formulae; transforms can be used in transforms.
dbDateTimeFromLong (transform)- takes a long input (offset from Unix epoch) and returns aDBDateTime.The attributetransformPrecisionshould be set to "millis", "micros", or "nanos" to indicate the units of the long offset value. For example,transformPrecision="millis"means that the long value from the source is the number of milliseconds from Unix epoch. RequiressourceType=longto match the expected input of the transform.new DBDateTime (function)- this is the constructor forDBDateTimeobjects. By default it takes a long offset of nanoseconds from Unix epoch. Additionally,DBDateTimeUtils.millsToNanos()andDBDateTimeUtils.microsToNanos()are available for converting other precisions of offsets to nanoseconds. Standard Java date and time parsing and conversion functions can be used to create a long Unix epoch offset from other formats; the result of which can then be passed to this function to store asDBDateTimevalue. java.time.* and java.time.format.DateTimeFormatterare included in the standard imports.ZonedDateTime.parsecan be used with various formats to parse strings intoZonedDateTimes; and theZonedDateTime.toInstant().toEpochMilli()call can then be used, for example, to convert to long milliseconds to pass to this creator. 'dbDateTimeFromTimestamp (function)- takes a Java Timestamp and returns aDBDateTimeused internally, automatically, when importing JDBC datetime types toDBDateTimedestinationcolumns.DBTimeUtils.convertDateTime (function)- takes a String and returns aDBDateTime. Expects a string of the form: YYYY-MM-DDThh:mm:ss.nnnnnnnnn TZ. One use of this function would be to convert dates that had originally been exported to CSV from a Deephaven system.enumFormatter (transform)- takes an int input and returns a String, based on lookup from an enum defined in the system columns file. The attributetransformColumnSetis the String column set name to match in the columns file. The attributetransformEnumis the String name of the enum under the column set to match in the columns file. RequiressourceType=inttomatch the expected input of the transform.accountingInt (function)- takes a String and converts to an int. Converts enclosing parentheses to a negative value. Removes thousands separators. Expects US number formatting (comma for thousands separator). RequiressourceType=Stringto match the expected input of the function.accountingLong (function)- takes a String and converts it to a long. Converts enclosing parentheses to a negative value. Removes thousands separators. Expects US number formatting (comma for thousands separator). RequiressourceType=Stringto match the expected input of the function.accountingDouble (function)- takes a String and converts it to a double. Converts enclosing parentheses to a negative value. Removes thousands separators. Expects US number formatting (comma for thousands separator). RequiressourceType=Stringto match the expected input of the function.stripFirstCharacter (function)- takes a String and returns a String. Strips the first character, assuming the String has at least one character. No overrides of sourceType needed because input and output types match.parseBoolean (function)- takes a String and returns a Boolean. Single character T/F 1/0 t/f converted to Boolean true or false. Strings (case-insensitive) true or false converted to Boolean true or false. Used internally, automatically, when reading a CSV to a destination column that is Boolean. Requires asourceType=Stringfor explicit use in custom formulae.getLongArray (function)- takes a String and returns an array of long values. Two arguments - first is the String of array values, second is a String delimiter to parse the values. Input string is expected to be enclosed - normally by square brackets. Only single-dimensional lists (arrays) are supported; no matrices. Used internally, automatically, when importing to along[]column. RequiressourceType=Stringfor explicit use in custom formulae.getDoubleArray (function)- takes a String and returns an array of double values. Two arguments: first is the String of array values, second is a String delimiter to parse the values. Input string is expected to be enclosed normally by square brackets. Only single-dimensional lists (arrays) are supported; no matrices. Used internally, automatically, when importing to adouble[]column. RequiressourceType=Stringfor explicit use in custom formulae.
Scripting Imports and Merges
The most flexible method for importing data into Deephaven is via Groovy/Python scripting. Import scripts may be deployed via the command line or through a RunAndDone persistent query. Import tasks are most easily executed from a script by using a "builder" class. The underlying import logic is identical to that accessible from the command line tools and persistent queries.
Command Line Execution
To run a script from the command line, use the iris_exec program as follows:
/usr/illumon/latest/bin/iris_exec run_local_script -- -s ./script.groovy -h <merge server host> -p <merge server port>
where ./script.groovy is a local script file to execute on the server.
See Running Local Scripts for more details on options.
Important Notes
- When importing CSV files, the source file(s) paths are local to the server and must be readable by the user that runs the query workers (typically dbquery/dbmerge depending on which server you use).
- Importing and merging data requires the appropriate write permissions. This means these scripts should be run against a "merge server", not a "query server". Since the latter is the default in the local script runner, you must specify an alternate host and/or port to reference a merge server. See the
-queryHostand-queryPortoptions torun_local_script.
Examples
The following examples show how to execute an import from a Groovy script. Note: there are many options not illustrated in these examples. Please refer to Import API Reference for all the variations available.
CSV Import Script
This script imports a single CSV file to a specified partition.
import com.illumon.iris.importers.util.CsvImport
import com.illumon.iris.importers.ImportOutputMode
rows = new CsvImport.Builder("Test","Sample")
.setSourceFile("/db/TempFiles/dbquery/staging/data1.csv")
.setDestinationPartitions("localhost/2018-04-01")
.setOutputMode(ImportOutputMode.REPLACE)
.build()
.run()
println "Imported " + rows + " rows."
JDBC Import Script
The following script imports all the records from a SQL Server table into a single partition:
import com.illumon.iris.importers.util.JdbcImport
import com.illumon.iris.importers.ImportOutputMode
rows=new JdbcImport.Builder("Test","Table1")
.setDriver("com.microsoft.sqlserver.jdbc.SQLServerDriver")
.setConnectionUrl("jdbc:sqlserver://myserverhost;database=testdb;user=myuser;password=mypassword")
.setQuery("SELECT * FROM table1")
.setDestinationPartitions("localhost/2018-05-01")
.setStrict(false)
.setOutputMode(ImportOutputMode.SAFE)
.build()
.run()
println "Imported " + rows + " rows."
While the following script imports all records into partitions based on the "Date" column, with the user and password values passed in via the iris_exec command line:
import com.illumon.iris.importers.util.JdbcImport
import com.illumon.iris.importers.ImportOutputMode
rows=new JdbcImport.builder("Test","Table1")
.setDriver("com.microsoft.sqlserver.jdbc.SQLServerDriver")
.setConnectionUrl("jdbc:sqlserver://myserverhost;database=testdb")
.setUser(user)
.setPassword(password)
.setSourceTimeZone("UTC")
.setQuery("SELECT * FROM table1 ORDER BY date")
.setDestinationPartitions("localhost")
.setPartitionColumn("Date")
.build()
.run()
println "Imported " + rows + " rows."
Merge Data Script
The following example assumes the partition is set via a command line argument, and might be executed from the command line as:
import com.illumon.iris.importers.util.MergeData
import com.illumon.iris.importers.ImportOutputMode
new MergeData.builder(db,"Test","MyTable")
.setPartitionColumnValue(partition)
.build()
.run()
println "Done merging!"
The following script might be executed from the command line for the 2018-05-01 partition: (Note: The port is specified to connect to the appropriate Deephaven server for merge operations.)
iris_exec run_local_script -- -s ~/myscripts/merge_single.groovy -p 30002 partition "2018-05-01"
Import API Reference
Each type of import (CSV/XML/JDBC/JSON) has a corresponding class. Each import class contains one or more static builder methods, which produce an object used to set parameters for the import. The builder returns an import object from the build() method. Imports are executed via the run() method and if successful, return the number of rows imported. All other parameters and options for the import are configured via the setter methods described below. The general pattern when executing an import is:
nRows = (Csv|Xml|Jdbc|Json)Import.builder(<namespace>,<table>)
.set<option>(<option value>)
...
.build()
.run()
Common Parameters
The following parameters are common to all import builders:
|
Setter Method |
Type |
Req? |
Default |
Description |
|---|---|---|---|---|
|
setDestinationPartitions |
String |
No* |
N/A |
The destination partition(s). e.g., " |
|
setDestinationDirectory |
File | String |
No* |
N/A |
The destination directory. e.g., |
|
setOutputMode |
ImportOutputMode | String |
No |
SAFE |
Enumeration with the following options: May also be specified as String (e.g., |
|
setStrict |
boolean |
No |
true |
If |
|
setPartitionColumn |
String |
No |
N/A |
Column name to use to choose which partition to import each source row. |
|
setSourceName |
String |
No |
N/A |
Specific |
* Either a destination directory, specific partition, or internal partition plus a partition column must be provided. A directory can be used to write a new set of table files to specific location on disk, where they can later be read with TableTools. A destination partition is used to write to intraday locations for existing tables. The internal partition value is used to separate data on disk; it does not need to be unique for a table. The name of the import server is a common value for this. The partitioning value is a string data value used to populate the partitioning column in the table during the import. This value must be unique within the table. In summary, there are three ways to specify destination table partition(s):
- Destination directory (e.g., .
setDestinationDirectory( /db/Intraday/<namespace>/<table>/localhost/<date>/<table/)) - Internal partition and destination partition (e.g.,
.setDestinationPartitions("localhost/2018-04-01")) - Internal partition and partition column - for multi-partition import (e.g.,
.setDestinationPartitions("localhost").setPartitionColumn("Date"))
CSV Import Builder
The CsvImport.builder method creates a CsvImportBuilder. The options are configured using the setter methods below.
CsvImport.Builder options
|
Setter Method |
Type |
Req? |
Default |
Description |
|---|---|---|---|---|
|
|
String |
No* |
N/A |
Directory from which to read source file(s) |
|
setSourceFile |
String |
No* |
N/A |
Source file name (either full path on server file system or relative to specified source directory) |
|
setSourceGlob |
String |
No* |
N/A |
Source file(s) wildcard expression |
|
setFileFormat |
String |
No |
DEFAULT |
The Apache commons CSV parser is used to parse the file itself. Five common formats are supported:
|
|
setDelimiter |
char |
No |
, |
Allows specification of a character other than the file format default as the field delimiter. If delimiter is specified, |
|
setSkipLines |
int |
No |
0 |
Number of lines to skip before beginning parse (before header line, if any) |
|
setTrim |
boolean |
No |
false |
Whether to trim whitespace from field values |
|
setConstantColumnValue
|
String |
No |
N/A |
A String to materialize as the source column when an
|
* The sourceDirectory parameter will be used in conjunction with sourceFile or sourceGlob. If sourceDirectory is not provided, but sourceFile is, then sourceFile will be used as a fully qualified file name. If sourceDirectory is not provided, but sourceGlob is, then sourceDirectory will default to the configured log file directory from the prop file being used.
XML Import
The XmlImport.builder method create an XmlImportBuilder. The options are configured using the setter methods below.
XmlImport.Builder options
|
Option Setter |
Type |
Req? |
Default |
Description |
|---|---|---|---|---|
|
setSourceDirectory |
String |
No* |
N/A |
Directory from which to read source file(s) |
|
setSourceFile |
String |
No* |
N/A |
Source file name (either full path on server file system or relative to specified source directory) |
|
setSourceGlob |
String |
No* |
N/A |
Source file(s) wildcard expression |
|
setDelimiter |
char |
No |
, |
Allows specification of a character to be used when parsing string representations of long or double arrays. |
|
setElementType |
String |
Yes |
N/A |
The name or path of the element that will contain data elements. This will be the name of the element which holds your data. |
|
setStartIndex |
int |
No |
0 |
Starting from the root of the document, the index (1 being the first top-level element in the document after the root) of the element under which data can be found. |
|
setStartDepth |
int |
No |
1 |
Under the element indicated by Start Index, how many levels of first children to traverse to find an element that contains data to import. |
|
setMaxDepth |
int |
No |
1 |
Starting from Start Depth, how many levels of element paths to traverse and concatenate to provide a list that can be selected under Element Name. |
|
setUseAttributeValues |
boolean |
No |
false |
Indicates that field values will be taken from attribute valued. E.g., |
|
setUseElementValues |
boolean |
No |
true |
Indicates that field values will be taken from element values. E.g., |
|
setPositionValues |
boolean |
No |
false |
When false, field values within the document will be named. E.g., a value called |
|
setConstantColumnValue |
String |
No |
N/A |
A String to materialize as the source column when an |
* The sourceDirectory parameter will be used in conjunction with sourceFile or sourceGlob. If sourceDirectory is not provided, but sourceFile is, then sourceFile will be used as a fully qualified file name. If sourceDirectory is not provided, but sourceGlob is, then sourceDirectory will default to the configured log file directory from the prop file being used.
JDBC Import
The JdbcImport.builder method creates a JdbcImportBuilder. The options are configured using the setter methods below.
JdbcImport.Builder options
|
Option Setter |
Type |
Req? |
Default |
Description |
|---|---|---|---|---|
|
setDriver |
String |
Yes |
N/A |
JDBC driver class. For example,
|
|
setConnectionUrl |
String |
Yes |
N/A |
JDBC connection string |
|
setUser |
String |
No |
N/A |
JDBC user (if not specified in connection string) |
|
setPassword |
String |
No |
N/A |
JDBC password (if not specified in connection string) |
|
setQuery |
String |
Yes |
N/A |
SQL query to execute for import |
|
setSourceTimeZone |
TimeZone |
No |
Server TZ* |
Time zone to be used when interpreting time & date values that do not have explicit offsets. |
* Unless the source time zone is specified, the JDBC import task attempts to read the server time zone/UTC offset prior to executing the query. The source time zone is used to interpret SQL "datetime", "date", and "time-of-day" values, unless those types explicitly contain an offset. Since Deephaven presently has no "date" type, "date" values are interpreted as a datetime at midnight in the server time zone.
JSON Import
JSON is imported using a recursive flattening of each JSON object (one top level JSON object per row). The input file should contain plain JSON objects, not comma separated or an array. For example, the following is a legal file with three objects, which will result in three rows:
{a:1} {a:2} {a:3}
You may have multiple JSON objects on a single line, and/or the JSON objects may span multiple lines.
Nested objects are recursively expanded, with the column name for each field derived from the full "path" to that field. The path separator is specified as a builder parameter. Array elements are numbered with a zero-based index. For example, the following maps to a schema with the columns "a", "b_c", "b_d", "e0", "e1", "e2" and a row with values 1, 2, 3, 4, 5, 6 (the path separator used here is "_"):
{ "a":1, "b":{ "c":2, "d":3 }, "e":[4,5,6] }
The JsonImport.builder method builds a JsonImportBuilder. The options are configured using the setter methods below.
JsonImportBuilder options
|
Option Setter |
Type |
Req? |
Default |
Description |
|---|---|---|---|---|
|
setSourceDirectory |
String |
No* |
N/A |
Directory from which to read source file(s) |
|
setSourceFile |
String |
No* |
N/A |
Source file name (either full path on server file system or relative to specified source directory) |
|
setSourceGlob |
String |
No* |
N/A |
Source file(s) wildcard expression |
|
setMaxInferItems |
Long |
No |
No Limit |
Maximum number of JSON objects to examine when inferring which columns are present in the file. Inference is necessary because JSON has no internal "schema". |
|
setColumnNames |
String | List<String> |
No |
N/A |
Column names to extract from source data. |
|
setFieldPathSeparator |
TimeZone |
No** |
N/A |
String to use when generating column names from nested JSON data. |
| setConstantColumnValue | String | No | N/A | A String to materialize as the source column when an ImportColumn is defined with a sourceType of CONSTANT |
* Unless the source time zone is specified, the JDBC import task attempts to read the server time zone/UTC offset prior to executing the query. The source time zone is used to interpret SQL "datetime", "date", and "time-of-day" values, unless those types explicitly contain an offset. Since Deephaven presently has no "date" type, "date" values are interpreted as a datetime at midnight in the server time zone.
** If nested JSON is present in the source file, you must specify a field path separator.
Merge API Reference
The Merge API is fairly simple, and analogous to the Import API. There is a single MergeData class with a builder method that returns a MergeDataBuilder object. MergeDataBuilder will produce a MergeData object when build() is called. Note that this MergeData class is in the com.illumon.iris.importers.util package (there is another MergeData class in the com.illumon.iris.importers package that is not intended for use from a script). Then the merge is executed via calling the run() method on the MergeData object. is used to build the merge. The general pattern for performing a merge is:
MergeData.builder(db,<namespace>,<table>)
.set<param>(<param value>)
...
.build()
.run()
MergeDataBuilder options
|
Option Setter |
Type |
Req? |
Default |
Description |
|---|---|---|---|---|
|
setPartitionColumnValue
|
String |
No* |
N/A |
A literal string used to select the column partition to merge. Often a date, e.g.. " |
|
setPartitionColumnFormula
|
String |
No* |
N/A |
An expression that will be evaluated to specify the partition to merge. For example |
|
setThreadPoolSize
|
int |
No |
4 |
The maximum number of parallel threads to use during the merge process |
|
setLowHeapUsage
|
boolean |
No |
false |
Whether to prioritize heap conservation over throughput |
|
setForce
|
boolean |
No |
false |
Whether to force merge when destination(s) already have data |
|
setAllowEmptyInput
|
boolean |
No |
true |
Whether to allow merge to proceed if the input data is empty |
|
setSortColumnFormula
|
String |
No |
N/A |
Formula to apply for sorting, post-grouping. For example, to sort on Timestamp, binned by second:
|
* Either a partition column value or formula must be specified (not both).
The BinaryStoreImporter Class
The Deephaven Binary Store Importer (com.illumon.iris.importers.BinaryStoreImporter) lets you import binary logs without a tailer or a data import server. This can be used as a production importer for normal or cleanup data processing. It also enables easy integration testing for generated loggers and listeners. At present, the BinaryStoreImporter does not support multi-partition imports. Note: access to the generated listener class used in online imports is required.
The syntax for using the Deephaven Binary Store Importer follows:
BinaryStoreImporter -ns <namespace> -tn <table name> [-sd <source directory>] -sf <exact file name> | -sg <file name glob> -dd <destination directory> | -dp <partitions delimited by '/'> [-om <SAFE | REPLACE | APPEND>]
|
Parameter Value |
Description |
|---|---|
|
|
The |
|
|
The |
|
|
Alternative source directory for binary store files. If this is not specified, the default log directory will be used. |
|
|
The source file |
|
|
The source file pattern |
|
|
The destination directory |
|
|
The destination partitions |
|
|
Output mode |
As indicated above, you must specify namespace, table name, enough source arguments to find the binary logs, and enough destination arguments to know where to write the table. This supports taking logs from a "log" dir and importing them into the intraday partitions, as well as taking logs from *anywhere* and importing to any directory you want.
Streaming Data
Getting Started
While batch data is imported in large chunks, ticking data (or streaming data) is appended to an intraday table row-by-row, as it arrives. Ticking data is also different from batch data in how Deephaven handles it. Normally, batch data that is imported to a partition with today's date is not available to users. The expectation is that such data will first be merged and validated before users should access it. Ticking data, on the other hand, is immediately delivered to users as new rows arrive. There is an expectation that the quality of this newest data may be lower than that of historical data, but having access to information with low latency is generally more important for ticking sources.
Another difference between batch and ticking data is that there are no general standards for ticking data formats. CSV, JDBC, JSON, and others provide well-known standards for describing and packaging sets of batch data, but, since ticking data formats do not have such accepted standards, there is always some custom work involved in adding a ticking data source to Deephaven.
Typical steps in adding a streaming data source to Deephaven:
- Create the base table schema
- Add a LoggerListener section to the schema
- Deploy the schema
- Generate the logger and listener classes
- Create a logger application that will use the generated logger to send new events to Deephaven
- Edit the host config file to add a new service for the tailer to monitor
- Edit the tailer config file to add entries for the new files to monitor
- Restart the tailer and DIS processes to pick up the new schema and configuration information
Overview
In addition to specifying the structure of the data in a table, a schema can include directives that affect the ingestion of live data. This section provides an overview of this process followed by details on how schemas can control it. Example schemas are provided as well.
Streaming data ingestion is a structured Deephaven process where external updates are received and appended to intraday tables. In most cases, this is accomplished by writing the updates into Deephaven's binary log file format as an intermediate step.
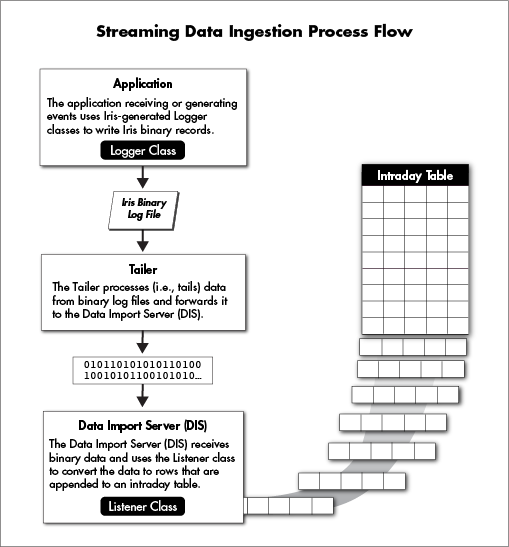
To understand the flexibility and capabilities of Deephaven table schemas, it is important to understand the key components of the import process. Each live table requires two custom pieces of code, both of which are generated by Deephaven from the schema:
- a logger, which integrates with the application producing the data
- a listener, which integrates with the Deephaven DataImportServer
The logger is the code that can take an event record and write it into the Deephaven binary log format, appending it to a log file. The listener is the corresponding piece of code that can read a record in Deephaven binary log format and append it to an intraday table.
The customer application receives data from a source such as a market data provider or application component. The application uses the logger to write that data in a row-oriented binary format. For Java applications or C#, a table-specific logger class is generated by Deephaven based on the schema file. Logging from a C++ application uses variadic template arguments and does not require generated code. This data may be written directly to disk files, or be sent to an aggregation service that combines it and then writes it to disk. See also Streaming Data from .NET Applications and Logging to Deephaven from C++.
The next step in streaming data ingestion is a process called the tailer. The tailer monitors the system for new files matching a configured name and location pattern, and then monitors matching files for new data being appended to them. As data is added, it reads the new bytes and sends them via TCP to one or more instances of the DataImportServer. The DataImportServer, or DIS, works interactively with the tailer, in case it needs to instruct the tailer to resend data from a file or restart a file. Other than finding files, and "tailing" them to the DIS, the tailer does very little processing. It is not concerned with what data is in a file or how that data is formatted. It simply picks up new data and streams it to the DIS.
The DataImportServer receives the data stream from the tailer and converts it to a column-oriented format for storage using the listener that was generated from the schema. A listener will produce data that matches the names and data types of the data columns declared in the "Column" elements of the schema.
Loggers and listeners are both capable of converting the data types of their inputs, as well as calculating or generating values. Additionally, Deephaven supports multiple logger and listener formats for each table. Together, this allows Deephaven to simultaneously ingest multiple real-time data streams from different sources in different formats to the same table.
The Java Logger Log Method and Logger Interfaces
The customer application might have "rows" of data to stream in two main formats: (1) sets of values using basic data types like double or String, and (2) complex objects that are instances of custom classes. The generated logger class will provide a log method that will be called each time the application has data to send to Deephaven, with its arguments based on the schema. To create the format for the log method, the logger class will always implement a Java interface. Deephaven provides several generic interfaces based on the number of arguments needed. For instance, if three arguments are needed, by default the Deephaven generic ThreeArgLogger is used. These arguments might be basic types such as double or String, custom class types, or a combination of both.
Deephaven provides generic logger interfaces for up to eight arguments, plus a special MultiArgLogger interface for loggers with more than eight arguments. The MultiArgLogger is more generic than the other interfaces in that the other interfaces will have their arguments typed when the logger code is generated, while the MultiArgLogger will simply take an arbitrarily long list of objects as its arguments. One known limitation of the MultiArgLogger is that it cannot accept generic objects among its arguments. In this case "generic objects" refers to objects other than String or boxed primitive types. The logger interfaces for fixed numbers of arguments do not have this limitation.
In many cases the events to be logged will have a large number of properties. Rather than use the MultiArgLogger there are two other approaches that are preferred: either create a custom logger interface or pass the event as a custom object.
In most cases the custom object is the easier solution, since such an object probably already exists in the API of the data source from which the custom application is receiving data. For example, if the custom application is receiving Twitter tweets as tweet objects, this object type could be added to the schema as a SystemInput, and Tweet properties could be used in the intradaySetters:
<SystemInput name="tweet" type="com.twitter.event.Tweet" />
…
<Column name="text" dataType="String" columnType="Normal" intradaySetter="tweet.getText()" />
<Column name="deleted" dataType="Boolean" columnType="Normal" intradaySetter="tweet.getDeleted()" />
This way, the customer application only needs to pass a Tweet object to the log() method instead of having to pass each of the properties of the object.
The other option for logging more than eight properties is to define a custom logger interface. A custom logger interface extends IntradayLogger, and specifies the exact names and types of arguments to be passed to the log() method:
public interface TickDataLogFormat1Interface extends IntradayLogger {
void log(Row.Flags flags,
long timestamp,
String name,
float price,
int qty);
default void log(long timestamp,
String name,
float price,
int qty)
{
log(DEFAULT_INTRADAY_LOGGER_FLAGS, timestamp, name, price, qty);
}
}
Note the timestamp argument. This column is often included in Deephaven tables to track when a logger first "saw" a row of data. By default, this is "now" in epoch milliseconds at the time the event was received. If needed, a custom intradaySetter and dbSetter can be specified to use other formats or precisions for this value.
A custom logger interface should specify any exceptions the log() method will throw. For instance, a logger that handles BLOB arguments will need to include throws IOException as part of its log(...) method declarations:
void log(<parameters as above>) throws IOException { … }
In this case, the "1" in the name (TickDataLogFormat1Interface) is to denote this is the first version of this interface, which is helpful if we later need to revise it. This is convention and recommended, rather than an enforced requirement in naming logger interfaces.
Log Formats
Each logger and listener corresponds to a distinct version number, which is specified in a logFormat attribute when defining a logger or listener in the schema. A listener will only accept data that has been logged with a matching column set and version number.
If a log format version is not specified, it will default to "0".
Listeners in Deephaven Schemas
Listeners are defined in a <Listener> element. A listener element has the following attributes:
|
Attribute |
Description |
|---|---|
|
|
Optional– specifies the listener's version number; defaults to 0 if this attribute is not present. If multiple listeners are defined then it is required. |
|
|
Optional – specifies the Java package for the generated code, defaults to the value of the |
|
|
Optional – specifies the Java class name for the generated code, defaults to a value that includes the table name and log format version (if non-zero), e.g., |
Listener Code Generation Elements
Listener code generation is supplemented by three elements:
|
Element |
Description |
|---|---|
|
|
Optional – specifies a list of extra Java import statements for the generated listener class |
|
|
Optional – specifies a free-form block of code used to declare and initialize instance or static members of the generated listener class |
|
|
Optional – specifies a state object used for producing validation inputs, with two attributes:
|
Listener <Column> Elements
Each <Listener> element contains an ordered list of <Column> elements. The <Column> elements declare both the columns expected in the data from the logger and the columns to write to the table. The <Column> elements for a listener support the following attributes:
|
Element |
Description |
|---|---|
|
|
Required – The name of the column. A column of this name does not necessarily need to exist in the table itself |
|
|
Optional, unless |
|
|
Optional (defaults to |
DBDateTime
One special case is the DateTime or DBDateTime data type. (DateTime is an alias for Deephaven's DBDateTime type, which is a zoned datetime with nanosecond precision.) It is expressed internally as nanoseconds from epoch. However, by default, listener code will assume that a DBDateTime is logged as a long value in milliseconds from epoch. If the value provided by the logger is something other than milliseconds from epoch, a custom setter must be specified in the dbSetter attribute.
For example:
dbSetter="com.illumon.iris.db.tables.utils.DBTimeUtils.nanosToTime(LoggedTimeNanos)"
In this case, the logging application is providing a long value of nanoseconds from epoch using the column name of LoggedTimeNanos.
The following is an example listener for the example table defined above:
<Listener logFormat="1" listenerPackage="com.illumon.iris.test.gen" listenerClass="TestTableFormat1Listener">
<ListenerImports>
import com.illumon.iris.db.tables.libs.StringSet;
</ListenerImports>
<ListenerFields>
private final String echoValue = "reverberating";
private final StringSet echoValueStringSet = new com.illumon.iris.db.tables.StringSetArrayWrapper(echoValue);
</ListenerFields>
<ImportState importStateType="com.illumon.iris.db.tables.dataimport.logtailer.ImportStateRowCounter" stateUpdateCall="newRow()" />
<Column name="Alpha"/>
<Column name="Bravo" />
<Column name="Charlie"/>
<Column name="Delta" dbSetter="5.0" intradayType="none" />
<Column name="Echo" dbSetter="echoValueStringSet" intradayType="none" />
</Listener>
Loggers in Deephaven Schemas
Loggers are defined in a <Logger> element, only required when a Java logger is needed. A logger element has the following attributes:
|
Attribute |
Description |
|---|---|
|
|
Required – specifies the logger's version number. |
|
|
Required – specifies the Java package for the generated code. |
|
|
Optional – specifies the Java class name for the generated code; defaults to a value that includes the table name and log format version (if non-zero), e.g., |
|
|
Optional – specifies a Java interface that the generated logger class will implement; defaults to a generified interface based on the number of system input parameters, e.g., |
|
|
Optional - the use of this attribute is deprecated. |
|
|
Optional - specifies the logger language. If not specified, a default value of "JAVA" will be used. Supported values are:
|
|
|
Optional - if specified as "true" this indicates that a logger should be generated that can write data directly to a Deephaven table. |
|
|
Optional - if specified as "false" then the logger loaded by a logging application will not be checked against the latest logger generated by the schema. This configuration is not recommended. |
Logger Code Generation Elements
Logger code generation is supplemented by three elements:
|
Element |
Description |
|---|---|
|
|
Optional – specifies a list of extra Java import statements for the generated logger class. |
|
|
Optional – specifies a free-form block of code used to declare and initialize instance or static members of the generated logger class. |
|
|
Required unless the
|
|
|
Optional - if specified, these are extra methods added to the generated logger class. |
|
|
Optional - if specified, these are extra fields (variables) added to the setter classes within the generated logger. |
The application should call the log() method once for each row of data, passing the data for the row as arguments.
Logger <Column> Elements
The <Column> elements declare the columns contained in the logger's output. A logger's column set typically matches the destination table's column set, but this is not a requirement, as the listener can convert the data from the logger's format to the columns required for the table. Each column in the table's Column set must exist in the Logger Column elements.
The <Column> element for a logger supports the following attributes:
|
Attribute |
Description |
|---|---|
|
|
Required – The name of the column in the logger's output. A corresponding |
|
|
The data type for values in the log, which may be different from the |
|
|
Required – A Java expression to produce the value to be used in this column. This can customize how a value from the logging application should be interpreted or converted before writing it into the binary log file. The expression may use the names of any |
If a logger depends on a customer's classes, those classes must be present in the classpath both for logger generation (as it is required for compilation) and at runtime.
The following is an example logger to go with the example listener:
<Logger logFormat="1" loggerPackage="com.illumon.iris.test.gen" loggerClass="BarTestLogger" loggerInterface="com.illumon.iris.test.ABCLogger">
<LoggerImports>
import com.abc.xyz.Helper;
</LoggerImports>
<LoggerFields>
private final Helper helper = new Helper();
</LoggerFields>
<SystemInput name="Alpha" type="String" />
<SystemInput name="Bravo" type="int" />
<SystemInput name="CharlieSource" type="String" />
<Column name="Alpha" dataType="String" />
<!-- The BarTestLogger will perform different input transformations than the TestLogger. -->
<Column name="Bravo" dataType="int" intradaySetter="Bravo + 1"/>
<Column name="Charlie" dataType="double" intradaySetter="helper.derive(Double.parseDouble(CharlieSource) * 2.0)" directSetter="matchIntraday" />
<!-- This column exists in the schema, but not in the V1 log. Missing columns are not allowed, therefore it must have an intradayType of none. -->
<Column name="Delta" dataType="double" intradayType="none" />
<Column name="Echo" dataType="StringSet" intradayType="none" />
</Logger>
Combined Definition of Loggers and Listeners
It is possible to declare a Logger and Listener simultaneously in a <LoggerListener> element. A <LoggerListener> element requires both a listenerPackage attribute (assuming the default listener package name is not to be used) and a loggerPackage attribute. The <Column> elements declared under the <LoggerListener>element will be used for both the logger and the listener. This is useful as it avoids repetition of the <Column> elements.
An example of a <LoggerListener> declaration for the example table is provided below.
<LoggerListener listenerClass="TestTableListenerBaz" listenerPackage="com.illumon.iris.test.gen" loggerPackage="com.illumon.iris.test.gen" loggerClass="TestTableLoggerBaz" logFormat="2">
<SystemInput name="Alpha" type="String" />
<SystemInput name="Bravo" type="int" />
<SystemInput name="Charlie" type="int" />
<ListenerImports>
import com.illumon.iris.db.tables.libs.StringSet;
</ListenerImports>
<ListenerFields>
private final String echoValue = "reverberating";
private final StringSet echoValueStringSet = new com.illumon.iris.db.tables.StringSetArrayWrapper(echoValue);
</ListenerFields>
<Column name="Alpha" dataType="String" />
<Column name="Bravo" dataType="int" />
<Column name="Charlie" dataType="double" intradayType="Int" dbSetter="(double)Charlie" directSetter="(double)Charlie" />
<Column name="Delta" dataType="double" dbSetter="6.0" intradayType="none" />
<Column name="Echo" dataType="StringSet" dbSetter="echoValueStringSet2" intradayType="none" />
</LoggerListener>
Combined Definitions of Table, Loggers, and Listeners
It is also possible to control code generation from the <Column> elements declared for the <Table>, without explicitly declaring the columns under a <Logger>, <Listener>, or <LoggerListener> attribute. The attributes normally defined on a <Column> element within <Logger>, <Listener>, or <LoggerListener> block can be placed on the same <Column> elements used to define the table itself. This can be useful for simple tables but is generally discouraged, as it does not allow for multiple logger or listener versions, or for easy migration such as the addition of new columns with application backwards-compatibility.
<Table namespace="TestNamespace" name="TestTable3" storageType="NestedPartitionedOnDisk" loggerPackage="com.illumon.iris.test.gen" listenerPackage="com.illumon.iris.test.gen">
<Partitions keyFormula="__PARTITION_AUTOBALANCE_SINGLE__"/>
<SystemInput name="Alpha" type="String" />
<SystemInput name="Bravo" type="int" />
<SystemInput name="Charlie" type="int" />
<SystemInput name="Foxtrot" type="double" />
<Column name="Timestamp" dbSetter="DBTimeUtils.millisToTime(Timestamp)" dataType="DateTime" columnType="Normal" intradaySetter="System.currentTimeMillis()"/>
<Column name="Alpha" dataType="String" />
<Column name="Bravo" dataType="int" />
<Column name="Charlie" dataType="double" intradaySetter="(double)Charlie + Foxtrot" directSetter="matchIntraday" />
<Column name="Delta" dataType="double" dbSetter="1.5" intradayType="none" />
</Table>
Logger/Listener Generation
Introduction
Streaming data ingestion by Deephaven requires a table structure to receive the data, generated logger classes to format data and write it to binary log files, generated listeners used by Deephaven for ingestion, and processes to receive and translate the data. The main components are:
- Schema files - XML files used to define table structure for various types of tables. These are described in detail in Schemas.
- Logger - generated class code that will be used by the application to write the data to a binary log, or to the Log Aggregator Service.
- Log Aggregator Service (LAS) - an optional Deephaven process that combines binary log entries from several processes and writes them into binary log files. The loggers may instead write directly to log files without using the LAS.
- Tailer - an Deephaven process that reads the binary log files as they are written, and streams the data to a Data Import Server (DIS).
- Data Import Server (DIS) - a process that writes near real-time data into the intraday table locations.
- Listener - generated class code running on the DIS that converts the binary entries sent by the tailer into appended data in the target intraday table.
The logger and the listener work together in that both of them are generated based on the table's schema file, and that the logger converts particular elements of discrete data into the Deephaven row-oriented binary log format, while the listener converts the data from the binary log format to Deephaven's column-oriented data store.
Although the typical arrangement is to stream events through the logger, tailer, and listener into the intraday tables as they arrive, there are also applications where only the logger is used, and the binary log files are manually imported when needed. The matching listener component will then be used when that later import is run.
Customers can generate custom loggers and listeners based on the definitions contained in schema files, and this will be required to use the streaming data ingestion described above. Logger and listener generation is normally done through the use of the generate_logger_listeners script, provided as part of the software installation.
When Deephaven uses a logger or listener class, it will first verify that the class matches the current schema definition for the table in question. Therefore, whenever a table schema is modified, and redeployed with deploy_schema, any related logger and listener will also need to be recreated.
generate_loggers_listeners Script
Once the schemas are defined, the generate_loggers_listeners script will normally be used to generate logger and listener classes. It finds schema files, generates and compiles Java files based on the definitions in these schema files, and packages the compiled .class files and Java source files into two separate JAR files which can be used by the application and Deephaven processes, or by the customer for application development. The IntradayLoggerFactory class is called to perform the actual code generation, and it uses the properties described above when generating the logger and listener code.
To use it with default behavior, simply call the script without any parameters, and it will generate the loggers and listeners for any customer schema files it finds. For example:
sudo service iris generate_loggers_listeners
The script will use several default options based on environment variables in the host configuration file's generate_loggers_listeners entry.
ILLUMON_JAVA_GENERATION_DIR- the directory into which the generated Java files will be placed. If this is not supplied, then the directory$WORKSPACE/generated_javawill be used. This can also be overridden with thejavaDirparameter as explained below. Two directories will be created under this directory:build_generated- used to generate the compiled Java class filesjava- used to hold the generated Java code
A typical value for this is:
export ILLUMON_JAVA_GENERATION_DIR=/etc/sysconfig/illumon.d/resources
ILLUMON_CONFIG_ROOTmust indicate the configuration root directory. The script copies the generated logger/listener JAR file to thejava_libdirectory under this. A typical value for this is:export ILLUMON_CONFIG_ROOT=/etc/sysconfig/illumon.dILLUMON_JAR_DIR- the directory in which the generated JAR files will be created. If it is not defined, then the workspace directory will be used. This is not the final location of the generated JAR file that contains the compiled .class files, as it's copied based on theILLUMON_CONFIG_ROOTenvironment variable. The JAR file that contains the logger Java sources is not copied anywhere.
Several options are available to provide flexibility in logger/listener generation. For example, a user could generate loggers and listeners from non-deployed schema files for use in application development.
outputJar- specifies the filename of the JAR file generated by the logger/listener script. If the parameter is not provided, the default JAR file name isIllumonCustomerGeneratedCode.jar.packages- a comma-delimited list which restricts which packages will be generated. If a logger or listener package doesn't start with one of the specified names, generation will be skipped for that logger or listener. If the parameter is not provided, all loggers and listeners for found schema files will be generated.
Customer logger and listener packages should never start with com.illumon.iris.controller or com.illumon.iris.db, as these are reserved for internal use.
javaDir - specifies the directory which will be used to write generated Java files. A logs directory must be available one level up from the specified javaDir directory. If the parameter is not provided, the directory generated_java under the workspace will be used. In either case, under this directory a subdirectory build_generated will be used to contain compiled .class files, and this subdirectory will be created if it does not exist.
schemaDir - specifies the path to search for schema files; it can include multiple semicolon-delimited locations. All specified locations are searched for schema and JAR files, and JAR files are searched for schema files therein. If provided, this overrides the SchemaConfig.resourcePath property described above. If the parameter is not provided, the SchemaConfig.resourcePath property will be used to find schema files.
jarDir - specifies a directory to hold the generated JAR file. If the parameter is not provided, then the workspace directory (as defined in the host configuration file) will be used, and the generated JAR file will be copied to a location where the Deephaven application will find it (currently /etc/sysconfig/illumon.d/java_lib).
javaJar - specifies a JAR file in which the generated logger source (java) files will be placed. This will be placed in the same directory as the generated JAR file. If the parameter is not specified, then a JAR file with the name "IllumonCustomerGeneratedCodeSources.jar" will be created.
For example, the following command would generate the JAR file /home/user1/jars/test.jar, using only the schemas found in their schema directory /home/user1/schema and using the directory /home/user1/temp/java_gen_dir to hold java and class files. It only generates those listeners or loggers with packages that start with com.customer.gen. Since it is only operating out of the user's directories it can be run under the user's account.
service iris generate_loggers_listeners \
outputJar=test.jar \
packages=com.customer.gen \
javaDir=/home/user1/temp/java_gen_dir \
schemaDir=/home/user1/schema \
jarDir=/home/user1/jars
If the generation process completes correctly, the script will show which Java files it generated and indicate what was added to the JAR files. The final output should be similar to the following:
**********************************************************************
Jar file generated: /db/TempFiles/irisadmin/IllumonCustomerGeneratedCode.jar
Jar file copied to /etc/sysconfig/illumon.d/java_lib
Jar file with logger sources created as /db/TempFiles/irisadmin/IllumonCustomerGeneratedCodeSources.jar
********************
Troubleshooting Logging
If logged events are not being seen in a db.i query in the console, these are some steps that can be taken to narrow down where a problem might be.
Check that bin files are being created and are growing.
- By default, the tailer runs under the
irisadminaccount, and binary log files should be generated in its logging directory:/db/TempFiles/irisadmin/logs. Log files will normally have a name in the form of<namespace>.<tablename>.bin.<date and time stamp>. They should be owned byirisadminand readable by thedbmergegrpgroup. - If no such files exist, or the files are not growing, it may be that the logging application is not running, that there is a problem with the logging application, or that no events are arriving. Most troubleshooting from here will be proprietary to the custom logging application itself.
- If needed, binary log file contents can be "dumped" using the iriscat tool (
/usr/illumon/latest/bin/iriscat). -
Another useful tool when developing new logging sources is the readBin command. readBin allows a binary log file to be loaded to a memory table in the Deephaven console. It requires that the the schema for the table be deployed on the query server and that the listener class corresponding to the table and logger version be available. Several usages are available; the most common is of the form:
myTable = readBin("namespace","table_name","path and file of binary log file relative to the server")
Check that the tailer is tailing the files
- When the tailer starts, it should indicate what files it has found. This is logged near the top of its log file (
/db/TempFiles/irisadmin/LogTailerMain[number - usually 1].current or datetimestamp. Use grep to check these log files for a message that includes the keywordOpening:and the name of the particular binary log file. If this message is not found, there may be a problem with the configuration of thetailerConfig.xmlor the host config file. The top of a new tailer log file, after restarting the tailer will show what xml file the tailer is using. If these files are not correctly configured with the service name and file names and patterns for the service, the tailer will not pick them up and tail them to the DIS. - Another thing to check is that the tailer is sending its data to the correct DIS and that the needed ports are open. These properties are set with
data.import.server.[DISname].hostanddata.import.server.portin the property file being used by the tailer. The default DIS port is 22021. (See: Property File Configuration Parameters in the Binary Log Tailer. )
Check for errors in the DIS log
- The DIS runs under the dbmerge account, and its log files will be located under
/db/TempFiles/dbmerge/logs/DataImportServer.log.[current or datetimestamp]. Use grep to check these logs forERRORor for references to the namespace and table name that should be logged. One possible error is that the listener code that was generated from the schema has not been deployed to the DIS system, or, similarly, that the schema for the new table has not been made available to the DIS. After new schema or listeners are deployed, the DIS must be restarted to pick up the changes (sudo monit restart db_dis). - If changes are made to a schema, logger, or listener mid-day (after data has already been logged), the DIS should be stopped and then the corresponding intraday directory (
/db/Intraday/[namespace]/[table name]/[host name]/[date]) must be deleted. Then, when the DIS is restarted, it will restart processing today's events for the table using the new schema and listener.
Examples
The following example schemas demonstrate the various capabilities of Deephaven table schemas.
Example 1
This example combines the logger and listener elements defined in the previous examples.
<Table name="TestTable" namespace="TestNamespace" storageType="NestedPartitionedOnDisk">
<Partitions keyFormula="__PARTITION_AUTOBALANCE_SINGLE__"/>
<Column name="Partition" dataType="String" columnType="Partitioning" />
<Column name="Alpha" dataType="String" columnType="Grouping"/>
<Column name="Bravo" dataType="int" />
<Column name="Charlie" dataType="double" />
<Column name="Delta" dataType="double" />
<Column name="Echo" dataType="StringSet" />
<Listener logFormat="1" listenerPackage="com.illumon.iris.test.gen" listenerClass="TestTableFormat1Listener">
<ListenerImports>
import com.illumon.iris.db.tables.libs.StringSet;
</ListenerImports>
<ListenerFields>
private final String echoValue = "reverberating";
private final StringSet echoValueStringSet = new com.illumon.iris.db.tables.StringSetArrayWrapper(echoValue);
</ListenerFields>
<ImportState importStateType="com.illumon.iris.db.tables.dataimport.logtailer.ImportStateRowCounter" stateUpdateCall="newRow()" />
<Column name="Alpha"/>
<Column name="Bravo" />
<Column name="Charlie"/>
<Column name="Delta" dbSetter="5.0" intradayType="none" />
<Column name="Echo" dbSetter="echoValueStringSet" intradayType="none" />
</Listener>
<Logger logFormat="1" loggerPackage="com.illumon.iris.test.gen" loggerClass="BarTestLogger" >
<LoggerImports>
import com.abc.xyz.Helper;
</LoggerImports>
<LoggerFields>
private final Helper helper = new Helper();
</LoggerFields>
<SystemInput name="Alpha" type="String" />
<SystemInput name="Bravo" type="int" />
<SystemInput name="CharlieSource" type="String" />
<Column name="Alpha" dataType="String" />
<!-- The BarTestLogger will perform different input transformations than the TestLogger. -->
<Column name="Bravo" dataType="int" intradaySetter="Bravo + 1"/>
<Column name="Charlie" dataType="double" intradaySetter="helper.derive(Double.parseDouble(CharlieSource) * 2.0)" directSetter="matchIntraday" />
<!-- This column exists in the schema, but not in the V1 log. Missing columns are not allowed, therefore it must have an intradayType of none. -->
<Column name="Delta" dataType="double" intradayType="none" />
<Column name="Echo" dataType="StringSet" intradayType="none" />
</Logger>
<LoggerListener listenerClass="TestTableListenerBaz" listenerPackage="com.illumon.iris.test.gen" loggerPackage="com.illumon.iris.test.gen" loggerClass="TestTableLoggerBaz" logFormat="2">
<SystemInput name="Alpha" type="String" />
<SystemInput name="Bravo" type="int" />
<SystemInput name="Charlie" type="int" />
<ListenerImports>
import com.illumon.iris.db.tables.libs.StringSet;
</ListenerImports>
<ListenerFields>
private final String echoValue = "reverberating";
private final StringSet echoValueStringSet = new com.illumon.iris.db.tables.StringSetArrayWrapper(echoValue);
</ListenerFields>
<Column name="Alpha" dataType="String" />
<Column name="Bravo" dataType="int" />
<Column name="Charlie" dataType="double" intradayType="Int" dbSetter="(double)Charlie" directSetter="(double)Charlie" />
<Column name="Delta" dataType="double" dbSetter="6.0" intradayType="none" />
<Column name="Echo" dataType="StringSet" dbSetter="echoValueStringSet2" intradayType="none" />
</LoggerListener>
</Table>
Example 2
This is a combined example where the table, logger, and listener elements are combined in one definition.
<!-- Simple test schema for backwards compatibility. -->
<Table namespace="TestNamespace" name="TestTable3" storageType="NestedPartitionedOnDisk" loggerPackage="com.illumon.iris.test.gen" listenerPackage="com.illumon.iris.test.gen">
<Partitions keyFormula="__PARTITION_AUTOBALANCE_SINGLE__"/>
<SystemInput name="Alpha" type="String" />
<SystemInput name="Bravo" type="int" />
<SystemInput name="Charlie" type="int" />
<SystemInput name="Foxtrot" type="double" />
<Column name="Partition" dataType="String" columnType="Partitioning" />
<Column name="Timestamp" dbSetter="DBTimeUtils.millisToTime(Timestamp)" dataType="DateTime" columnType="Normal" intradaySetter="System.currentTimeMillis()"/>
<Column name="Alpha" dataType="String" />
<Column name="Bravo" dataType="int" />
<Column name="Charlie" dataType="double" intradaySetter="(double)Charlie + Foxtrot" directSetter="matchIntraday" />
<Column name="Delta" dataType="double" dbSetter="1.5" intradayType="none" />
</Table>
Example 3 - Batch Data Import Using the Schema Editor and Query-based Importing
The following example is presented to show the common steps in setting up schema and an import job for a new CSV batch data source.
The example uses U.S. Federal College Scorecard data from www.data.gov. To follow along with this walk-through exactly, please download and unzip the CollegeScorecard_Raw_Data.zip file from: https://catalog.data.gov/dataset/college-scorecard.
Click the Advanced button at the top of the Deephaven Console and then select Schema Editor. Note: The Schema Editor menu item is only available if you are a member of the iris-schemamanagers group.
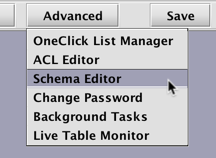
Accept the defaults presented on the first panel and click OK.
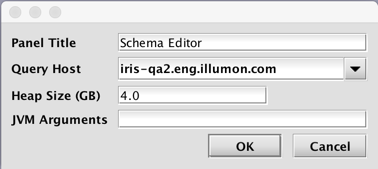
The Schema Editor panel will open, as shown below:
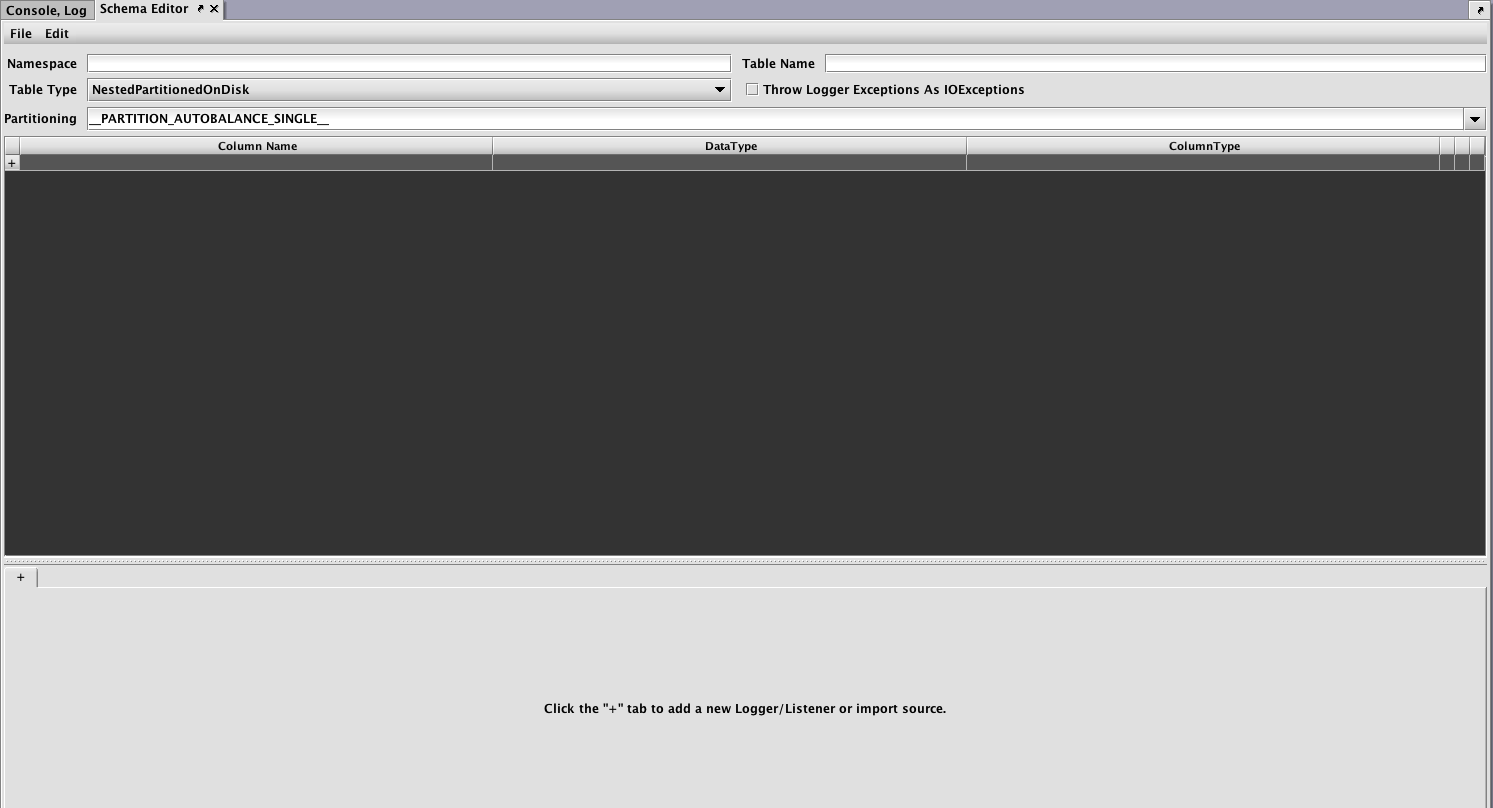
Click the File menu and the select the Discover CSV Schema... option
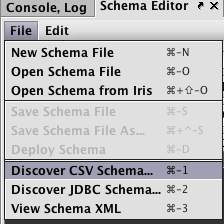
When the Discover Schema panel opens, select the ellipsis button to the right of the Source File field, (circled below). 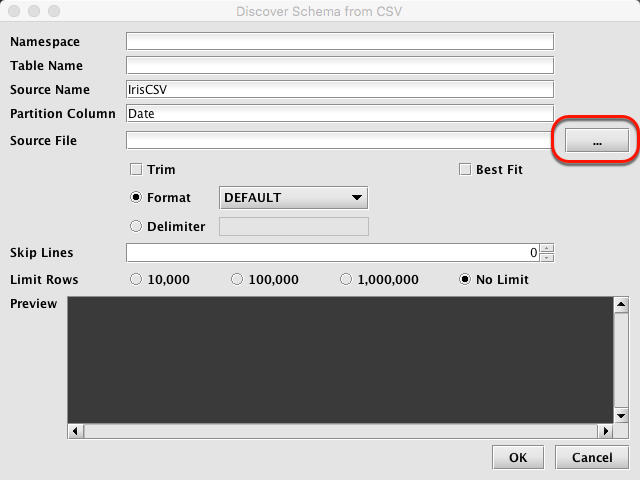
Browse for the CSV file you downloaded earlier. Then select Open.
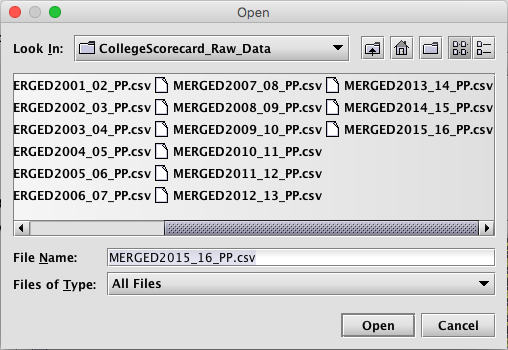
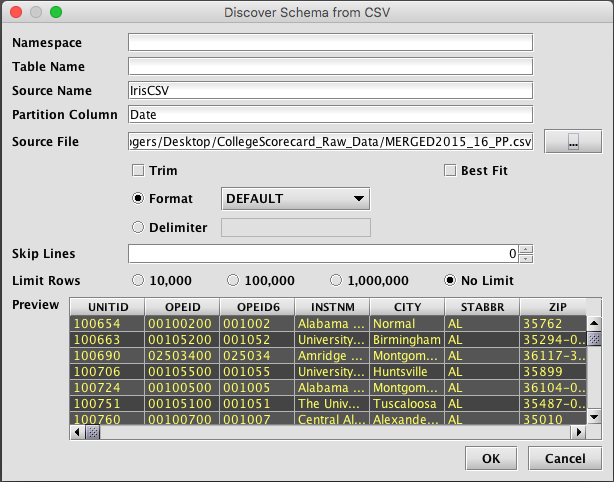
After selecting the file, enter the name of the Table Name and Namespace. (It can also be entered in the main Schema Editor window in the next step.) Format, Skip Lines, and Delimiter should be set here to result in a good preview of the data. For very large files, it may be desirable to limit how many rows are analyzed to infer the data types of the columns. The entire file does not need to be scanned, as long as there is enough representative data in the selected top lines of the file.
Click OK once the preview looks correct. Depending on the size of the file, it may take several seconds or longer to process the file. A progress bar will be shown at the bottom of the window during processing.
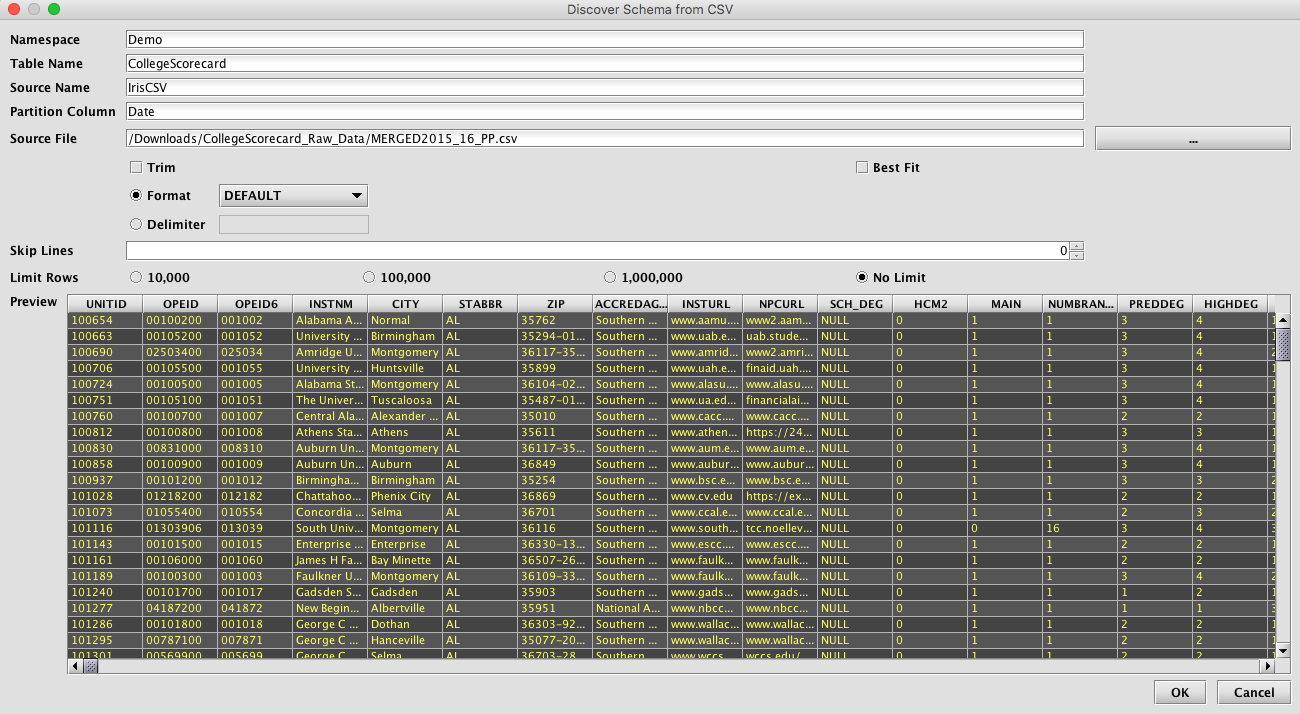
Once processed, the schema details will be shown in the main Schema Editor window. The schema can then be edited from here to change column names, types, order, and import processing, as needed or desired.

The expected results of an import to Deephaven can then be previewed using the Preview Table button. This action requires that the Source Directory, and Source File or Source Glob be completed for a path to source files relative to the query server where the Schema Editor is being run.
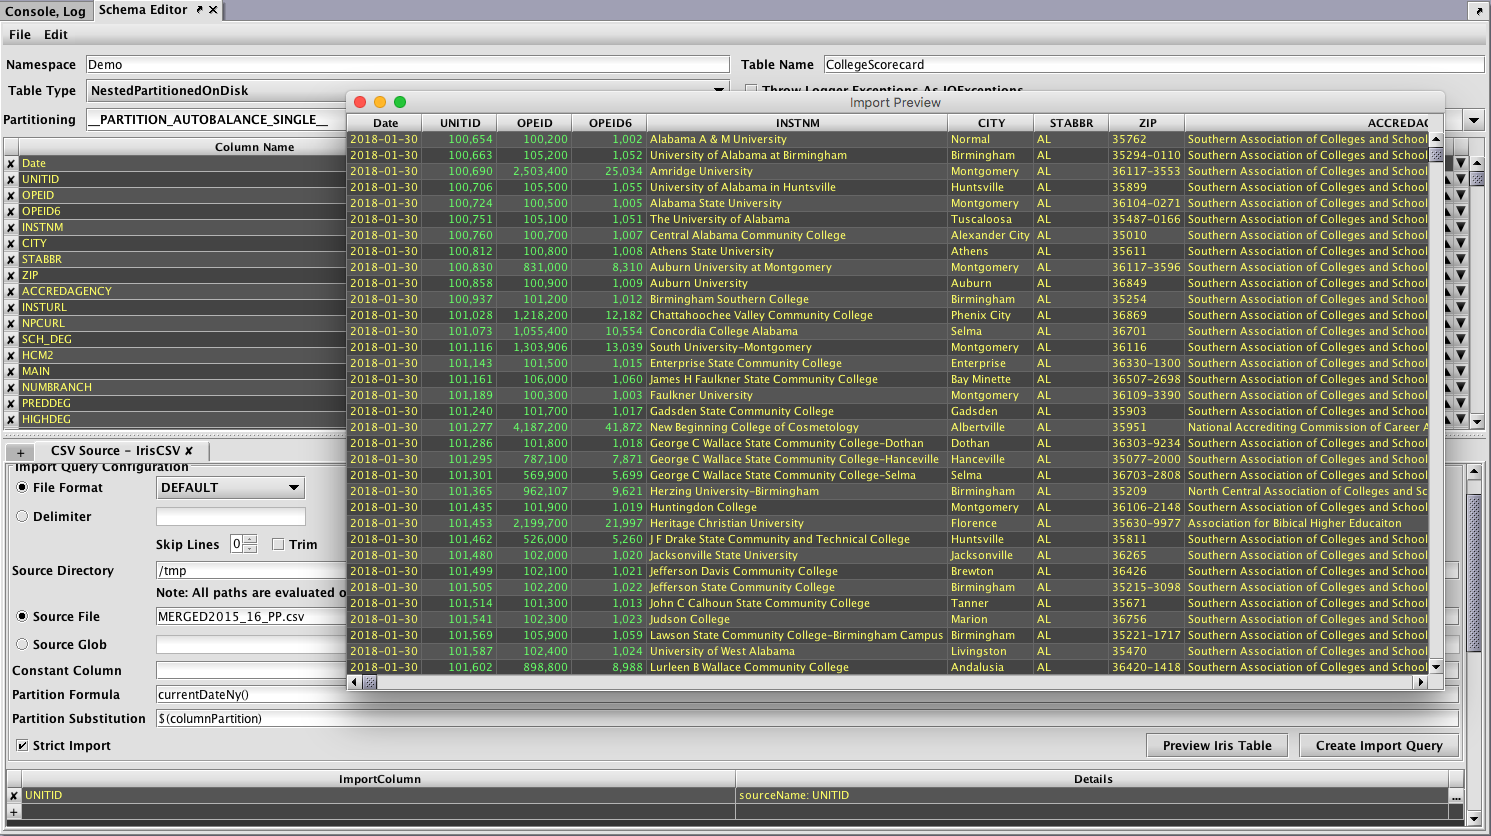
Once the schema and results of a test import are as desired, the schema can be deployed to Deephaven to create a new table definition.
Open the File menu again, and select the Deploy Schema option to deploy the new table to Deephaven. Optionally, the schema file could instead be saved to disk for later use or manual deployment.
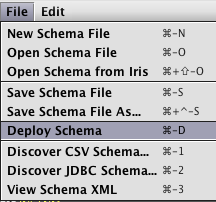
Once the schema is deployed, an Import Query can be created using the Create Import Query button.You can also use the Create Import Query button to deploy the schema.
Alternatively, an Import Query can also be created later from the Query Config panel of the Deephaven console. It will be necessary to set basic settings on the Settings tab, at least a timeout on the Scheduling tab, and details of the source file path and name on the CsvImport Settings tab.
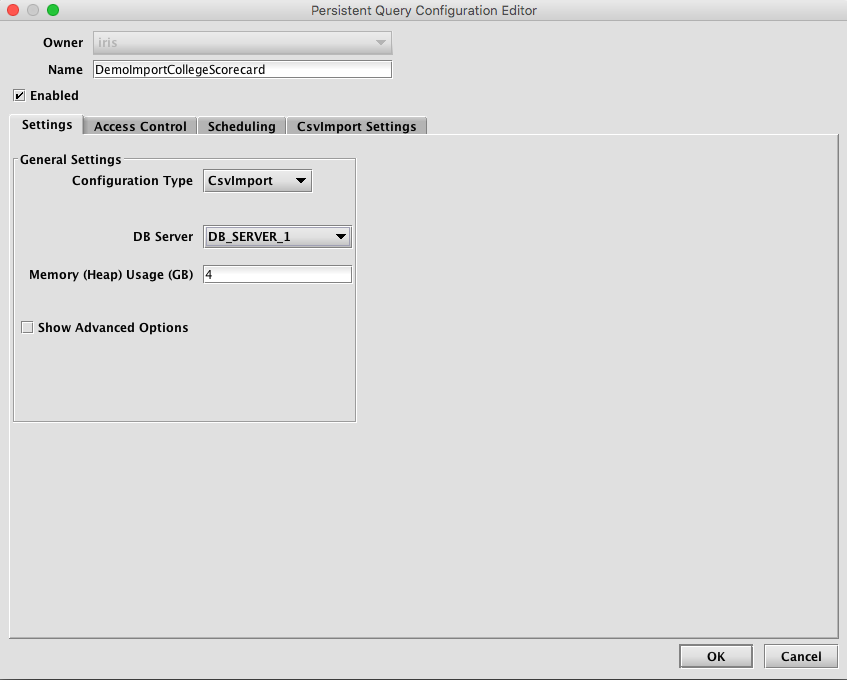
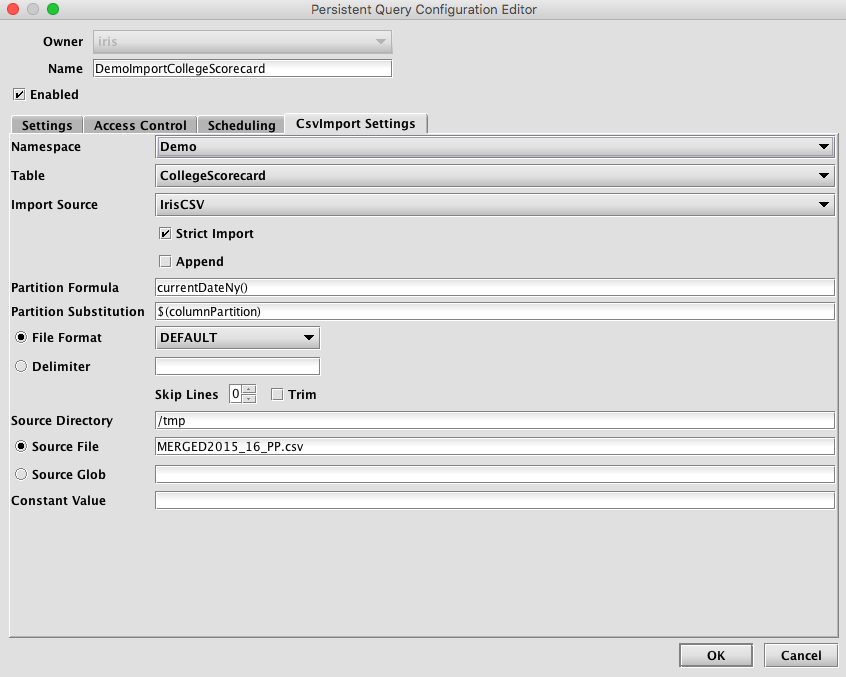
After completing this process, the new Import Query will be displayed alphabetically in the Query Config panel. It can then be run as desired.

Last Updated: 20 August 2019 09:54 -06:00 UTC Deephaven v.1.20180917
Deephaven Documentation Copyright 2016-2018 Deephaven Data Labs, LLC All Rights Reserved