Scaling to Multiple Servers
We are in the process of updating the information contained in this document. If you need assistance with the steps/processes described within, please contact Deephaven Support.
Advanced Installation Guide
Overview
This guide shows how to expand a single node running Deephaven into a multi-node installation, and provides the foundation necessary to scale Deephaven to support growing big data analysis requirements. A review of the Large Data Infrastructure and Performance Guidance document should be considered before implementing the changes.
To support a growing infrastructure, Deephaven allows you to easily add more capacity to loading data or querying resources by scaling horizontally. Additional servers or virtual machines running the Deephaven application stack can be configured to add capacity where it is needed.
Three-layer Application Stack Model
Whether a single node or multiple node deployment, the standard Deephaven application stack consists of three core components called layers, allowing for expansion of the layers independently when extra capacity is needed outside of the application software.
- The Network Layer
- The Storage Layer
- The Application Layer
The server deployment discussed in the Deephaven Server Installation Guide implemented these three layers on a single server.
Before breaking out this single server into multiple servers, it is necessary to understand how Deephaven handles data.
Deephaven Data Lifecycle
The scaling of Deephaven to handle large data sets is mostly driven by the data lifecycle. Deephaven has been designed to separate the write-intensive applications (db_dis, importers) from the read/compute intensive applications (db_query_server, db_query_workers, etc.).
The diagram below shows a generalized version of the processes that are responsible for handling data as part of the Deephaven engine. An external data source can be imported via a stream by generating binary logs that are fed to the Data Import Service (db_dis) process or by manually running an import of data using one of Deephaven' many importers. Once in the system, either type can be queried by end-users via the db_query_server and its workers.
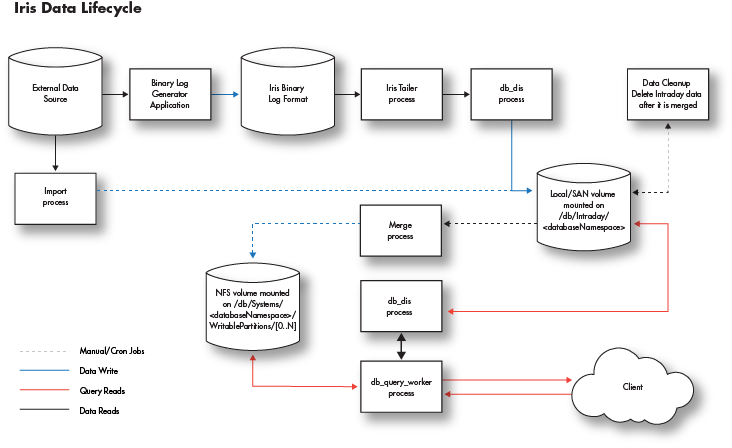
Two Types of Data
Deephaven views data as one of two data types: intraday (near real-time) data or historical data. Each data type is stored in different locations in the database filesystem.
Intraday Data
- Intraday data is stored in
/db/Intraday/<databaseNamespace>/<tableName>. When deploying servers, it is advised that each of these be on low latency, high-speed disks connected either locally or via SAN. All reads and writes of this data are done through this mount point. Depending on data size and speed requirements, one or more mount points could be used at the/db/Intraday,/db/Intraday/<databaseNamespace>, or/db/Intraday/<databaseNamespace>/<tableName>levels - The
db_dis processreads/writes data from/to these directories. - The
db_ltdsprocess reads data from these directories. - If the administrator doesn't create mount points for new namespaces and/or tables in advance of their use, Deephaven will automatically generate the required subdirectories when data is first written to the new tables.
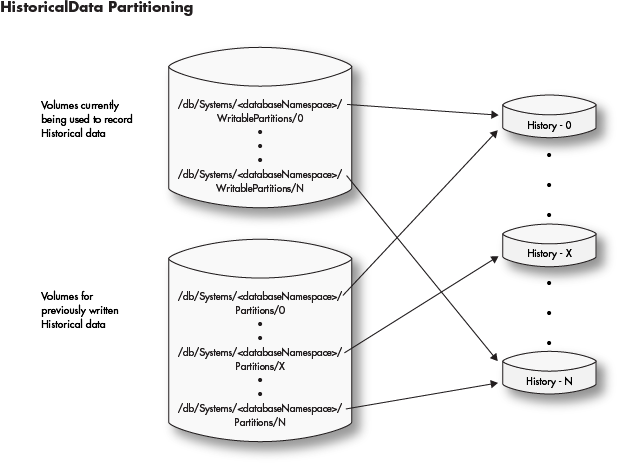
Historical Data
- Historical data is stored in
/db/Systems/<databaseNamespace>. - Intraday data is merged into historical data by a manual or cron merge process.
- If the required subdirectories don't exist, an attempted merge will fail.
- Each historical database namespace directory contains two directories that must be configured by the administrator:
- WritablePartitions - used for all writes to historical data
- Partitions - used for all reads from historical data
The (historical)
<databaseNamespace>is divided into a Partitions and WritablePartitions pair of directories. The subdirectories of these two will contain the data. Each of these subdirectories are either mounted shared volumes or links to mounted shared volumes. Partitions should contain a strict superset of WritablePartitions. It is recommended that each<databaseNamespace>be divided across many shared volumes to increase IO access to the data.When historical partitions are first set up for a namespace, the WritablePartitions and Partitions subdirectories will typically refer to the same locations. For example, if there are six Partitions named "0" through "5", then there will be six links named "0" through "5" in the WritablePartitions to those Partitions directories. Over time the devices holding these directories will fill up and additional space will be required. Additional directories (such as "6" through "11) can be created in Partitions pointing to new storage, and the WritablePartitions links updated to point to these new directories. This should be done by deleting the old links in WritablePartitions and creating new ones with the same names as the new Partitions directories. In this way the already written historical locations will become read-only, and future merges will write to the newly allocated storage.
- All volumes mounted under WritablePartitions and Partitions should be mounted on all servers. However, since these are divided by read and write functions, you could potentially have a Query Server that only had the read partitions mounted or an Import Server with only the WritablePartitions mounted.
- filesystem permissions could also be controlled in a like manner: the Partitions volumes only need to allow read-only access. A server that only performs queries would only need these mounted without the WritablePartitions if desired.
- A large historical data installation will look like this:
Data Lifecycle Summary
- Intraday disk volumes (or subdirectory partitions thereof) should be provided for each database namespace via local disk or SAN and be capable of handling the write and read requirements for the data set.
- Intraday data is merged into historical data by a configured merge process.
- Once merged into historical data, intraday files should be removed from the intraday disk by a manually configured data clean up process.
- Historical shared (NFS) volumes (or subdirectory partitions thereof) should be provided for each database namespace via shared filesystem that is mounted under
/db/Systems/<databaseNamespace>/WritablePartitionsand/db/Systems/<databaseNamespace>/Partitionson all servers. - Historical data for each database namespace has WritablePartitions for writing data and Partitions for reading data.
Scaling
Deephaven is designed with horizontal scaling in mind. This means adding capacity for services typically involves adding additional compute resources in the form of servers or virtual machines.
When considering how to scale Deephaven, the types of capacity needed should be determined before adding resources.
Scaling Capacities
- Read Capacity
- Queries requiring access to very large data sets might require more IO bandwidth or substantial SAN caching
- Add more
db_query_serverprocesses with added IO bandwidth
- Write capacity
- Handling multiple near real-time data streams quickly (through the Deephaven binary l
og/tailer/db_disarchitecture)- Expanding IO for batch data imports or merges
- Large batch imports of historical data
- Query capacity (Memory and CPU)
- Queries may take large amounts of memory to handle large amounts of data, a lot of CPU to handle intensive manipulation of that data, or both
- Support for more end-user queries
- Support for analysis of large datasets that may consume smaller server's resources
Server types
- Query Servers
- Increase read and analysis capacity of the database for end-users
- Large cpu and memory servers
- Run the
db_query_serverand the spawned worker processes.
- Real-time Import Servers
- Increase write capacity for importing near real-time data
- Increase write capacity for merging near real-time data to historical partitions
- Run the
db_disanddb_ltdsprocesses
- Batch Import Servers
- Increase write capacity for batch data imports to intraday partitions
- Increase write capacity for merging batch data to historical partitions
- Separate the batch data import function away from the near real-time data imports
- Administrative Servers
- Run administrative Deephaven processes such as the Deephaven controller, the authentication server, and the ACL write server
- May have additional requirements such as access to MySQL
A single host may run multiple server types. For example, the administrative processes do not require many resources, and consequently may be co-located with other services. The hardware information for each server type can be found in Appendix - Server Hardware Examples.
Single Server Architecture
The Deephaven Server Installation Guide illustrates the provisioning of a server with a network interface and the loopback interface (network layer), local disk storage (storage layer), and the Deephaven software (application layer) to create a single server Deephaven deployment. The guide then used this single server to perform basic operations by connecting to Deephaven from a remote client.
With that in mind, this single-server installation looks like the following:
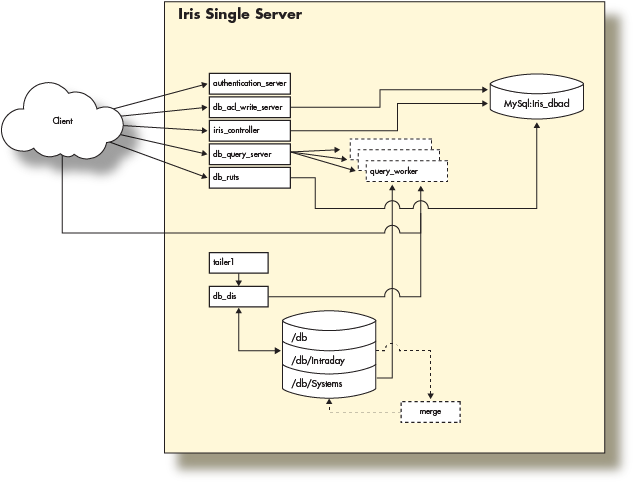
This fully functional installation of Deephaven is limited to the compute resources of the underlying server. As the data import or query capacity requirements of the system grow beyond the server's capabilities, it is necessary to distribute the Deephaven processes across several servers, converting to a multiple server architecture.
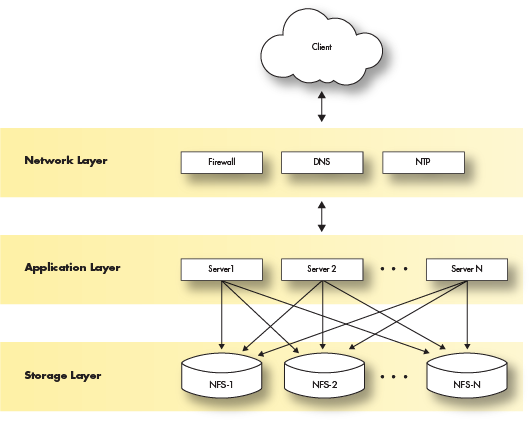
Multiple Server Architecture
The multiple server architecture is built by moving the network and storage layers outside the server, and by adding hardware to run additional data loading or querying processes. The network layer moves to subnets or vlans. The storage layer becomes a shared filesystem that is mounted across all servers. The application layer becomes a set of servers with the Deephaven software installed and configured to perform certain tasks.
Deploying Deephaven on multiple servers has the following requirements:
- Modification of each layer in the three-layer model.
- Modification and management of the Deephaven configuration.
- Modification and management of the monit Deephaven configuration.
The Network Layer
The network and necessary services (DNS, NTP, etc.) is supplied by the customer. Therefore, this document will not cover configuration or implementation of the network except to specify the network services on which Deephaven depends.
Deephaven requires a subnet or VLAN for the servers to communicate. Like all big data deployments, fast network access to the data will benefit Deephaven in query and analysis speed. If using FQDNs in the Deephaven configuration, a robust DNS service is also recommended.
It is recommended that the network layer provide the fastest possible access to the storage layer.
The Storage Layer
The storage layer has the most changes in a multiple server installation. Deephaven requires access to a shared filesystem for historical and intraday data that can be mounted by each server in the Deephaven environment.
Typically, these disk mounts are provided via the NFS protocol exported from a highly available storage system. Other types of distributed or clustered filesystems such as glusterFS or HDFS should work but have not been extensively tested.
As mentioned, Deephaven relies on a shared filesystem architecture for access to its data. Currently, the larger installations use ZFS filers to manage the storage mounts that are exported to the query and data import servers via NFS over 10g network interfaces.
Deephaven divides data into two categories: Intraday Data and Historical Data
Intraday Data
Intraday data is any data that hasn't been merged to historical storage partitions, including near real-time as well as batch-imported data. Depending on the data size and rate, the underlying storage should typically be high-throughput (SSD) or contain sufficient caching layers to allow fast writes.
Intraday data is written to the database via the Data Import Server or other import processes onto disks mounted on /db/Intraday/<namespace>/.
Historical Data
Historical data is populated by performing a merge of the Intraday data to the historical file systems. As storage needs grow, further storage can be easily added in the form of writable partitions without the need to reorganize existing directory or file structures, as Deephaven queries will automatically search additional historical partitions as they are added.
Intraday data is typically merged to Historical data on the Data Import Servers during off hours by scheduled processes.
The historical disk volumes are mounted into two locations on the servers:
- For writing:
/db/Systems/<databaseNamespace>/WritablePartitions/[0..N] - For reading:
/db/Systems/<databaseNamespace>/Partitions/[0..N]
The Deephaven Application Layer
The software installation procedure for each server does not change from that posted in the Deephaven Server Installation Guide. Once the server is deployed, the network storage should be mounted on all the servers. Once this is done, the main configuration of Deephaven must now be managed and the Monit configuration modified to only run processes for each server type.
Users and groups
Deephaven requires three unix users and four unix groups that are created at install time by the iris-config rpm.
The uid and gids associated with the users and groups need to be created on the shared storage to allow them to read and write to the mounted file systems.
|
Group Name |
gid |
Members |
|---|---|---|
|
dbquery |
9000 |
dbquery |
|
dbmerge |
9001 |
dbmerge |
|
irisadmin |
9002 |
irisadmin |
|
dbmergegrp |
9003 |
dbquery, dbmerge, irisadmin |
|
User name |
uid |
|---|---|
|
dbquery |
9000 |
|
dbmerge |
9001 |
|
irisadmin |
9002 |
Deephaven Server Types
In the Scaling section we described four server types: Data Import Server, Batch Import Server, Query Server and an Infrastructure Server. Each of these server types is defined by the Deephaven processes they run and defined by the hardware resources required for each. You can also easily combine server types into a single server to provide both sets of functionality given sufficient hardware resources. For instance, it is common to have administrative servers combined with a data import server.
As an example, a query server will require more CPU and memory than an administrative server, which requires a smaller CPU and memory footprint.
Example server types and associated resources are outlined below.
Administrative Server
Server Hardware and Operating System
- 6 cores (2 core minimum) @ 3.0 Ghz Intel
- 10GB RAM
- Linux - RedHat 7 or derivative
- Network: 1g
- Storage:
- Root - sufficient local disk space
Processes
- MySql - ACL database
authentication_server- Securely authenticates users on logindb_acl_write_server- Serves as a single writer for ACL information stored within the ACL databaseiris_controller- Specialized client that manages persistent query lifecycles, and provides discovery services to other clients for persistent queries
Real-time Import Server
Server Hardware and Operating System
- 24 cores (6 cores minimum) @ 3.0 Ghz Intel
- 256GB RAM (32GB minimum)
- Linux - RedHat 7 or derivative
- Network: 10g mtu 8192
- Storage:
- Root - sufficient local disk space
- Database mount - 250GB SSD mirror local
- Intraday data - SSD either local or iScsi
- Historical data - NFS mounts for all historical data
Processes
db_dis- receives binary table data from user processes and writes it to user namespaces, simultaneously serving read requests for samedb_ltds- serves read requests for local data, used for serving intraday data not managed bydb_dis- Tailer1
- The tailer1 application sends data from the processes in the stack to the
db_disfor the DbInternal namespace. - A tailer application is used to read data from binary log files and send them to a
db_disprocess. - Tailer configuration is covered in Importing Data.
- The tailer1 application sends data from the processes in the stack to the
Batch Import Server
Server Hardware and Operating System
- 24 cores (6 cores minimum) @ 3.0 Ghz Intel
- 256GB RAM (32GB minimum)
- Linux - RedHat 7 or derivative
- Network: 10g mtu 8192
- Storage:
- Root - sufficient local disk space
- Database mount - 250GB SSD mirror local
- Intraday data - SSD either local or iScsi
- Historical data - NFS mounts for all historical data
Processes
- Batch import processes run via cron or manually to load intraday data from external data sources such as CSV files
- Validation and merge processes run via cron or manually to validate intraday data and add it to the historical database
- Scripts to delete intraday data after it has been successfully merged
Query Server
Server Hardware and Operating System
- 24 cores (6 cores minimum) @ 3.0 Ghz Intel
- 512GB RAM (32GB minimum)
- Linux - RedHat 7 or derivative
- Network: 10g mtu 8192
- Storage:
- Root - sufficient local disk space
- Database mount - 250GB SSD mirror local
- Historical data - 16 NFS mounts @ 35TB each
Processes
db_query_server- manages query requests from the client and forksdb_query_workerprocesses to do the actual work of a query
Multiple Server Deployment
In this section, we will show how to deploy the Deephaven components in a multi-server environment. We will deploy:
- One server combining a Data Import Server with an Infrastructure Server
- Two Query Servers
The solution will also depend on a storage volume that needs to be available to mount from each of the Deephaven servers.
Prerequisites
- A storage layer (e.g. NFS Server) with exported volumes available to the deployed Deephaven servers.
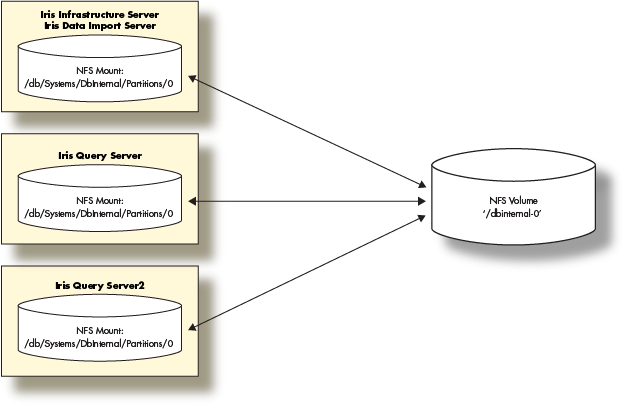
- Deephaven ships with a schema using the namespace 'DbInternal' which contains query performance data among other data. After the Deephaven software install, there will be directories in
/db/Intraday/DbInternaland/db/Systems/DbInternal. - In this deployment, we will mount a NFS volume for the 'DbInternal' historical data and use that to demonstrate the steps involved to provide historical data volumes for any namespace.
- Deephaven ships with a schema using the namespace 'DbInternal' which contains query performance data among other data. After the Deephaven software install, there will be directories in
- Three servers or VMs with at least the minimum physical or virtual hardware resources.
Prepare the storage layer (NFS Server)
- Assure the Deephaven users and groups are able to read and write to any NFS exports.
- Create a data volume on the storage server to hold the Historical data.
- This will be the first historical volume for the 'DbInternal' namespace so we will call it '
dbinternal-0'. - 'DbInternal' historical does not use very much space. 10g should be sufficient.
- This will be the first historical volume for the 'DbInternal' namespace so we will call it '
- Export the
dbinternal-0data volume.
Deploy the Deephaven Servers
- Provision three servers using the procedures outlined in the 'Provision a Server' section of the Deephaven Server Installation Guide. Note: You will need to substitute the hardware sizing in this guide for those provided in the Installation Guide.
- Install the Deephaven Software on each Server
When installing Deephaven, there are two packages to install: the Deephaven Database package and Deephaven Configuration package. Your Deephaven account representative will provide you with the latest versions of these two packages.
To install the software, you will first need to copy the packages onto your provisioned Deephaven Linux host. Once the packages have been copied to the host, you should SSH onto the server and run the following commands to install the Deephaven Database and the Deephaven Configuration packages:
sudo yum localinstall illumon-db-<VERSION>.rpm -y
sudo yum localinstall iris-config-<VERSION>.rpm -y
The installation includes a default set of configuration files and sample data for a basic Deephaven installation.
- Install MySql Java Connector Software
Deephaven uses MySql (
mariadb) to store authentication and database ACL information. This requires themysql-connector-javaJAR to be installed into/etc/sysconfig/illumon.d/java_lib.wget https://dev.mysql.com/get/Downloads/Connector-J/mysql-connector-java-5.1.43.tar.gz
tar -xvzf mysql-connector-java-5.1.43.tar.gz
cd mysql-connector-java-5.1.43
sudo cp mysql-connector-java-5.1.43-bin.jar /etc/sysconfig/illumon.d/java_lib/
Configure Deephaven Software on Each Server
Setup the Historical Partition on each Server
- Verify the 'DbInternal' historical mounts
ls -l /db/Systems/DbInternal/
- Two directories should exist:
WritablePartitionsandPartitionsand be owned by the user 'dbmerge'. If not, you can create them and set the proper permissions. - Mount the '
DbInternal-0' NFS volume on the providedPartitions/0sub-directory
sudo mount -t nfs <nfsserver address>:/dbinternal-0 /db/Systems/DbInternal/Partitions/0
df -h /db/Systems/DbInternal/Partitions/0
- Verify the link from
WritablePartitions/0to theParititions/0mount exists:
ls -al /db/Systems/DbInternal/WritablePartitions
df -h /db/Systems/DbInternal/WritablePartitions/0
If the symbolic link does not exist, create it as follows:
sudo ln -s /db/Systems/DbInternal/Partitions/0 /db/Systems/DbInternal/WritablePartitions/0
Update the iris-common.prop on each Server
The default configuration file comes configured with localhost for all the services. Update the properties by replacing all localhost values with the ip or FQDN of the data import/infrastructure server.
Update the following properties in /etc/sysconfig/illumon.d/resources/iris-common.prop:
intraday.server.host.1=<INFRASTRUCTURE_SERVER_IP_1>
PersistentQueryController.host=<INFRASTRUCTURE_SERVER_IP_1>
authentication.server.list=<INFRASTRUCTURE_SERVER_IP_1>
MysqlDbAclProvider.host=<INFRASTRUCTURE_SERVER_IP_1>
dbaclwriter.host=<INFRASTRUCTURE_SERVER_IP_1>
RemoteUserTableLogger.host=<INFRASTRUCTURE_SERVER_IP_1>
MysqlDbAclProvider.host=<INFRASTRUCTURE_SERVER_IP_1>
Modify the smtp properties to send critical error emails to a defined location. Note these properties must be able to connect to a valid smtp server. If you don't have one, localhost should work for most installations:
smtp.mx.domain=localhost
critEmail=root@localhost
For each query server IP addresses or FQDNs modify the following property and add any additional properties beyond the first one. There should be one for each query server:
iris.db.1.host=<QUERY_SERVER_IP_1>
iris.db.1.classPushList=
iris.db.2.host=<QUERY_SERVER_IP_2>
iris.db.2.classPushList=
Adjust the total count property for the total number of query servers:
iris.db.nservers=2
Update the query_servers.txt
All query servers that are made available to end-users to run queries need to be listed in the /etc/sysconfig/illumon.d/resources/query_servers.txt file.
The default setting is 'localhost'. Replace the contents of this file with a list of the IP addresses or FQDNs of the servers you designated as the query servers one per line.
For example:
echo <QUERY_SERVER_IP_1> \
> /etc/sysconfig/illumon.d/resources/query_servers.txt
echo <QUERY_SERVER_IP_2> \
>> /etc/sysconfig/illumon.d/resources/query_servers.txt
cat /etc/sysconfig/illumon.d/resources/query_servers.txt
Custom Configuration for Data Import/Infrastructure Server
Configure the Client Update Service on Data Import/Infrastructure Server
If you haven't already, configure the Client Update Service to make the remote client available.
- On the Deephaven Server, edit the
/var/www/lighttpd/iris/iris/getdown.txt.prefile:
Set the
appbasevalue, replacingWEBHOSTwith the host address of your Deephaven infrastructure server. The following example demonstrates using 10.20.30.40 as the host address:#appbase = http://WEBHOST/iris/
appbase = http://10.20.30.40/iris/
#ui.install_error = http://WEBHOST/iris/error.html
ui.install_error = http://10.20.30.40/iris/error.html
- In the Monit config folder, remove the
.disabledextension from the Client Update Service config file name.
cd /etc/sysconfig/illumon.d/monit
sudo mv 04-cus.conf.disabled 04-cus.conf
Configure Monit on Data Import/Infrastructure Server
The Deephaven Monit configurations are located in /etc/sysconfig/illumon.d/monit/.
Each Deephaven process has its own Monit configuration file. Any configuration with a .conf file extension will be loaded by Monit and started. To disable an individual process, change the file extension to anything else.
We use .disabled to easily recognize which services are not under Monit control.
- Disable the
db_query_server, run the following commands:
cd /etc/sysconfig/illumon.d/monit
sudo mv 03-db_query.conf 03-db_query.conf.disabled
- Restart Monit:
sudo service monit restart
sudo monit reload
sudo monit restart all
- To check the state of the Deephaven processes run:
sudo monit summary
The output should look something like this:
The Monit daemon 5.14 uptime: 0m
Process 'client_update_service' Running
Process 'tailer1' Running
Process 'iris_controller' Running
Process 'db_query_server' Running
Process 'db_ltds' Running
Process 'db_dis' Running
Process 'db_acl_write_server' Running
Process 'authentication_server' Running
System '<ServerHost>' Running
Configure Query Servers
Configure Monit on Query Servers
To disable all processes, except the db_query_server process, run the following commands:
cd /etc/sysconfig/illumon.d/monit
sudo mv 02-authentication_server.conf 02-authentication_server.conf.disabled
sudo mv 02-db_acl_write_server.conf 02-db_acl_write_server.conf.disabled
sudo mv 03-db_dis.conf 03-db_dis.conf.disabled
sudo mv 03-db_ltds.conf 03-db_ltds.conf.disabled
sudo mv 03-iris_controller.conf 03-iris_controller.conf.disabled
sudo mv 03-tailer1.conf 03-tailer1.conf.disabled
Restart Monit:
sudo service monit restart
sudo monit reload
To check the state of the Deephaven processes run:
sudo monit summary
The output should look similar to the following:
The Monit daemon 5.14 uptime: 3h 24m
Process 'db_query_server' Running
System '<ServerHost>' Running
Final Steps
Congratulations. Deephaven is now running on three servers with two servers serving queries for end users.
The next steps are to set up nightly merges of Intraday data to the Historical data volume mounted and for users to connect to Deephaven using the Deephaven Console.
Nightly Merge Jobs
To merge the query performance Intraday data to the Historical data volume mounted, run the merge command on the infrastructure server:
sudo runuser -s /bin/bash dbmerge -c "/usr/illumon/latest/bin/db_merge_import_base.sh 2 DbInternalAllFeeds root@localhost `date +%Y-%m-%d`"
This command should be added as a nightly cron job on the infrastructure server:
cat > /etc/cron.d/illumon-mergeDbInternal <<EOT
#!/bin/bash
#
# Dependencies:
# 1) db_dailymergeDXFeed.xml
# make sure each 'feed' in the feed list is set up in the file in step 2
# 2) db_mergeDXFeedQuoteStockSchema.xml
#
10 0 * * 0-6su - dbmerge -c "/usr/illumon/latest/bin/db_merge_import_base.sh 2 DbInternalAllFeeds root@localhost | logger -t dbinternal-merge"
EOT
Deephaven Console Installation
Refer to the Getting Started - How to Install and Access Deephaven to download and connect remotely from your Windows, Mac or Linux desktop.
End users can now use the Deephaven Console client application to access Deephaven and begin executing queries.
Deephaven ships with a schema using the namespace DbInternal which contains query performance data among other data. This data can be queried from the Deephaven Console as follows:
t1=db.i("DbInternal", "QueryPerformanceLog").where("Date=`" + new Date().format('yyyy-MM-dd') + "`")
t2=db.i("DbInternal", "PersistentQueryStateLog").where("Date=`" + new Date().format('yyyy-MM-dd') + "`")
Appendix - Server Hardware Examples
The example servers come from a cross-section of other large data installations running Deephaven.
Infrastructure Server
The Infrastructure Server handles the authentication, acl and other tasks of running Deephaven. This server requires very few compute, disk or memory resources.
Hardware and Operating Systems
- 6 cores @ 3.0 Ghz Intel
- 10GB RAM
- Linux - RedHat 7 or derivative
- Network: 1g
- Storage:
- Root - sufficient local disk space
Intraday Import Server
The Data Import Server is mainly a write-centric server with access to fast storage. Typically, this will be an SSD or volumes of SSDs, depending on the data speed and storage size required.
Hardware and Operating Systems
- 40 cores @ 3.0 Ghz Intel
- 256GB RAM
- Linux - RedHat 7 or derivative
- Network: 10g mtu 8192
- Storage:
- Root - sufficient local disk space
- Database mount - 250GB SSD mirror local
- Intraday data - Sufficient space consisting of SSD either local or iScsi
- Historical data - 16 NFS mounts @ 35TB each
Query Servers
Query servers provide compute, memory and query access to storage. They host the memory-intensive applications.
Hardware and Operating Systems
- 40 cores @ 3.0 Ghz Intel
- 512GB RAM
- Linux - RedHat 7 or derivative
- Network: 10g mtu 8192
- Storage:
- Root - sufficient local disk space
- Database mount - 250GB SSD mirror local
- Historical data - 16 NFS mounts @ 35TB each
Batch Import Servers
Import servers are similar to Intraday Import Servers, but are less write-intensive. They are used to perform large-batch imports of data, typically overnight.
Hardware and Operating Systems
- 24 cores @ 3.0 Ghz Intel
- 192GB RAM
- Linux - RedHat 7 or derivative
- Network: 10g mtu 8192
- Storage:
- Root - sufficient local disk space
- Database mount - 250GB SSD mirror local
- Intraday data - Sufficient space for the import via local, iScsi, nfs or other
- Historical data - 16 NFS mounts @ 35TB each
Appendix - Methodologies for Mounting Historical NFS Partitions
- Historical data is stored in
/db/Systems/<DATABASE_NAMESPACE> - File read operations for a particular namespace are performed through the file systems mounted under
/db/Systems/<DATABASE_NAMESPACE>/Partitions/0..N - File write operations for a particular namespace are performed through the filesystems mounted under
/db/Systems/<DATABASE_NAMESPACE>/WritablePartitions/0..N - The two sets of directories can be on local disk, on a shared filesystem, an NFS volume or be a set of soft links to other directories
- It should be noted that the WritablePartitions can be a subset of the Partitions directories if you only require a small amount of IO bandwidth
There are three methodologies for mounting NFS partitions. By default, Deephaven uses the Partial Indirect Mounting option that links the WritablePartitions as a subset of the NFS volumes mounted under each Partitions directory.
In large deployments, customers often use the Indirect Mounting option to allow for maximum flexibility. By soft linking both the Partitions and the WritablePartitions to the mount point of the NFS volume. This allows changing the NFS mounts to which Deephaven is writing data by simply removing a soft link or changing the soft link to point to another NFS mount.
Historical Data Methodologies
There are three options for creating historical data directories and mounts: Direct Mounting, Partial Indirect Mounting, and Full Indirect Mounting
- Direct Mounting
Direct Mounting should only be used in small data installations where only a handful of mounts are required.
Adding additional storage would require creating similarly numbered directories and mounting more NFS volumes.
As an example, the
namespace-0NFS volume is mounted directly to the Partitions and WritablePartitions sub-directories:sudo mount -t nfs -o ro <NFSSERVER_ADDRESS>:/namespace-0 /db/Systems/DbInternal/Partitions/0
sudo mount -t nfs <NFSSERVER_ADDRESS>:/namespace-0 /db/Systems/DbInternal/WritablePartitions/0
If additional storage beyond this is required, a second partition
namespace-1would be created.Two more mount points would be created and the new NFS volume mounted under each:
sudo mkdir -p /db/Systems/<NAMESPACE>/Partitions/1
sudo mkdir -p /db/Systems/<NAMESPACE>/WritablePartitions/1
sudo mount -t nfs -o ro <NFSSERVER_ADDRESS>:/namespace-1 /db/Systems/<NAMESPACE>/Partitions/1
sudo mount -t nfs <NFSSERVER_ADDRESS>:/namespace-1 /db/Systems/<NAMESPACE>/WritablePartitions/1
Additional partitions would be added in this manner as the system expands.
- Partial Indirect Mounting
With Partial Indirect Mounting, each NFS volume is only mounted once under /db/Systems/<NAMESPACE>/Partitions/0..N. The /db/Systems/<NAMESPACE>/WritablePartitions/0..N are then soft linked to their counterparts under /db/Systems/<NAMESPACE>/Partitions/.
sudo mount -t nfs <NFSSERVER_ADDRESS>:/namespace-0 /db/Systems/<NAMESPACE>/Partitions/0
sudo ln -s /db/Systems/<NAMESPACE>/Partitions/0 /db/Systems/<NAMESPACE>/WritablePartitions/0
Additional file systems would be added under
/db/Systems/<NAMESPACE>/Partitions/and then soft links would be created under the WritablePartitions directory.
- Full Indirect Mounting
The most flexible methodology, Full Indirect Mounting, allows each individual mount to be customized, or moved with minimal impact to Deephaven. By soft linking, both
/db/Systems/<DATABASE_NAMESPACE>/Partitions/0..Nand/db/Systems/<DATABASE_NAMESPACE>/WritablePartitions/0..Nthe underlying NFS file systems can be switched out by changing a link, or removed from service by deleting the link altogether.The
namespace-0NFS volume is mounted elsewhere on the server and soft links are created to both the Partitions and WritablePartitions directory.sudo mkdir /srv/<NAMESPACE>/0
sudo mkdir /srv/<NAMESPACE>/read-only/0
sudo mount -t nfs <NFSSERVER_ADDRESS>:/namespace-0 /srv/<NAMESPACE>/0
sudo mount -t nfs -o ro <NFSSERVER_ADDRESS>:/namespace-0 /srv/<NAMESPACE>/read-only/0
sudo ln -s /srv/<NAMESPACE>/0 /db/Systems/<NAMESPACE>/WritablePartitions/0
sudo ln -s /srv/<NAMESPACE>/read-only/0 /db/Systems/<NAMESPACE/Partitions/0
Adding additional storage or IO bandwidth is mounted under
/srv/<NAMESPACE> directories, and new soft links are created for Partitions or WritablePartitions.
Last Updated: 16 February 2021 18:07 -04:00 UTC Deephaven v.1.20200928 (See other versions)
Deephaven Documentation Copyright 2016-2020 Deephaven Data Labs, LLC All Rights Reserved