Using Envoy as a Front Proxy
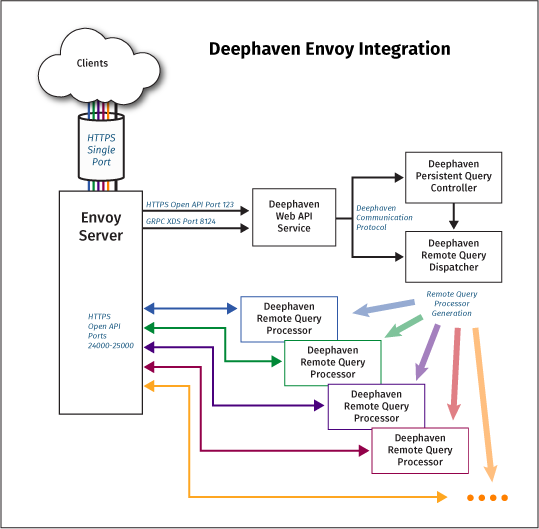
The Deephaven Open API and Web interface require connecting to the web_api_service and Deephaven query workers. This architecture allows Deephaven to scale to many users and machines without introducing a single process to handle all of the network traffic. However, this can be inconvenient from a network management perspective because API clients (e.g., Web browsers) must be permitted to connect to many different hosts and ports on the query cluster.
To simplify network management, a front proxy can be exposed to client machines and route the traffic to either the main web_api_service or the appropriate worker. Deephaven uses Envoy (http://envoyproxy.io) as a front proxy. Envoy is a scalable open-source network proxy originally developed by Lyft which supports dynamic configuration using gRPC calls.
To configure Envoy for use with Deephaven, you must select a host for installation. Appropriate installation directions for your environment can be found at https://www.getenvoy.io/. For example, the steps to install on CentOS follow:
sudo yum install -y yum-utils
sudo yum-config-manager --add-repo https://getenvoy.io/linux/centos/tetrate-getenvoy.repo
sudo yum install getenvoy-envoy-1.12.2.p0.g55af249-1p49.g8b1f2e3
After installing Envoy, you must configure it using a YAML file. The YAML file must contain a listener definition for incoming traffic and a cluster that references your Deephaven web_api_service as discovery service (xDS). In particular, Deephaven exports a Cluster Discovery Service (CDS) and Route Discovery Service (RDS) to Envoy proxies.
The Deephaven Web API Service and each Deephaven worker are defined as clusters in your dynamic Envoy configuration. Deephaven’s RDS creates routing rules that map paths of the form “/worker/<identifier>” to the appropriate worker. The identifier is simply a string that is unique to each worker. Any path that does not match a worker prefix is directed to the Web API service.
An example Envoy configuration file suitable for use with Deephaven follows:
# You must define a node and cluster ID to use xDS discovery
node: { id: "envoynode", cluster: "envoycluster" }
# The CDS discovery service references a cluster defined as “xds_service” below
dynamic_resources:
  cds_config:
     api_config_source:
       api_type: GRPC
       grpc_services:
        envoy_grpc: { cluster_name: xds_service }
# The static resources define the location of the xDS server and the port to listen to.static_resources:
static_resources:
  clusters:
  - name: xds_service
    connect_timeout: 0.25s
    http2_protocol_options: {}
    type: static
    # If you run the Deephaven web_api_service on a different machine or port, you must change this configuration.
    hosts: [{socket_address: { address: 127.0.0.1, port_value: 8124 } }]
  listeners:
  - address:
      socket_address:
        address: 0.0.0.0
        port_value: 443
    filter_chains:
    - filters:
      - name: envoy.http_connection_manager
        typed_config:
          "@type": type.googleapis.com/envoy.config.filter.network.http_connection_manager.v2.HttpConnectionManager
          codec_type: AUTO
          stat_prefix: egress_http
          upgrade_configs:
          - upgrade_type: websocket
          rds:
            config_source:
               api_config_source:
                 api_type: GRPC
                 grpc_services:
                   envoy_grpc:
                     cluster_name: "xds_service"
            route_config_name: rds_config
          access_log:
          # You may choose to write an access log to record requests to Envoy. See the Envoy documentation for
          # defining filters based on HTTP status codes or request duration.
          - name: envoy.file_access_log
            typed_config:
              "@type": type.googleapis.com/envoy.config.accesslog.v2.FileAccessLog
              path: "/tmp/envoy-access.log"
          http_filters:
          - name: envoy.router
            typed_config: {}
    # To listen with TLS, you must define the paths to your certificate and key .pem files. If you do not
    # define a tls_context,then Envoy will listen with HTTP instead of HTTPS.
      transport_socket:
        name: envoy.transport_sockets.tls
        typed_config:
          "@type": type.googleapis.com/envoy.api.v2.auth.DownstreamTlsContext
          common_tls_context:
            tls_certificates:
              certificate_chain:
                filename: "/etc/ssl/certs/envoy.crt"
              private_key:
                filename: "/etc/ssl/private/envoy.key"
# Running an admin server allows you to debug Envoy’s xDS by connecting to port 8001 with a web browser and
# visiting the “config_dump page.
admin:
  access_log_path: "/tmp/envoy-admin.log"
  address:
    socket_address:
      address: 0.0.0.0
      port_value: 8001
Download the Envoy Configuration Template
To run using systemd, create the file /etc/systemd/system/envoy.service. Its contents follow:
# /etc/systemd/system/envoy.service
[Unit]
Description=Envoy Proxy
Documentation=https://www.envoyproxy.io/
After=network-online.target
[Service]
User=root
Restart=on-failure
ExecStart=/usr/bin/envoy --config-path /etc/envoy/config.yaml --log-path /var/log/deephaven/envoy.log
[Install]
WantedBy=multi-user.target
To start Envoy:
sudo systemctl start envoy
To enable Envoy to automatically start upon system start-up:
sudo systemctl enable envoy
After installing and configuring Envoy, you must configure the Deephaven web_api_service to run an xDS and to direct API traffic to Envoy instead of directly to workers. To enable Envoy, set the “front.proxy.url” property in your Deephaven configuration to the host and port on which Envoy is listening for connections. Add the property into the service.name=web_api_service stanza. For example:
envoy.front.proxy.url=your-user-facing-host.company.com:[8000]
Setting the front.proxy.url property automatically starts an xDS service and directs OpenAPI clients to Envoy. You must also set the “Webapi.server.host” property to the hostname (or IP) of the Web API service (as accessible from the Envoy node). The Webapi.server.host must be visible to the Web API service, for example by placing it in the service.name=web_api_service stanza.
Webapi.server.host=your-web_api_service-host.company.com
By default, the Web API service listens for Envoy xDS requests on port 8124. You can change this port by setting the “envoy.xds.port” property. Deephaven also assumes you have configured Envoy to listen for HTTP requests with SSL enabled [and strongly recommends this configuration, as the connection is used for authentication]. If you must disable SSL, you can set the “envoy.terminate.ssl” property to false.
If a single instance of Envoy is insufficient for your Deephaven installation, then you may run multiple instances of Envoy using network-level load balancing of your choice (e.g., round-robin DNS, a hardware load balancer, etc.).
Note: The following version of envoy is confirmed and tested:
getenvoy-envoy-1.12.1.p0.g44f8c36-1p47.g93e425e
In order to prevent Envoy from upgrading past version 1.12, exclude Envoy from updates by adding exclude=getenvoy-envoy in /etc/yum.conf.
Last Updated: 16 February 2021 18:07 -04:00 UTC Deephaven v.1.20200928 (See other versions)
Deephaven Documentation Copyright 2016-2020 Deephaven Data Labs, LLC All Rights Reserved