Working with Tables
Overview
Once a table has been created by a query, its content and layout can be further manipulated in the Deephaven interface. For example, users can choose to hide or show certain columns, change the column order, resize column widths, filter and/or sort the data in the columns, or add more columns to the table. However, the manipulations performed after the table is generated only impact the presentation of the original table. These alterations do not change the underlying values created by the original query - only what the user is presented in the Deephaven interface. All of the original table, as a whole or in parts, can be reinstated at any time.
Table Names
Each table in Deephaven is identified with a tab that shows the name of the table. Tables are automatically named with the variable used in the query to identify the table.
When you hover the mouse over the tab of a table , a tooltip will present the query name and the name of the table. For example, the tooltip in the image below displays information about the StockTrades table generated by a persistent query of the same name.
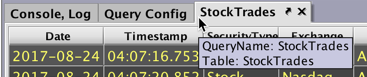
Table Statistics
When you hover the mouse over the name of a column, a tooltip will appear and show you the name of the column, the data type, and the number of rows in that column. It also may present the message,"Select Generate statistics for additional summary information." Generate statistics is a shortcut menu option available when you right-click on a column header.
See also: Generate statistics.
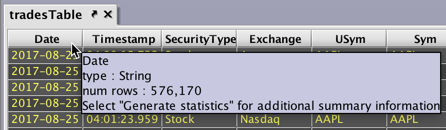
Note: For smaller tables, statistics are generated automatically. Column header tooltips on Tree Tables do not currently support statistics.
Moving a Column
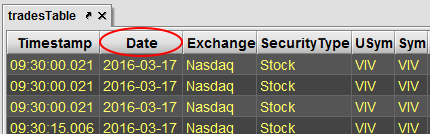
You can move a column left or right by dragging the column header to a new location. In the second image shown below, the Date column was moved to the second position.

Changing Column Width
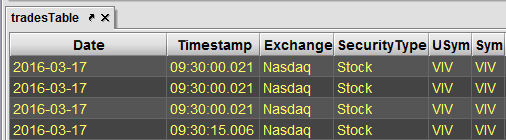
You can increase or decrease the width of a column by dragging the right border of any column name. For example, the image below now shows an increased width for the Date column.
Note: The minimum width for any column is limited to the width of the cell containing the most characters in that column.
Sorting Data in Columns
You can sort table data in ascending order by clicking once on a column name. To change the sort to descending order, click the column name again. Once a table has been sorted in this fashion, an "up" arrow or "down" arrow will appear to the right of the column name to indicate the sort and the order. See below:
Table with no manually sorted columns.

Table showing the Timestamp column has been manually sorted in ascending order.

Table showing the Timestamp column has been manually sorted in descending order.

Table Search Bar
Users can add an optional Search Bar to any table in Deephaven. The Search feature quickly filters a table to any value. To access the Search bar, type Ctrl+F or ⌘+F, or select Show Search from the right-click column menu.
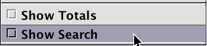
The Show Search check box is deselected by default.
When Show Search is selected, the Search Text field will appear at the top of the table (note: the keyboard shortcuts, Ctrl+F or ⌘+F also open the search bar). To search for a term in that table, enter the term desired in the field and then click Search. If the term is found, the table will present any row that contains that value, regardless of the column in which it is found.
Note: The results provided through Search are applied in addition to any filter that has already been applied to the table.
For example, the table below is filtered to only show rows that contain the value GOOG.

For example, the table below is filtered to only show rows that contain the value 33.

To clear the search results from the table, delete any text in the Search Text field and press Enter or Return on your keyboard.
The drop-down menu to the right of the Search button offers the following options: 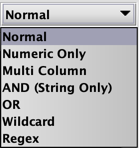
- Normal - This mode searches for letters and numbers only.
- Numeric Only - This mode searches for numerals only.
-
Multi-column - This mode returns rows where each value entered is contained in at least one column.
-
AND (String Only) - This mode interprets all values typed in the Search field as Strings, and only applies to columns with String values. It returns rows where any columns contain all values entered.
-
OR - This mode returns rows where any column contains one of the values entered.
- Wildcard - This mode matches against String values only using the following rules:
- * is a wildcard that matches against zero or of any character; e.g., h*o matches "hello" or "hero" or "ho".
- ? is a wildcard that matches against exactly one of any character; e.g, h?o matches "hio" or "heo".
- Regex - This mode matches against String values only using the Java regex rules. See Java Class Pattern to learn more.
Note: searches are case insensitive.
Go to...
The Go to… feature makes quick work of getting to specific row in the table or jumping to the previous or next row in the table that contains a specific value or string contained in one of the columns.
There are three ways to access the Go to… feature in a Deephaven table:
- Click anywhere in a table, and then press Ctrl+G (Windows) or ⌘+G (MacOS).
- Right-click in any of the column headers and select Go to… from the drop-down menu
- Right-click anywhere in the table and select Go to… from the drop-down menu.
The Go to... dialog windows offer the following options:
When Row is selected , you can enter the number of a specific row to which you want to proceed. (Note: the total number of rows in the table is presented to the right of the Row field.) Click OK or press Enter on your keyboard to go to the selected row.
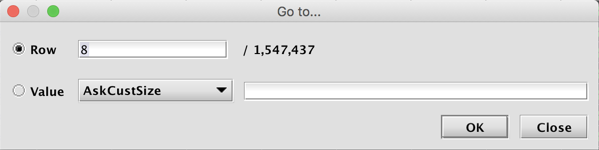
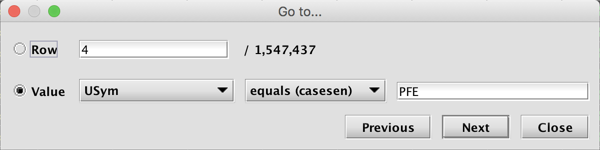
When Value is selected, the field will automatically show the value for the row in the column in which you originally right-clicked. However, you can find a value in any of the available columns in the table by using the drop-down list of column names. Depending on the column chosen, you may need to select whether the value in that column should be equal to or contain the value entered, and whether it should match the case used in the column. (See images below.) You can then enter the value desired in the last field.
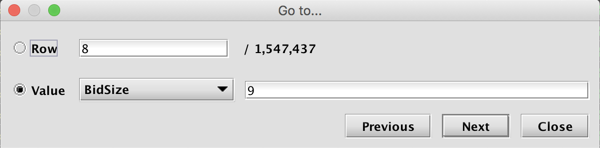
When you click Previous or Next on your keyboard, you will be taken to previous or next row in the table that contains that value.
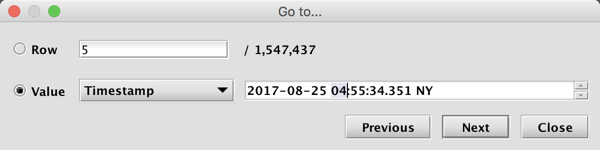
If a table has a timestamp column and you select the name of that column in the Go to… dialog window, the field to the right of the column name will present a "date/time picker". Values in the field can be changed with your mouse/pointer by selecting a value and then using the up/down arrows at the right side of the field to increase or decrease the values. You can also move through the various fields (date, hours, minutes, second, etc.) by using the left or right arrows on your keyboard (or by using Shift+Semicolon combination to scroll right, or the Shift+Ctrl+Semicolon combination to scroll right). The up and down arrows on your keyboard can be used to increase or decrease the values. You can also directly type values into the field.
When you click Previous orNext on your keyboard, you will be taken to the nearest matching timestamp.
Last Updated: 06 July 2020 14:55 -04:00 UTC Deephaven v.1.20200928 (See other versions)
Deephaven Documentation Copyright 2016-2020 Deephaven Data Labs, LLC All Rights Reserved