Using Notebooks
Notebooks are accessible through the Deephaven interface only when a Console is connected to a server. Once the Console is connected to the server, the options for creating new Notebooks or selecting an existing Notebook can be found by clicking the More Actions button on the lower right corner of the Console window.
Add Notebook
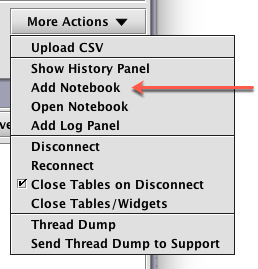
To add a new Notebook, select Add Notebook from the More Actions drop-down menu. See below:
Once selected, the Notebook window will appear in its own tabbed panel below the Console window, as shown below:
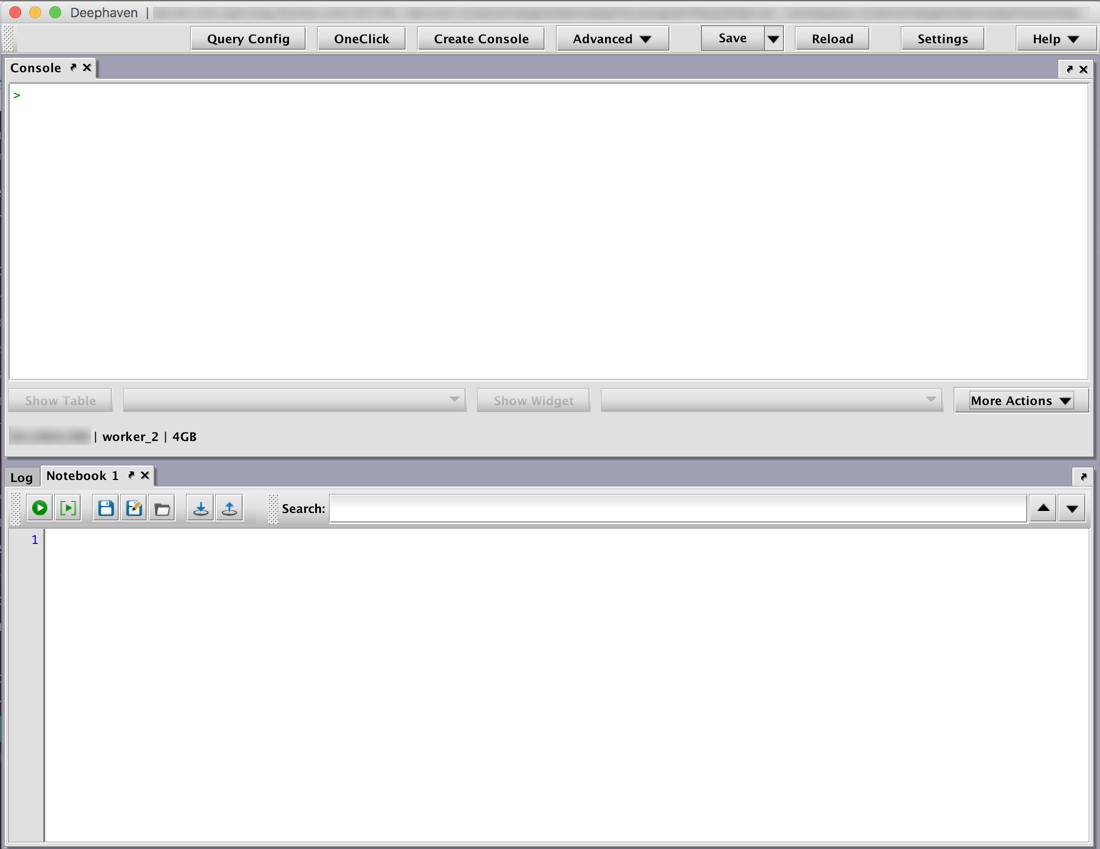
The new Notebook is now ready for use.
Open Notebook
To open an existing Notebook, click More Actions and select Open Notebook. See below.

A dialog window will then enable you to navigate to the location of an existing notebook on your computer's workspace. Once the file is found and selected, the notebook will open in a new tab.
Notebook Toolbar
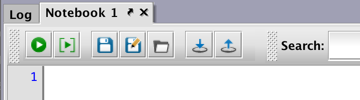
Content entered in the Notebook panel can be acted upon by using the buttons in the Notebook Toolbar, as described below.
 Run Notebook - This option automatically copies all of the content in the Notebook window, and then executes the content in the Console. This action can also be triggered with the following keyboard shortcut: Ctrl+Alt+R (Windows); ⌘+Option+R (MacOS).
 Run Selected Lines - This option copies the content you have highlighted in the Notebook window and then executes those selected lines in the Console. This option runs the entire selected line (or lines), even if you have highlighted only a portion of the line. This action can also be triggered with the following keyboard shortcut: Ctrl+Enter (Windows); ⌘+Enter (MacOS).
 Save - This option saves all of the content of the Notebook to a file on the user's system. When Save is clicked for the first time, the Save dialog window prompts the user to enter a filename and select the file location. Depending upon the content in the Notebook, the file is saved as .txt, Groovy or Python filetype. Clicking Save again overwrites the existing file with the current Notebook content. After the file is saved, the name shown on the Notebook tab changes to match the filename used during the Save process. Note: Notebooks with unsaved changes include an asterisk (*) in the panel tab.
 Save As - This option enables the user to save all of the content of a Notebook into a new file and/or to a new location on the user's system. In essence, it is the same as clicking Save for the first time. However, it can also be used to save previously saved Notebooks with a different name or to a different location. When selected, the user is prompted to enter a filename and select the file location. After the file is saved, the name shown on the Notebook tab changes to match the filename used during the Save process.
 Open - This option enables the user to open a .txt, Groovy or Python file on his/her system. Once a file is selected, the content of that file is copied into the Notebook panel, and will replace the previous content (if any) in the Notebook. If there is unsaved content in the existing notebook, the following dialog box will prompt you for a decision:

Note: A collection of pre-made Notebook files is available for download. See: Notebooks.
 Save to Persistent Query - This option enables the user to save the content of the Notebook to a persistent query. When clicked, the Save to Persistent Query dialog window prompts the user to select whether to save the content to a new Persistent Query or to update an existing Persistent Query.
- If Create New Persistent Query is selected, the Persistent Query Configuration Editor window will open and prompt the user for additional information. The entire contents of the Notebook will be copied to the Script Editor for this persistent query, and can be further edited if desired. Once the persistent query is saved, the name shown on the Notebook tab will change to match the name of the persistent query. Moreover, if the script was edited further in the Script Editor, the most recent version of the script will be shown in the Notebook. However, the original Notebook may be reopened to retrieve any of the original content that may have been overwritten.
- If Update Existing Persistent Query is selected, the user will then need to select the name of the existing persistent query in Deephaven that should be updated. When OK is selected, the content of the Notebook will completely replace the content found in the existing persistent query selected. After the file is saved, the name shown on the Notebook tab will change to match the name of the persistent query used during the Save process. This feature works with persistent query scripts that are sourced from within Deephaven. Scripts sourced outside of Deephaven (e.g., Git, etc.) will not be updated.
 Load from Persistent Query - This option enables the user to extract the contents of an existing persistent query in Deephaven and load it into the Notebook window. When selected, the Load from Persistent Query dialog window will open, and show a list of the persistent queries for which you are an authorized editor. After you select the desired persistent query and click OK, the previous contents of the Notebook (if any) will be replaced with the script from the selected persistent query. The name of the Notebook tab will also change to match the name of the persistent query selected. If the Notebook contains unsaved content when you select Load from Persistent Query, you will be prompted for a decision to handle the unsaved content. This feature works with persistent query scripts that are sourced from within Deephaven. Scripts sourced outside of Deephaven (e.g., Git, etc.) will not be loaded.
Search - Entering a value in the Search field will enable you to search for that value in the Notebook. When a searched value is found in the Notebook, the value will be highlighted. The up and down arrows to the right of the Search field enable users to move forward and backward in Search history.
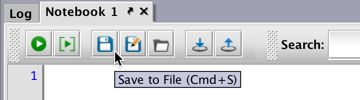
Hovering over the buttons in the Notebook toolbar will show the name of the function and the corresponding keyboard shortcut to execute the function (when available). An example is shown below.
Other commands include the following:
- Run Selected Notebook: Ctrl+Alt+R (Windows); ⌘+Alt + R (macOS)
- Run Selected Lines: Ctrl+Enter (Windows); ⌘+Enter (macOS)
- Save to File: Ctrl+S (Windows); ⌘+S (macOS)
Notebook Right-click Options
In addition to the tools in the Notebook Toolbar, additional options are presented when you right-click in the Notebook window. The options presented will depend upon where you right click in the window and if you highlight any content.
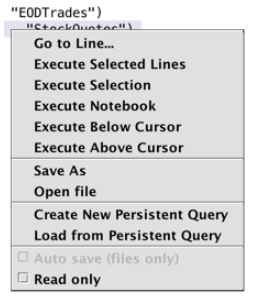
As mentioned earlier, the Notebook can be used as a sandbox for query development and refinement. In support of that intention, the top half of the right-click menu provides shortcuts for quick code execution and testing:
-
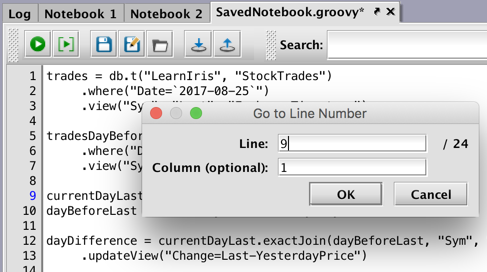
Go to Line… - This option opens the Go to Line Number dialog window, which allows you to go to a line or a column (optional) in the Notebook to easily jump to any location. The dialog can also be accessed using the keyboard shortcut Ctrl+G /⌘+G (macOS).
- Execute Selected Lines - This option copies the entire line(s) of content you have highlighted in the Notebook window, and then executes that content in the Console.
- Execute Selection - This option copies only the content you have highlighted in the Notebook window, and then executes that content in the Console.
- Execute Notebook - This option automatically copies all of the content in the Notebook window, and then executes the content in the Console.
- Execute Below Cursor - This option copies all of the content in the Notebook window that is below the location of your cursor, and then executes that content in the Console.
- Execute Above Cursor - This option copies all of the content in the Notebook window that is above the location of your cursor, and then executes that content in the Console.
The next sections of the right-click menu provide the following options related to saving, opening , loading and creating external files and persistent query scripts:
- Save <filepath/filename> - This option is shown when the content in the Notebook was opened from a previously saved Notebook file on your PC.
- Save As - This option saves the entire notebook to a new Groovy or text file on your PC.
- Open file - This option enables user to open an external text or Groovy file from your PC.
- Update script for <script name> - This option is presented when the content of the notebook was derived from a previously existing persistent query. When selected, this option will update the original persistent query with any changes made in the Notebook.
- Load script from <script name> - This option is presented when the content of the notebook was derived from a previously existing persistent query. When selected, this option provides users the option of loading the content from a specific existing persistent query.
- Create New Persistent Query - This option provides users the option of saving the existing content in the notebook to a new persistent query.
- Load from Persistent Query - This option provides users the option of loading the content of an existing persistent query into the Notebook.
Options in the last section of the right-click menu include the following:
- Auto save (files only) - When a Notebook has been saved to a file, the Auto save (files only) option is activated. When the check box is selected, Deephaven will automatically save the file 3-4 seconds after a subsequent change is made.
- Read only - When the Read only check box is selected, the Notebook cannot be edited.
Rearranging Notebooks
Like other console panels, Notebook panels can be rearranged and/or nested into other panel groups. (See: Customizing Your Workspace.)
Renaming Notebooks
If a Notebook has not been saved as a file or as a persistent query, the Notebook's name can be changed by right clicking on the tab for that panel and selecting Rename Tab. Once a Notebook has been saved to a file or a persistent query, the name on the panel's tab cannot be changed with the right-click option.
Adding Code Comments in a Notebook
Content entered in a Notebook (or the Persistent Query Configuration Script Editor) can be converted into Comments (or reverted from Comments) with the following key commands:
- Ctrl + / (Windows); Command + / (macOS): Comment out the selected lines. It will un-comment them if every line starts with a comment "
//". - Ctrl + Shift + / (Windows); Command + Shift + / (macOS): Create a block comment around the selected text. If a block comment is exactly selected from
/*to*/then it will un-comment the selected text.
Last Updated: 25 February 2020 08:26 -05:00 UTC Deephaven v.1.20200121 (See other versions)
Deephaven Documentation Copyright 2016-2020 Deephaven Data Labs, LLC All Rights Reserved