Server Installation Guide
This document details the steps to installing Deephaven.
Prerequisites
This section provides information on how to provision a physical or virtual server for Deephaven software.
Deephaven can be installed on a Linux server or virtual machine.
Minimum Hardware Requirements
|
Processor: |
x86_64 (64-bit) |
|
RAM: |
128 GB minimum, 512 GB preferred |
|
Intraday Data |
Mount: /db/Intraday Needed on server(s) running the Data Import Server (DIS) process or batch import processes. |
|
Historical Data |
Mount: /db/Systems |
|
Binary Log Data |
Mount: /var/log/deephaven/binlogs Size: Sufficient to store at least a day's streamed data. Type: Low-latency direct attached; SSD is usually ideal. Needed on server(s) running logger and tailer processes. Deephaven services also generate binary logs for internal monitoring. |
|
Process Log Files |
Mount: /var/log/deephaven other than binlogs Size: Sufficient for a minimum of a week's log files. Type: Locally attached disk. Needed on all Deephaven servers. |
|
Operating System: |
CentOS/RHEL version 7.x or greater OpenSUSE Tumbleweed |
Regarding System RAM
Deephaven connections — either from users/applications interactively executing queries, or from persistent queries managed by the Deephaven Controller process — allocate heap space to worker processes spawned on the server(s). The amount of heap allocated to a worker is configurable, and more complex queries that manipulate more and larger columns of data will need more heap.
A reasonable starting point in determining the RAM needed for a query server is to allow 8GB per concurrent user and per persistent query. For example, 160GB of RAM should be able to comfortably serve 10 users running 10 persistent queries.
Operating System Settings
Turn off swap in the kernel.
echo "vm.swappiness = 0"| sudo tee -a /etc/sysctl.conf
sudo sysctl -p
Note: Many Deephaven processes use large amounts of RAM. If swapping is permitted, the kernel may swap a significant portion of RAM allocated to Deephaven processes. In some environments, this can drastically increase the time needed to run garbage collection (GC). Extremely long GCs can cause network timeouts that adversely impact system stability. For this reason, in addition to general performance concerns, it is strongly recommended that servers running Deephaven are provisioned with ample RAM and configured to avoid swapping.
Set minimum process limits.
Add or adjust the following settings in /etc/security/limits.conf file:
* soft nproc 204800
* hard nproc 204800
root soft nproc unlimited
Set minimum open files limits.
Add or adjust the following settings in /etc/security/limits.conf file:
cat /etc/security/limits.d/*-nofile.conf
* soft nofile 65535
* hard nofile 65535
root soft nofile unlimited
Kernel Settings
The use of Transparent Huge Page memory should be disabled.
To check for use of Transparent Huge Pages:
cat /sys/kernel/mm/transparent_hugepage/enabled
always madvise [never]To disable Transparent Huge Pages in the kernel for Centos 7:
sudo vi /etc/default/grub
Locate the line starting with:
GRUB_CMDLINE_LINUX=Add the following option to the current list:
'transparent_hugepage=never'sudo grub2-mkconfig -o /boot/grub2/grub.cfg
The IO scheduler should be set to use the 'deadline' scheduler.
Centos 7:
sudo vi /etc/default/grub
Locate the line starting with: GRUB_CMDLINE_LINUX=
Add the following option to the current list: 'elevator=deadline'
sudo grub2-mkconfig -o /boot/grub2/grub.cfg
Reboot the server for the settings to take effect.
Install OS Package Dependencies
The following software packages are required for the basic installation. The software's version (when noted) is confirmed to function with Deephaven. However, later versions should be compatible as well.
- rsync 3.1.2 version 31
- epel-release
- redhat-lsb-core
- initscripts
- python-pip
- monit
- wget
- unzip
- mariadb-server
- mariadb
- nfs-utils
- glibc
- libgcc
- libgomp
- libstdc++
- httpd-tools
- lighttpd
- Python version 2.7 (version 3 is not supported at this time)
sudo yum -y install epel-release
sudo yum -y install redhat-lsb-core initscripts python-pip monit wget unzip mariadb-server mariadb nfs-utils glibc libgcc libgomp libstdc++ httpd-tools lighttpd
sudo systemctl enable mariadb
sudo systemctl start mariadb
Install MySql Java Connector Software
Deephaven uses MySql (mariadb) to store authentication and database ACL information. This requires the mysql-connector-java JAR to be installed into /etc/sysconfig/illumon.d/java_lib on each Deephaven server.
wget
https://dev.mysql.com/get/Downloads/Connector-J/mysql-connector-java-5.1.43.tar.gz
tar -xvzf mysql-connector-java-5.1.43.tar.gz
cd mysql-connector-java-5.1.43
sudo cp mysql-connector-java-5.1.43-bin.jar /etc/sysconfig/illumon.d/java_lib/
Download and Install the Oracle Java JDK *rpm
Download the latest Oracle Java JDK 8 rpm: http://www.oracle.com/technetwork/java/javase/downloads/index.html
Install the downloaded rpm:
sudo yum localinstall -y jdk<VERSION>.rpm*
Or install the OpenJDK:
sudo yum install java-1.8.0-openjdk-devel
Install Deephaven Server Software
There are two packages to install: the Deephaven Database package and Deephaven Configuration package. Your Deephaven account representative will provide you with the latest versions of these two packages.
To install the Deephaven server software, you will first need to copy the packages onto your provisioned Deephaven Linux host. Once the packages have been copied to the host, you should SSH onto the server and run the following commands to install the Deephaven Database and the Deephaven Configuration packages:
sudo yum localinstall illumon-db-<VERSION>.rpm -y
sudo yum localinstall iris-config-<VERSION>.rpm -y
The installation includes a default set of configuration files and sample data for a basic Deephaven installation. Note: See Customizing the Deephaven Configuration for more information about customizing your Deephaven configuration.
Install and Configure
Deephaven uses etcd to store and distribute various configuration values, which will require the setup and configuration of etcd.
At least one of the Deephaven nodes must run etcd. Due to failover considerations, etcd should run on an odd number of nodes. Nodes that are not running etcd will still connect to it to retrieve schemas and the configuration steps should still be performed on those nodes.
Configure and package (run on exactly one node)
# Package up new-env.tar.gz
sudo \
infra_ip=... \
dis_ip=... \
worker_ip=... \
web_api_dns=... \
dis_dns=... \
query_dns=... \
schema_rw_pass="$(openssl rand -base64 12)" \
schema_ro_pass="$(openssl rand -base64 12)" \
/usr/illumon/latest/bin/ops/release/new/package-infra-dis-worker.sh
# Distribute new-env.tar.gz to all nodes. This includes nodes that are not running etcd.
scp new-env.tar.gz <ip1>:
scp new-env.tar.gz <ip2>:
...
scp new-env.tar.gz <ipN>:
Execute configuration (run on all nodes)
Note: run these commands in parallel on all nodes. (One step waits for certs from the other nodes in order to complete.)
From the home directory where the files were created on each box, run:
tar xzf new-env.tar.gz
sudo /usr/illumon/latest/bin/ops/release/new/run.sh
Cleanup (all nodes)
rm new-env.tar.gz
rm -r new-env
Start Deephaven Processes
Deephaven processes are started and stopped with Monit. (Refer to https://mmonit.com/monit for more information.)
All Monit configuration files for the Deephaven processes are located in /etc/sysconfig/illumon.d/monit.
Start the monit daemon:
sudo service monit restart
Start the Deephaven processes with the following:
sudo monit start all
This will start all the Deephaven processes enabled in /etc/sysconfig/illumon.d/monit
It may take a few minutes for all processes to start. You can check the status of all processes with the following:
sudo monit status
or
sudo monit summary
Note: sudo monit status provides process details, like uptime, while sudo monit summary shows a more concise list of processes and their current states.
You can stop all the configured Deephaven processes with the following:
sudo monit stop all
Alternatively, individual Deephaven processes can be stopped and started with the following:
sudo monit stop <process name>
sudo monit start <process name>
Individual Deephaven processes can be started/restarted with commands similar to the following:
sudo monit start db_dis
sudo monit start db_ltds
sudo monit restart db_query_server
sudo monit restart iris_controller
You can check the status of individual processes with the following:
sudo monit status <process name>
To see process names and their uptimes (useful for verifying that processes have been restarted) use:
sudo monit status | grep "uptime\|Process"
Access the Client Update Service
Once the Client Update Service is up and running, you can proceed to install and run the Launcher on client desktops. The installers for Windows, Mac and Linux desktops can be downloaded from the Client Update Service on your Deephaven server using the following URL in any browser:http(s)://<server>
- Default username:
iris - Default password:
Illumon1 - Download the installer for your OS
Verify Your Installation
- Start your launcher and connect to the server.
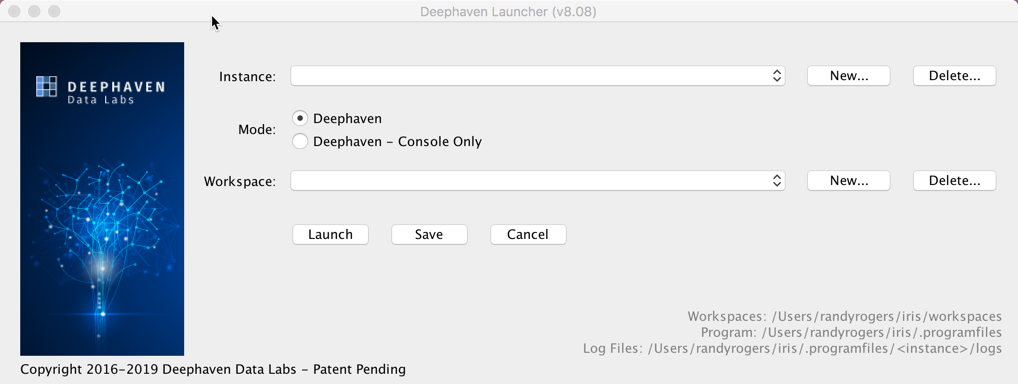
- Click New to create a new Instance and enter:
- The URL to your server:
http(s)://<server>/iris - An Instance Nickname
- A Workspace Name
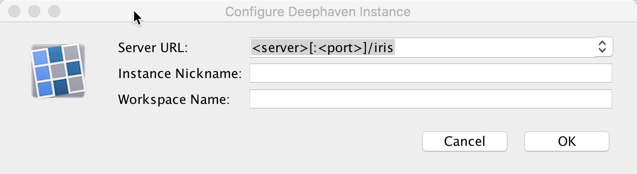
Click OK or Press Enter on your keyboard.
- The URL to your server:
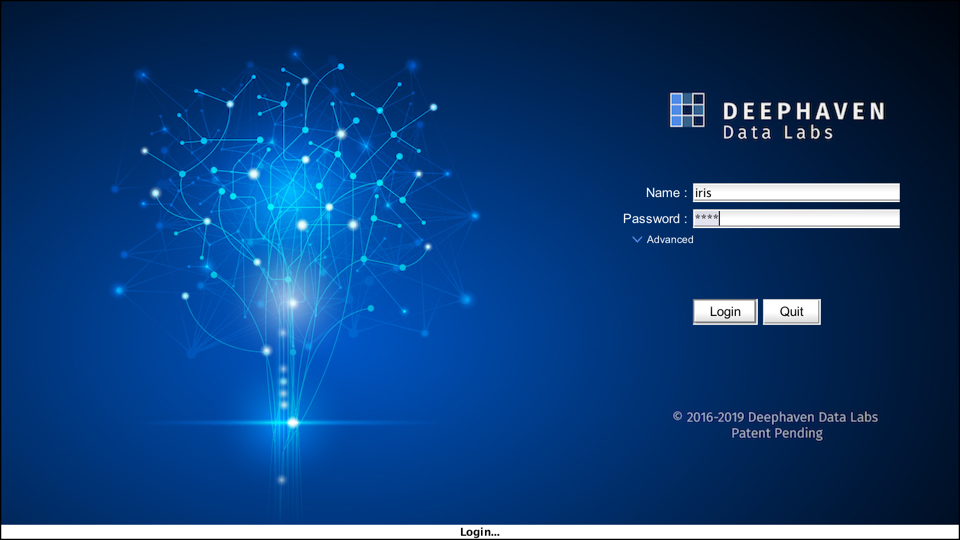
- On the next screen, click Launch.
- In the next window, enter the User Name and Password if prompted by the site "Client Update Service".
- User Name:
iris - Password:
Illumon1 -
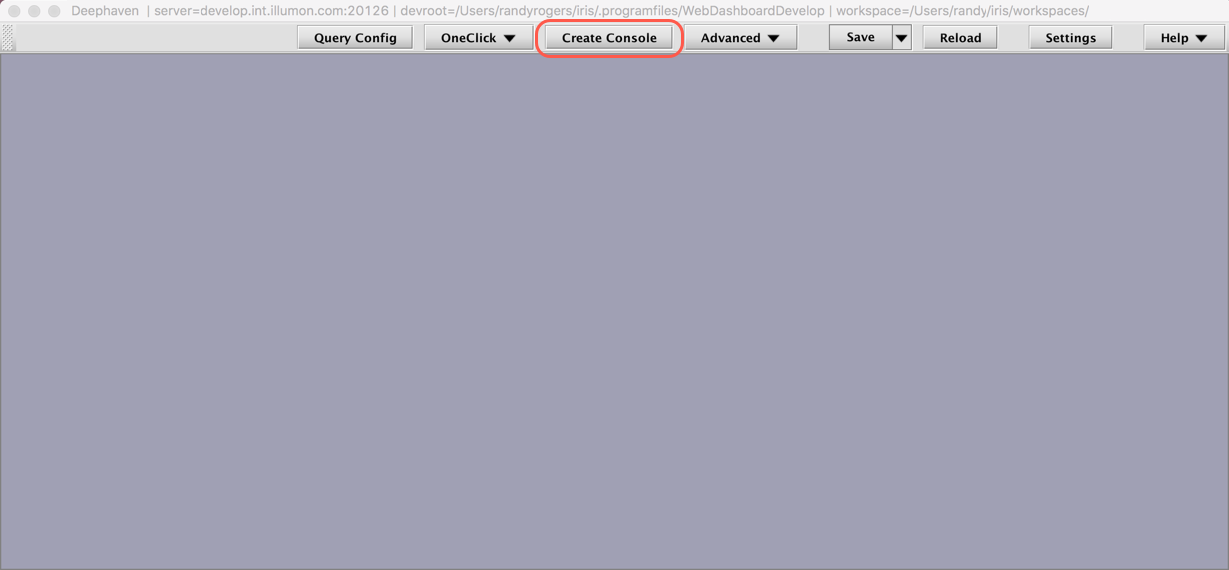
Enter the default administrative account credentials as shown below:
- Name:
iris - Password:
iris
- Name:
- Click Create Console
- Select the server in the Query Server drop-down menu, and click Connect

- Paste the following query into the console to verify a query against the installed dataset:
t=db.t("LearnIris", "StockTrades").where("Date=`2017-08-25`");
The lower panel should populate with the
LearnIris/StockTradessample data set, as shown below: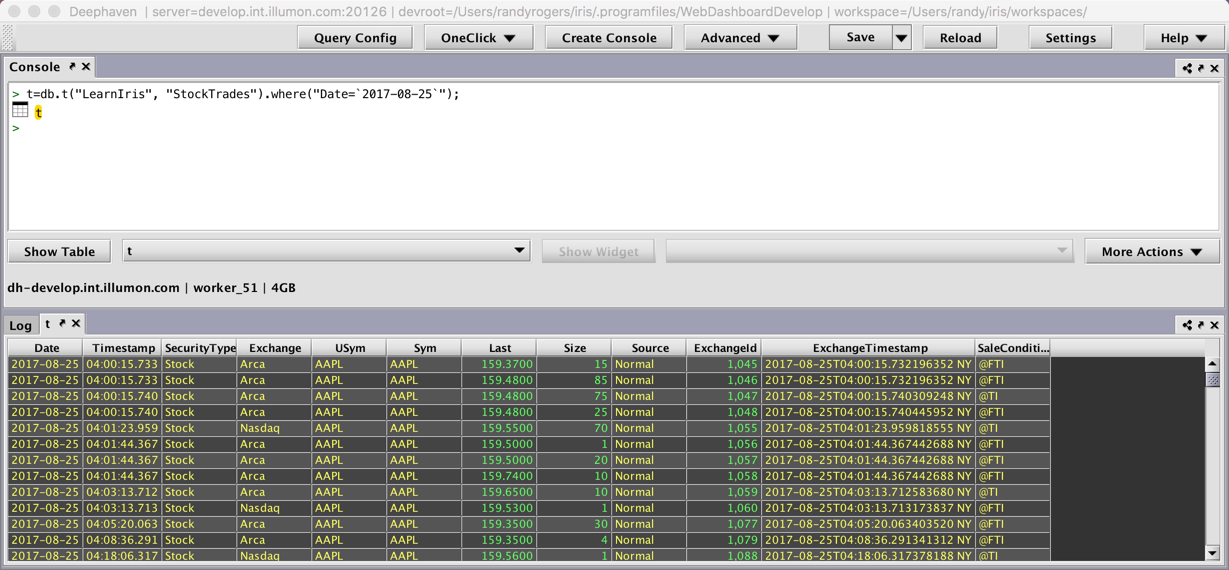 2
2

Last Updated: 19 March 2020 10:41 -04:00 UTC Deephaven v.1.20190816 (See other versions)
Deephaven Documentation Copyright 2016-2020 Deephaven Data Labs, LLC All Rights Reserved