Installing Python
Installing Deephaven Python Packages on the Server
To integrate Python with Deephaven, the following server installations are required. This should only be required once for all users, provided the suggestions are followed. These instructions will be appropriate for a default Centos 7 deployment, and assumes a successful Deephaven rpm install prior to following these instructions.
The deephaven and deephaven_jpy packages are tested for compatibility with Python 2.7(>=.9), 3.6, and 3.7, and can be installed for use with any or all of these Python versions. Currently, in the Centos repository, is Python 2.7 and Python 3.6, so out-of-the-box integration is easiest with these versions.
Install Required Python items
Required Python components can be installed by running the following:
sudo yum install python36 python36-devel python36-virtualenv python-virtualenv python-devel
Note that Centos 7 comes with Python 2.7 installed as a dependency.
Virtualenv setup
A simple helper script should exist at /usr/illumon/latest/bin/dh_py_env_setup.sh to simplify the creation of appropriate Python virtual environments with Deephaven packages and dependencies installed. Note that regardless of the user who creates and maintains the virtual environments, any user should be able to execute from these virtual environments.
The suggested location to setup the virtual environments is /usr/illumon/vens. Note that /usr/illumon is owned by root, which is undesirable. Let us first prepare so that user dbmerge can perform the creation and maintenance of our Python virtual environments.
sudo mkdir /db/VEnvs/
sudo chown dbmerge:dbmerge /db/VEnvs/ -R
For full options for virtualenv setup script, see dh_py_env_setup.sh -h.
To set up the default Python 3.6 environment (after installing Python 3.6 from yum):
sudo su - dbmerge
/usr/illumon/latest/bin/dh_py_env_setup.sh -p /usr/bin/python3.6 -v /db/VEnvs/python36
Note that this will install the deephaven and deephaven_jpy packages (from PyPI) and all dependencies.
Note: The execution of this script should end with printing a collection of JVM flags, which are required to properly create a user's console using this Python environment.
To set up the default Python 2.7 environment:
sudo su - dbmerge
/usr/illumon/latest/bin/dh_py_env_setup.sh -p /usr/bin/python2.7 -v /db/VEnvs/python27 [-e filename] [-o directory]
Optional flags
The
dh_py_env_setup.shhas two potentially useful optional arguments:
-eor--extra_pkgs filename: This performs an install (via pip and fetching packages from PyPI) of all Python packages contained in the provided requirements file.-oor--offline directory: This is intended for sandboxed workstations without an open Internet connection, and will install all wheel files contained in the provided directory.If the
--offlineoption is used, it's important that the provided directory contains the entire dependency tree for deephaven (dill, wrapt, numpy, pandasand their dependencies) anddeephaven_jpy(no dependencies). This is easily resolved, from a compatible Python environment and sensible working directory, via the commandpip download deephaven, which will automatically download (from PyPI) the entire dependency tree of most up-to-date package to the current working directory. The wheel fordeephaven_jpy(for Linux) is obtained from https://github.com/illumon-public/illumon-jpy/releases.
JPY JVM Flags
The JVM flags mentioned above in the virtualenv setup section follow:
- jpy.programName references the path to the Python executable for your Python environment
- jpy.jpyLib references the jpy dynamic library from your Python environment, which comes from the
deephaven_jpypackage in your environment - jpy.jdlLib references the jdl dynamic library from your Python environment, which also comes from the
deephaven_jpypackage in your environment - jpy.pythonLib references the dynamic library associated with your Python executable
and should accompany the Virtualenv setup. If the default instructions have been followed, it should be given by:
For Python 2.7
-Djpy.programName=/db/VEnvs/python27/bin/python2.7 -Djpy.pythonLib=/usr/lib64/libpython2.7.so -Djpy.jpyLib=/db/VEnvs/python27/lib/python2.7/site-packages/jpy.so -Djpy.jdlLib=/db/VEnvs/python27/lib/python2.7/site-packages/jdl.so
For Python 3.6
-Djpy.programName=/db/VEnvs/python36/bin/python3.6 -Djpy.pythonLib=/usr/lib64/libpython3.6m.so -Djpy.jpyLib=/db/VEnvs/python36/lib/python3.6/site-packages/jpy.cpython-36m-x86_64-linux-gnu.so -Djpy.jdlLib=/db/VEnvs/python36/lib/python3.6/site-packages/jdl.cpython-36m-x86_64-linux-gnu.so
It is worth reemphasizing that the Python version used on the client must match the Python version used on the worker, which is requirement imposed for working serialization by the dill module.
Updating Deephaven Packages
Once a virtual environment has already been created, it will be necessary to update some of the packages in the virtual environment. As directed above, the user dbmerge should be used to perform this maintenance. This is most explicitly pressing when updating the entire Deephaven infrastructure via rpm install. The updated wheel files for the deephaven and deephaven_jpy packages are placed in /usr/illumon/latest/wheels.
The first step of this process is to change user to dbmerge and activate the appropriate virtual environment. To accomplish this, execute the following (on the server in question):
sudo su - dbmerge
cd /db/VEnvs/<environment>/bin (or appropriate virtualenv location)
source activate
At this point, you have switched to the dbmerge user and activated the Python environment, which should be accompanied by a prompt change.
To update a package from PyPI inside the virtual environment for a Windows or Mac package, run the following:
pip install --upgrade <package name>
To update a package from PyPI inside the virtual environment for a Linux package, run the following:
pip install --upgrade <path/to/.whl file>
Note that pip install deephaven will always install the latest Deephaven release. If you are running a previous version, be sure to include the version number (e.g., pip install deephaven==1.20190607.151).
You may want to apply options to pip install such as --no-deps (to avoid inspecting/installing dependencies) or --force-reinstall (to force a reinstallation). See pip install -h for other options.
To end this process, simply deactivate the environment and exit the dbmerge authentication:
deactivate
exit (exit dbmerge user)
Testing the Python Server Installation
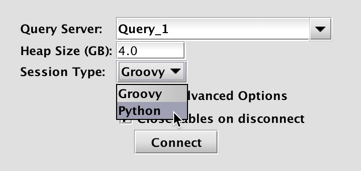
To test the Python installation, open a Deephaven console. To the right of Session Type, click the drop-down list and select Python as shown below. Then, under Advanced Options, supply the appropriate jvm flags for the desired Python virtual environment, then click Connect.
Once the console has connected to the server, execute the following statement in the console:
from deephaven import *
If this does not result in an error, then your Deephaven environment should be properly configured. To verify you are using the intended Python version, execute the following:
import sys; print(sys.version)
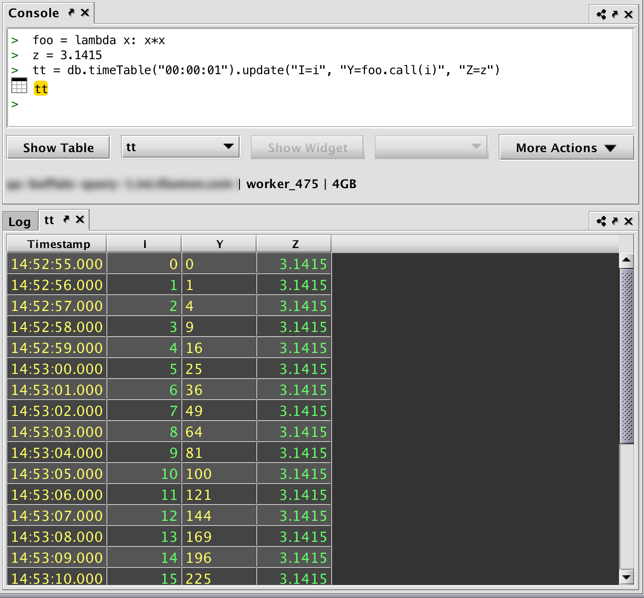
For a more functional test, try the following:
foo = lambda x: x*x
z = 3.1415
tt = db.timeTable("00:00:01").update("I=i", "Y=foo.call(i)", "Z=z")
If the table below appears in the lower portion of the console window, Python is ready to use in the Deephaven console.
Python Client Workstations
The following client installations are only required if you plan to execute Python queries outside of the Deephaven console. The "local client - remote worker" scenario requires that Python objects are serialized and deserialized via the dill module, which relies on using the pickle protocol, which is not compatible between versions of Python. It is a requirement that the same version of Python is being used by the local client and remote worker.
Java Environment Variable Configuration
For Python integration to function properly, the jpy module requires that the environment variable JDK_HOME is properly set for your JDK installation and that PATH is defined to contain the appropriate Java library files.
Windows:
set JDK_HOME=C:\Program Files\Java\jdk<version>
set PATH=%JDK_HOME%\bin;%JDK_HOME%\jre\bin\server;%PATH%
Mac:
export JDK_HOME=$(/usr/libexec/java_home)|
export PATH=$PATH:$JDK_HOME/bin
Linux:
export JDK_HOME=/usr/java/latest
export PATH=$PATH:$JDK_HOME/bin
Python Packages
The deephaven_jpy package is used to translate between Java and Python, and must be installed as a bridge between the Python interpreter and Deephaven's Java infrastructure. The deephaven_jpy has no Python package dependencies, requires that the Java setup noted above is correct. It can be installed from PyPI for 64-bit Windows and OS X, and a .whl is available for direct download for linux from https://github.com/illumon-public/illumon-jpy/releases. The deephaven package depends on deephaven_jpy, dill, wrapt, numpy, and pandas.
Package Installation
There are many ways to setup and maintain a Python environment - far too many to cover here. However, the following provides simple guidance for a few different options:
Windows Guidance
Anaconda is probably the simplest way to setup and maintain a Python environment on Windows, and the necessary packages are in the conda repository. After installing the desired Anaconda version (which also supplies pip), simply perform the command
conda install dill wrapt numpy scipy pandas
For 64-bit Windows. Deephaven packages can be installed by executing the following:
pip install deephaven deephaven_jpy
Mac OSX Guidance
A stripped down version of Python comes installed with osX, but there are many fewer complications observed when avoiding the use of this OS X system Python. It is recommended that the user use Anaconda (same as Windows instructions), Homebrew, or Macports. Anaconda and Macports segregate all packages from the Mac OS X native libraries, and makes it easier to avoid problems and conflicts with system packages. Homebrew is based on integrating with the system packages, which seems more problematic specifically for Python usage.
For Macports, after basic Macports configuration, execute the following:
sudo port install python<version>
where <version> indicates the desired Python version (currently one of 27, 36, 37 is supported by Deephaven). Note that Macports supports installing and using multiple versions. After the install completes, follow with the dependencies. Assuming you are installing <version>=37, execute the following:
sudo port install py37-pip py37-wrapt py37-dill py37-numpy py37-scipy py37-pandas
Note, perform the suggested port select --set pip pip<version> to make the desired version of pip the default. Otherwise, directly use the appropriate pip command for the desired version, i.e. pip-2.7 or pip-3.7. Then run the following,
sudo pip install deephaven deephaven_jpy
Linux Guidance
Use the package manager, as appropriate for your Linux distribution, to install the appropriate version of Python and associated pip. It is likely that associated numpy and pandas packages also exist in the package manager, as may wrapt and dill. Otherwise, these packages will installed by pip as dependencies of the deephaven package.
The deephaven_jpy is available for download from https://github.com/illumon-public/illumon-jpy/releases, with easy to follow instructions for installation provided there.
The deephaven package can then be installed from PyPI by using pip:
sudo pip install deephaven
jpy Configuration Repair
If your deephaven_jpy wheel was built on a machine with a different version of Java, then the loader will not find the appropriate libjvm when you try import jpy from the Python prompt. First, try to update the JDK path used by deephaven_jpy by running the following:
<python> -m jpyutil
where <python> indicates the appropriate python binary for your environment. Note: this requires that JAVA_HOME or JDK_HOME environment variable is set (as directed above) and write permission in the site-packages directory where the jpy.so is located. If this requires root access (i.e., for system site-packages), then remember to forward the environment variables:
sudo -E <python> -m jpyutil
Examples of the resulting error follow:
ImportError: libjvm.so: cannot open shared object file: No such file or directory
or
ImportError: jvm.dll: cannot open shared object file: No such file or directory
If the libjvm is NOT discovered by the above, then you will likely also have to set the library path (LD_LIBRARY_PATH environment variable) for the loader to include the libjvm dynamic library (jvm.dll on Windows). On all systems, this should be the /server/ directory beneath your JDK location.
For OSX, this can be accomplished via
export LD_LIBRARY_PATH=$JDK_HOME/jre/lib/server:$LD_LIBRARY_PATH
This is only because the jpy dynamic library was built versus a different version of Java was and the RPath directive in the library is hard-coded to the incorrect libjvm location. On OSX, setting the LD_LIBRARY_PATH will still not work if system Python is used (i.e., installed via Homebrew), because Apple System Integrity Protection (SIP) precludes redirection of the loader for System resources. This should not be an issue if the deephaven_jpy wheel is built with the Java version present on the user's machine.
For Linux, this is accomplished (for most distributions) by defining the following:
export LD_LIBRARY_PATH=$JDK_HOME/jre/lib/amd64/server:$LD_LIBRARY_PATH
Setting Up The Deephaven Environment
Bootstrapping The Deephaven Environment
To use Deephaven from a client workstation, the Python packages discussed above must be installed. However, virtually all of the functionality of the deephaven Python package requires that the jvm is initialized through jpy, with the Deephaven Java infrastructure appropriately initialized inside the jvm. Finally, the Deephaven data capabilities will most sensibly be used by connecting to a remote server that is running the appropriate Deephaven processes.
The local Deephaven configuration assumes a particular file structure for a collection of jar and configuration files. Setting up this structure is most easily accomplished through a bootstrap process directly using the remote server. This bootstrap process can be accomplished with the Python script in bootstrap.zip.
Deephaven workspace
The Deephaven workspace, as the name may suggest, will be the root of the assumed Deephaven file structure. Before executing the bootstrap process, the desired location (something like <user home>/deephaven/workspaces/remote) should be set in the environment variable DEEPHAVEN_WORKSPACE and the directory need not exist. That is, execute the following statement:
export DEEPHAVEN_WORKSPACE=<location>.
To make this value persistent (and automatic), put this statement in your .profile or .bashrc file. This is the root for the overall Deephaven workspace, and can be used for more than one remote server, if desired.
Deephaven devroot
The Deephaven devroot contains all jar and configuration files in an expected file structure. This should be generically be located at <DEEPHAVEN_WORKSPACE>/.iris/<instance>. Here <instance> some user chosen instance name, and the contents are directly tied to the specific remote server used to bootstrap/connect. Before executing the bootstrap process, set the environment variable DEEPHAVEN_DEVROOT to the desired location, and the directory need not exist.
In the case that more than one remote server may be used, you can setup more than one devroot, as in <DEEPHAVEN_WORKSPACE>/.iris/<instance_1> and <DEEPHAVEN_WORKSPACE>/.iris/<instance_2>, where <instance_1> and <instance_2> are named appropriately. Switching between the two amounts to setting the environment variable DEEPHAVEN_DEVROOT as appropriate.
Important Note: the entire contents of DEEPHAVEN_DEVROOT will be affected (deleted or modified) by executing the bootstrap process.
Executing Bootstrap process
Extract the bootstrap archive to the desired working location. Ensure that you have set the JDK_HOME, DEEPHAVEN_WORKSPACE, and DEEPHAVEN_DEVROOT environment variables as directed above. With the working directory the extracted bootstrap directory, execute:
python update_workspace.py --host <host address>
Where <host address> is a viable Deephaven host of the form:
http://<address>[:<port>]/iris or
https://<address>[:<port>]/iris
This will create any missing directory structure as necessary, and sync all appropriate files beneath DEEPHAVEN_DEVROOT from the server indicated by --host argument.
Deephaven propfile
The Deephaven propfile is an important way of passing properties for initialization of the remote worker (i.e., on the server). It is assumed to be located in directory <DEEPHAVEN_DEVROOT>/resources/ and the default is iris-console.prop. This file will not exist until after the bootstrap process, but plays an integral role in the local client/remote worker execution model.
Before trying to perform any local client/remote worker processing, set the environment variable DEEPHAVEN_PROPFILE=iris-console.prop. If desired, make a copy of iris-console.prop and set DEEPHAVEN_PROPFILE to this new location.
Important Note: the DEEPHAVEN_PROPFILE is required to be in <DEEPHAVEN_DEVROOT>/resources/. The entire contents of DEEPHAVEN_DEVROOT will be affected (deleted or modified) by executing the bootstrap process. Specifically, any changes that you make in to the DEEPHAVEN_PROPFILE will be overwritten.
For this discussion, the most important role of DEEPHAVEN_PROPFILE is that this is where you will provide the appropriate jpy directives to tell the remote worker which python version to use. Inside the DEEPHAVEN_PROPFILE file , whose full path is <DEEPHAVEN_DEVROOT>/resources/<DEEPHAVEN_PROPFILE>, insert the line
RemoteQueryClient.extraJvmArgs=-Djpy.programName=<value> -Djpy.pythonLib=<value> -Djpy.jpyLib=<value> -Djpy.jdlLib=<value>
where these values are determined by the Python environment on the server. See JPY Flags section above for the specific values.
It is worth reemphasizing that the Python version used on the client must match the Python version used on the worker, which is requirement imposed for working serialization by the dill module.
Testing the Python Client Installation
After following the bootstrap instructions, the testDeephaven.py.txt script has an example of creating a remote query client and a remote database; and executing remote queries.
Note: On a Mac, you may need to install a JDK 6 to launch the integration even though you must actually be running JDK 8. See: https://github.com/s-u/rJava/issues/37.
Last Updated: 19 March 2020 10:41 -04:00 UTC Deephaven v.1.20190816 (See other versions)
Deephaven Documentation Copyright 2016-2020 Deephaven Data Labs, LLC All Rights Reserved